Video Semaphore format
The light(s) flashing in the image will use the same asynchronous serial
data transmission protocol as you used in checkpoint 1 to communicate between
the Xilinx board and the PC:
-
Default is for the transmitter to be "high", which we will define to be
"the light is on"
-
A falling edge indicates the beginning of the start bit
-
The following 8 bits are data, with "light on" meaning a logic 1, and "light
off" meaning a logic zero
-
The last bit is "high", logic 1, "light on"
As with the protocol in checkpoint 1, it takes 10 slots to transmit 8 bits,
so the maximum data transmission rate will be 1.5 bytes/second for a 15Hz
bit rate. As with checkpoint 1, the communication is asynchronous,
so you need to watch for the falling edge, and then hope that your clocks
are close enough that for the next
ten bits worth of time that you don't get out of phase. This
shouldn't be a problem for your project.
The frame rate from the camera is 60 frames per second. The serial
bit stream will be transmitted at 15 bits per second. This means
that each bit should be four frames long. Once you see a "falling
edge" in the image (i.e. a transition from bright spot to dark spot), that
indicates the beginning of a transmission. Checking 1 or 2 frames
later should put you in the middle of the start bit, checking 4 frames
after that should put you in the middle of the first bit of the data, and
so on. You can assume that the computers 15 Hz clock is pretty accurate,
so hopefully we won't see any drift between the two clocks.
In checkpoint 1, you were generating high and low voltages on a single
electrical signal line to transmit information. For the optical semaphore
transmitter, we will be generating high and low light levels in a two dimensional
array. For testing your projects, this 2D array will be the computer
screen. In the real application, the 2D array is some part of the
real world. In either case, the 2D image goes into the camera, and
turns into a time-varying set of electrical charges on a CCD camera chip.
Every 1/60 second these charges are read out, amplified, and converted
into composite video by the electronics in the camera. If you grab
every frame and store it in SRAM on your Xilinx board, then the images
you would see for a simple transmission in one second would look something
like this: (note: in these pictures the intensity is inverted relative
to what you will see on the computer screen when you test your devices.
The "light" appears black here, and the background appears white, because
of my poor computer drawing skills)
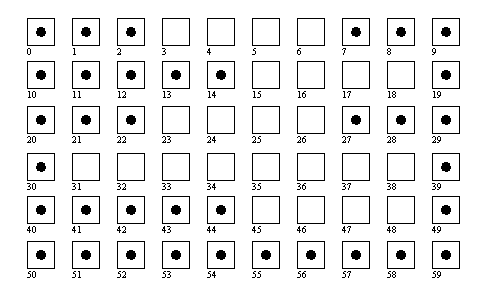
Simple transmission sequence: these 60 frames represent 1 second
of video images from the camera. In the first three images a bright
spot is visible in the center of the image (on paper ink means bright,
no inc means dark, just like in astronomy). In image #3, the spot
has dissappeared, signalling that this may be the beginning of the start-bit
of a digital transmission. The next three frames (4,5, and 6) are
also missing the bright spot, so it is a valid start-bit. The next
four frames (7-10), and the four after that (11-14) have the spot again,
so they represent two consecutive 1 bits in the serial semphore transmission.
Frames 15-18 are a 0 bit, followed by another one bit (frames 19-22), 0
bit (23-26), 1 bit (27-30), two 0s (31-38), and then a stop bit (39-42).
Frame 45 shows the beginning of a new transmission with a valid start bit
(45-48) followed by three 1s, and we dont see the rest of the transmission
This is a simplified picture because:
-
There is no background light
-
The transmitting light is 100% on
-
There are no other bright objects in the frame
Two transmitters
The figure below shows an example of a harder problem in which there are
two transmitters, one circular and the other rectangular. You do
not need to decode two simultaneous transmitters to get full credit
on this project. This figure is just to help you understand the concept.
For full credit, you need to be able to find either of the transmitters,
assuming that each one stays constant during the transmission of the other.
In other words, if the circular transmitter stayed constant until frame
40, and then started transmitting some time after 41 while the rectangular
transmitter stayed constant, then your project should transmit the coordinates
and data of the rectangular transmitter after frame 40, and later transmit
the coordinates and data from the circular transmitter after it is done.
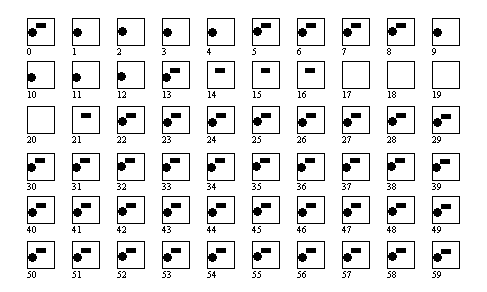
Two transmitters: In the first 14 frames, the circular transmitter
stays on, and should be ignored. The rectangular transmitter sends
10101111 from frames 1 through 40 (begining of start bit to end of stop
bit). From frames 14 to 53 the circular transmitter sends 01111111.
Noise, blur, etc.
The analog signal coming out of the camera is not perfect - bright spots
may not be completely saturated, and black areas may not be completely
black. The analog to digital converter (ADC) samples this analog
signal and gives an 8 bit binary representation of its magnitude, where
0 represents black ideally, and 255 represents white/bright ideally (it's
not a color camera, so any bright color will give a high number).
In practice, even in a dark room you will see signals which are not zero,
and even if you point the camera at a constant image you will see variation
in pixel values between frames. This variation comes from several
noise sources including both poor design and fundamental physical limitations
in the camera electronics. Whatever it's source, you need to be able
to deal with it, and not mistake noise for a digital signal. You
also don't want to let noise make you ignore a signal that's real.
The figure below shows what the analog intensity received by a single
pixel in the video camera might look like. It's pretty clear that
there's a digital signal here, but it certainly isn't ones and zeros.
The vertical lines represent sampling times when this particular pixel
had it's analog signal read-out, it became a part of the composite video
stream, and then was sampled by the ADC on your board. So the sampling
interval is 1/60 second. In the figure below, we first see a start bit
which lasts for 4 frames, then the signal is high for 12 frames (3 ones),
low for 4, high for 12, low for 4, and then finally high for at least 4
frames, giving a valid stop bit. The bits transmitted are then: 11101110.
Since the serial protocol is to transmit the LSB first, this corresponds
to the hex number 88.
Near the transitions, the signals are not very clear - sometimes we're
still part of the way down a falling edge, for example. For this
reason, you want to make your determination of the logic value as close
to the middle of the bit time as possible.
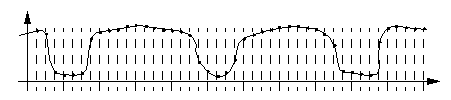
Note that this is not a picture of the composite video!
There
are thousands of pixels in the camera, each one sees an analog intensity
level over time. Here's another example (below) of what the intensity
at three different pixels in the image might look like. They all
move around a little bit with time due to noise, but clearly one of them
has a digital signal hiding in it, and the other two don't.
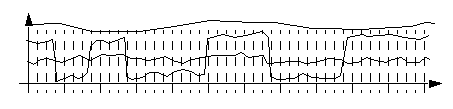
Given this kind of intensity variation, it can be a little tricky to figure
out how to tell when you've got a signal, and when you've just got noise.
To do this you need to have some kind of threshholding algorithm which
says "that's a 1" and "that's a 0", and maybe "can't tell what that one
is".
Image threshholding
The pixel intensity at location i,j and time n assuming a fixed background
should be something like:
Iij(n) = Iij0 + Nij(n) + Dij(n)*Sij0
Where Iij0 is the constant background light intensity (a positive
integer), Dij(n) is the random noise in the intensity which
varies from frame to frame (a random integer, probably varying from -10
to +10), Sij0 is the intensity of the light due to the
transmitter when it is on (a positive integer), and Dij(n)
is the binary value of the signal being transmitted. So if we pick
a pixel at random and look at it's intensity, we should see just Iij0
+ Nij(n). Different pixels will have different background
intensity and different noise. If we look at a pixel that is looking
at a transmitter, then we will see a signal that hops back and forth between
two intensities, Iij0 and Iij0 + Sij0
(plus noise).We want to choose a threshholding scheme that will ignore
the (relatively) small noise-induced changes in constant pixels and still
identify the (relatively) large changes in flashing pixels.
A successful project should at the very least be able to see large signals
when there is little background light and little noise. Ideally (i.e.,
for extra credit), you would also be able to see large signals in the presence
of lots of background light and lots of noise, and you would be able
to see small signals if background and noise were small. Finally,
it would also be nice if you could deal with all of the above situations
without having to change your threshhold level!
Single threshhold
In the simplest scheme, you pick a single threshhold T. If the value
of the pixel is greater than or equal to T, then it has a logic 1.
If the value of the pixel is less than T, it has a logic 0. The problem
with this approach is that if a constant pixel Iij0 happens
to be very close to T then even small changes in pixel intensity due to
noise will appear to be binary transitions. Since you will be looking
at thousands of pixels in the image, the probability of finding several
that have intensity very close to T is almost 1, so this approach probably
won't work very well.
Double threshhold
Another approach is similar to the definitions of logic 1 and 0 that are
used in digital electronic systems. In these schemes, there are two
threshholds: T0 and T1. A signal less than
T0 is a logic zero, and a signal greater than T1
is a logic 1. A signal in between is not a valid logic signal, and
should probably cause the rest of the transmission to be ignored.
The problem with this approach is that it is difficult to set the threshholds
to allow for a wide range of background intensities, Iij0.
Percent of reference signal
Since we will be looking for a falling edge to start our digital transmission,
we can use the value of the signal before the falling edge to set a reference
level, and then refer our 1 and 0 decisions to that intensity. This
should give us a reference level of Iij0 + Sij0 The
threshhold for this particular pixel and this particular transmission could
then be some fraction of that reference - maybe 50% or 90%, depending on
how much noise there is in the pixel readings. This requires a multiplier
in your circuit, which is probably more than you want to bite off.
Delta below reference signal
My favorite approach at this point is to measure the reference intensity
Rij = Iij0 + Sij0 just before the high
to low transition of the start bit and then set a threshhold Tij
= Rij-D. Now D
can be set (on the dip switches) based on the noise in the digitized video
signal, and we can still see weak signals on top of strong background light
intensity, as long as the signal is not so weak that it becomes comparable
to the noise.
Implementation
To implement any of these techniques, each time you get a new pixel intensity
value from the ADC you will need to
-
read the previous value from SRAM
-
compare the two using some threshholding approach
-
write the new value into the SRAM
Based on the comparison of the current and previous values, you may decide
that the input just made a transition from a logic 1 to a logic 0.
If this is the case, then you need to activate some additional circuitry
to start paying attention to this particular i,j location, and track what
it does over the next 40 frames (40 frames = 10 bits * 4 frames/bit; 10
bits = start, 8 data, stop).
The threshhold(s) should be input from the dip switches on your Xilinx
board.
Single detector circuit
The minimal successful project needs to be able to find one transmitter
at a time. One approach to this would be to have two registers to
hold the i and j address of the current transmitter, a frame counter to
keep track of where you are in the transmission sequence timing, and a
shift register to hold the data that has been seen so far. After
getting the "I found a start bit!" alert from the pixel reader above, the
sequencing might look something like this:
-
Clear the frame counter and data reg., load the row/col registers with
the current address
-
foreach frame from 1 to 39, for each row/col pair in the frame:
-
if current row/col != row/col of interest continue, else
-
if frame = 2,3, or 4, check to make sure that this is a valid start bit
-
if frame = 37, or 38, check to make sure that this is a valid stop bit
-
if frame = 6, 10, 14, 18, 22, 26, 30, 34
% middle of all of the data bits
-
use threshhold alg. to figure out what the value of this bit is
-
shift that bit into the data register
-
send data to the serial transmitter
Multiple detector circuits
One of your TAs (Charles Kunzman) had the clever idea that if you implement
the single detector circuit above as a block, and can make multiple copies,
then you just need to have a little bit of circuitry in the block that
figure out if it should grab the "I found a start bit!" signal, or pass
it on to the next block. That way you can add as many blocks as will
fit on your xilinx chips, and be able to receive that many signals at once.
Single detector per row
Since you've got 10 microseconds at the end of each line of video to think,
you might consider using that time to read and write to some SRAM locations.
This would allow you to dedicate some of your SRAM to perform the register
functions of a single detector circuit. In this case, you only need
to store the column, data, and frame count information, since the row information
is supplied by the current value of your row pointer.
Detector on every pixel
If you've got enough RAM and enough time, you could store several variables
per pixel. In particular: last pixel value (like all of the modes
above), current frame count (zero means haven't seen any falling edge),
and data. You could either add more RAM chips onto your board (if you've
got enough free i/o pins on the Xilinx to bring in 24 bits of data per
RAM access instead of 8), or maybe you've got enough time to do multiple
RAM accesses per pixel, or maybe a combination of the two.