Project 4 - Distributed Key-Value Store
Overview
In project 4, you will implement a distributed key-value store that runs across multiple
nodes.
Multiple clients will be communicating with a single master server in a given messaging
format (KVMessage) using a client library (KVClient). The master contains
a set-associative cache (KVCache), and it uses the cache to serve GET
requests without going to the key-value (slave) servers it coordinates. The slave servers are contacted for a GET only upon a cache miss on the master. The master will
use the TPCMaster library to forward client requests for PUT and DEL to multiple
slave servers and follow the 2PC
protocol for atomic PUT and DEL operations across multiple slave servers. KVServers remain the same as project 3.
- Operations on the store should be atomic (succeeds
completely or fail altogether) without any side effects, guaranteed by the 2PC protocol.
- Data storage is durable, i.e. the system does not lose data if a single node fails. You
will use replication for fault tolerance.
- The key-value store should optimize read throughput by accessing data concurrently from multiple replicas.
Concepts to learn: two-phase commit, logging and recovery,
consistent hashing, failure detection using timeouts
Figure: A distributed key-value store with replication factor of two.
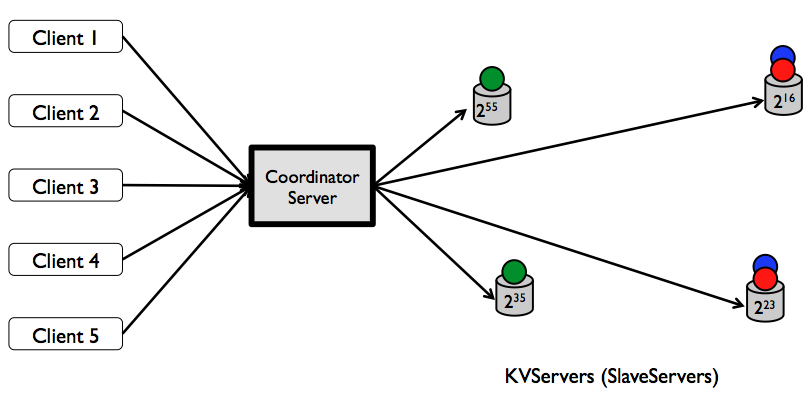
Figure: Functional diagram of a distributed key-value store. Components in colors other
than black are the key ones you will be developing for this project. Blue depicts GET execution
path, while green depicts PUT and DEL; purple ones are shard between operations. Note that,
components in black might also require minor modifications to suite your purposes. Not shown in
the figure: PUT and DEL will involve updating the write-through cache in the master.

Task Outline
- [10%] Implement two-phase commit messages. You must either modify KVMessage directly or extend the class with your own TPCMessage. Complete all methods in KVMessage including a new constructor. Also implement the ignoreNext method in KVClient. See message specs in tables below.
- [10%] Implement the TPCLog class that slaves will use to log
transactions and rebuild the server during recovery.
- [20%] Implement registration logic in the RegistrationHandler and SlaveInfo classes in TPCMaster. Also implement the methods findFirstReplica and findSuccessor which will be used to find the slaves involved in a transaction. Complete the modified SocketServer.
- [30%] Implement the rest of the TPCMaster and the modified KVClientHandler to handle all for two-phase commit logic on the master node. In TPCMaster, this includes performTPCOperation and handleGet.
- [30%] Implement the TPCMasterHandler class that has handles 2PC logic on
the slaves. Be sure to handle ignoreNext requests. You will also need to fill in hasKey in KVServer.
Requirements
Unless otherwise specified below, you will have to satisfy the requirements described in project 3. Again, you should bulletproof your code such that the nodes do not crash under normal operation.
You are required to keep up with this Piazza thread for ongoing clarifications.
Two-phase Commit
- TPCMaster must select replica locations using consistent hashing. Only a single 2PC operation can be executed at a
time (performTPCOperation is synchronized).
- You do not have to support concurrent update operations across different keys (i.e. 2PC PUT and DEL operations are performed one after another), but retrieval
operations (i.e. GET) of different keys must be concurrent unless restricted by an ongoing
update operation on the same set.
- The master will include a set-associative cache, which
will have the same semantics as the cache you used before. If the master finds the key in its cache, it does not need to contact any slaves.
- You can assume no requests will be made until all slaves register.
- A slave will send vote-abort to the master if the key doesn't exist for DEL or invalid key/value size (only if you do not implement it client/master side). The situations for this case are very limited in our "dummy" version of a kv-store.
- If the master receives any response from the slave in phase-2, it can assume that it was successful (we ask for this guarantee from phase-1).
- When sending phase-1 requests, the master must contact both slaves, even if the first slave sends an abort. You can do this by sequentially making the requests or concurrently by forking off threads.
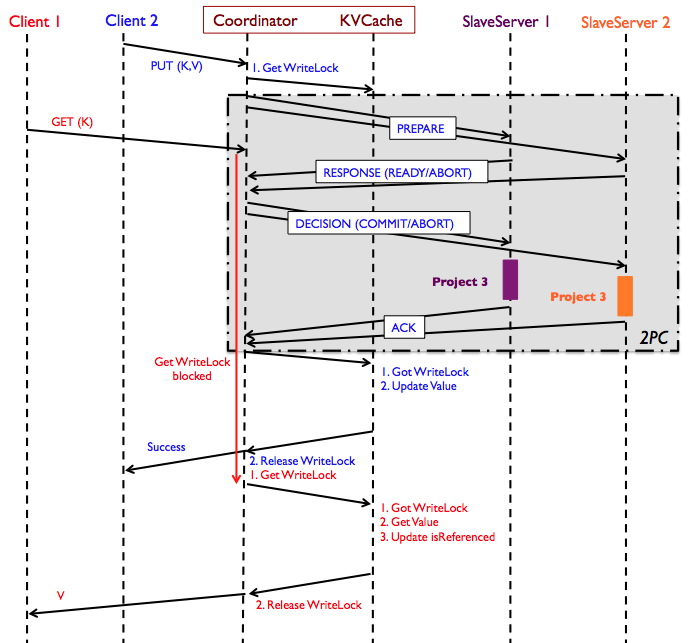
Figure: Sequence diagram of concurrent read/write operations using the 2PC protocol in
project 4. Project 3 blocks in the diagram refer to the activities when clients write to a
single-node slave server, where the master is the client to individual slaves. GET request from Client 1 is hitting the cache in the above diagram; if it had not, the
GET request would have been forwarded to each of the SlaveServers until it is found.
Failures, Timeouts, and Recovery
At any moment there will be at most one slave server down. Upon revival, slave servers always come back with the same ID. For this particular project, you can assume that the master will never go down, meaning there is no need to log its states.
Individual slave servers, however, must log necessary information to survive from
failures.
Your code should be able to handle the slave server failing at any point in the 2PC transaction
(there are multiple cases that you have to handle here), handle the ignoreNext messages, and handle pathological inputs to the system.
- On failure, we assume our in-memory KVStore is wiped. When the slave comes back up, it will be rebuilt using the log that is has been updating.
- When a slave comes back up, it does not contact the server or other slaves. It rebuilds from the log and will know if the last request it received was a phase-1 request (interruptedTpcOperation). If a slave crashes anytime during phase-2 (including before receiving the global decision), the master will need to keep trying to send the global message to that slave until it gets a response (retry using timeouts).
- During phase-1, if master does not get a vote within a single timeout period, it should assume the slave voted abort.
- During phase-2, the master must retry until it receives a response to its decision. You must send a decision to slaves that you timeout on because they may be waiting on a decision once they reboot in the event that they crashed after receiving the request. Note that in the case that the slave restarts, it may bind to a new port and re-register. Your master node must retry with the latest host-port the slave has registered with. Remember that slaves always restart with the same ID. GET requests may be served concurrently during this time.
- If a slave finishes performing the operation in phase-2 but fails before sending an ack, the master will keep trying to send the decision. In this case, the slave will get a duplicate decision from the master (it knows from the last entry in the log). The slave should immediately send an ack because it will have already performed the operation while rebuilding the server.
- It is up to you to figure out which messages you need to write to your log and at which points in the code you need to write them. You can assume you will never fail during a call to TPCLog.appendAndFlush.
Registration
- Slave servers will have 64-bit globally unique IDs (Java long's),
and they will register with the master with that ID when they start. For simplicity, you
can assume that the total number of slave servers is fixed. (Note that this simplification will cause the system to block on any failed slave server. However, not assuming this is much harder since it will require dynamic successor adjustment and
re-replication, among other changes).
- The master will listen for client requests from port 8080 and listen for registration requests from slaves on port 9090.
- When a slave starts it should start listening in a
random free port (see ServerSocket API) for 2PC requests, and register that port number with the master so that the
the master can send requests to it. When you see the SocketServer's port set to -1, it must be replaced with the actual port it will be listening on.
- Although we are assuming there will be no errors regarding registration, we would like you to send a response from the master and for the slave to accept the response (already done for you on the slave side in TPCMasterHandler).
- Note: When parsing the registration, remember that the SlaveServerID can be negative.
These are the message formats for registration.
register |
<?xml version="1.0" encoding="UTF-8"?>

      <KVMessage type="register">

      <Message>SlaveServerID@HostName:Port</Message>

</KVMessage> |
resp |
<?xml version="1.0" encoding="UTF-8"?>

      <KVMessage type="resp">

      <Message>Successfully registered SlaveServerID@HostName:Port</Message>

</KVMessage> |
- Each key will be stored using 2PC in two slave servers; the first of
them will be selected using consistent hashing, while the second will be
placed in the successor of the first one.
- There will be at least two slave servers
in the system. Each key-value (slave) server will have a unique 64-bit ID. The master will hash
the keys to 64-bit address space.
- Each slave server will store the first copies of keys
with hash values greater than the ID of its immediate predecessor up to its own ID. Note that
each slave server will also store the keys whose first copies are stored in its
predecessor. These IDs and hashes will be compared as unsigned 64-bit longs with functions provided in TPCMaster.
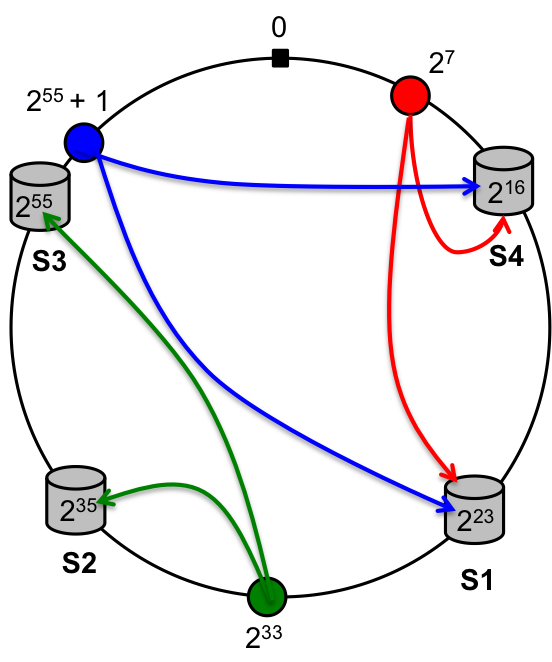
Figure: Consistent Hashing. Four slave servers and three hashed keys along with
where they are placed in the 64-bit address space. In this figure for example, the different
servers split the key space into S1:; [216 + 1, 223], S2: [223 +
1, 235], S3: [235 + 1, 255] and finally note that the last
server owns the key space S4: [255 + 1, 264 - 1] and [0, 216].
Now when a key is hash to say a value 255 + 1, it will be stored in the server that
owns the key space, i.e, S4 as well as the immediately next server in the ring S1.
Testing with ignoreNext
Testing distributed systems is hard, more so in presence of failures. We are introducing the ignoreNext message that will be issued directly to the
slave server by the autograder (ignoreNext is purely for us). Upon reception of this message, the slave server will ignore the
next 2PC operation (either a PUT or a DEL) and respond back with a failure message during the phase-1. This will cause the 2PC operation to fail and the failure code path will be
triggered. You do not need to implement any ignoreNext forwarding logic in the
TPCMaster (we will not send the message to the TPCMaster). The ignoreNext will be sent to the
appropriate slave servers directly by our testing code. You do not need to maintain ignoreNext
status on reboots. If a slave server receives an ignoreNext message, then restarts before the
next 2PC operation, the next 2PC operation can be processed instead of ignored.
request |
<?xml version="1.0" encoding="UTF-8"?>

<KVMessage type="ignoreNext"/> |
resp |
<?xml version="1.0" encoding="UTF-8"?>

      <KVMessage type="resp">

      <Message>Success</Message>

</KVMessage> |
This error should be sent back from the slave if the previous request was an ignoreNext. Note: there are no newlines in the message.
ignoreNext resp |
<?xml version="1.0" encoding="UTF-8"?>

      <KVMessage type="resp">

      <Message>IgnoreNext Error: SlaveServer SlaveServerID has ignored this 2PC request during
      the first phase</Message>

</KVMessage> |
2PC message formats
These are the new message formats for 2PC communication between the master and slave nodes. get requests should remain unchanged from project 3 since they have no 2PC semantics. There are no newlines in these messages. Italicized fields should be replaced with the actual value.
|
putreq
|
<?xml version="1.0" encoding="UTF-8"?>

          <KVMessage type="putreq">

          <Key>key</Key>

          <Value>value</Value>

          <TPCOpId>2PC Operation ID</TPCOpId>

          </KVMessage>
|
|
delreq
|
<?xml version="1.0" encoding="UTF-8"?>

          <KVMessage type="delreq">

          <Key>key</Key>

          <TPCOpId>2PC Operation ID</TPCOpId>

          </KVMessage>
|
|
ready vote
|
<?xml version="1.0" encoding="UTF-8"?>

          <KVMessage type="ready">

          <TPCOpId>2PC Operation ID</TPCOpId>

          </KVMessage>
|
|
abort vote
|
<?xml version="1.0" encoding="UTF-8"?>

          <KVMessage type="abort">

          <Message>Error Message</Message>

          <TPCOpId>2PC Operation ID</TPCOpId>

          </KVMessage>
|
|
commit decision
|
<?xml version="1.0" encoding="UTF-8"?>

          <KVMessage type="commit">

          <TPCOpId>2PC Operation ID</TPCOpId>

          </KVMessage>
|
|
|
<?xml version="1.0" encoding="UTF-8"?>

          <KVMessage type="abort">

          <TPCOpId>2PC Operation ID</TPCOpId>

          </KVMessage>
|
|
ack
|
<?xml version="1.0" encoding="UTF-8"?>

          <KVMessage type="ack">

          <TPCOpId>2PC Operation ID</TPCOpId>

          </KVMessage>
|
Extra error formats
Multiple error messages in case of an abort should be placed in the same Message field of a
"resp" message prefixed by @SlaveServerID:= and separated by the newline character
'\n'. These will be created by TPCMaster and returned to the client if multiple slaves return error messages. Use this as you deem necessary.
multiple errors |
<?xml version="1.0" encoding="UTF-8"?>

      <KVMessage type="resp">

      <Message>@SlaveServerID1:=ErrorMessage1\n@SlaveServerID2:=ErrorMessage2</Message>

</KVMessage> |
Testing
Testing for this project is complicated. We have a two main suggestions for testing failures. Neither of these are required, but you will likely find that you need to do something similar. Do not expect a public autograder for this project. Expect to spend a significant portion of your time testing.
- Spawn threads/processes for each slave and manually kill them at certain points in your test. If you want to look into it yourself, ProcessBuilder can be useful in building a framework to create, kill, and respawn (recreate) slaves. You can use SlaveServer as a starting point and modify it to suit your needs. Actually creating threads/processes and killing them is the suggested method of testing.
- Fully implement the ability to send ignoreNext requests to your slaves. You may need to slightly modify KVMessage, and you will need to add the ability to handle ignoreNext requests on the master node (probably via KVClientHandler -> TPCMaster.handleIgnoreNext(), similar to GET requests). How you choose to send these to your slaves is up to you. It should be sufficient to send it to all slaves and test only with two slaves running (otherwise you may fail multiple requests since the next request only involves two slaves).
Skeleton
The skeleton you must build on top of is linked below. Project 4 builds on top of
the single-server key-value store developed in project 3; however, several interfaces have been
modified/extended to support the required functionalities for this project. You should reuse the
code developed for project 3 and define additional classes and methods as you see fit.
http://www-inst.eecs.berkeley.edu/~cs162/fa13/kvstore/proj4-skeleton.tar.gz
The following (hopefully) describes all of the new/modified files included in the project 4 tar and the changes associated with each:
- Autograder - Has autograder hooks for compiling. There are a couple example tests included that were used in previous semesters. We do not expect you to use these tests or for them to even work at all. You may, however, want to use them as inspiration for your own tests. Replace your project 3 Autograder.java with this new one.
- KVClient - Added ignoreNext().
- KVClientHandler - Modified for project 4.
- KVMessage - Added a new constructor. Methods will need to accommodate new message formats.
- KVServer - Added hasKey().
- Server - Replace your Server.java with this file that shows an example instantiation of your master node.
- SlaveServer - This is an example instantiation of a slave node.
- SocketServer - Slightly modified for project 4.
- TPCLog - New to project 4.
- TPCMaster - New to project 4.
- TPCMasterHandler - New to project 4.
You will need to merge your project 3 logic into the project 4 skeleton for classes that have been modified. Files from project 3 that are not mentioned in the list above will also be necessary for project 4 but will remain unchanged (Client, KVCache, KVStore, ThreadPool, etc).
Deliverables
- Mon 12/02: Initial Design Document (10 points)
- Thu 12/12: Code (60 points)
- Fri 12/13: Final Design Document (20 points)
If your last proj4-initial-design submission is before Wed, 11/27 at 11:59PM, you will receive 2 points of extra credit in your project grade.
You will have to submit JUnit test cases. The following are the expectations regarding
testing:
Initial Design Document: One to two sentence description of each test case you
plan on implementing for each class and the reason for including them (what they test). Please
follow the general outline of our design
doc template (not updated for project 4). 15 page maximum.
Code: Submit code along with your set of test cases. You are free to use any library for testing; just include the jar file(s) in your submission.
Final Design Document: Description on each test case you have implemented for each class. Our evaluation of your test cases will be worth 10 of the 20 points on your final
design. We are looking for unit tests with good code coverage and integration tests that
verify the behavior of your system. 18 page maximum (extra 3 pages for tests).