UNIVERSITY OF CALIFORNIA
College of Engineering
Department of EECS, Computer Science Division
| CS186 |
Prof. Joe Hellerstein
Dr. Christopher Olston
|
Fall 2006
|
Assignment 0
|
Assignment 0: Getting Started
with Postgres
Your goal in this assignment is to start up
the PostgreSQL open source DBMS, define some tables, and try out some
simple SQL. The
assignment is quite free-form, and will be graded on a pass/no-pass
basis (i.e., if you turn in a script showing at least 2 tables and 2
queries, you pass.) While the assignment is very simple, if you do
not pass this assignment, you will not pass the course!
Specifically, your challenge is to design a small
database for a local online dating service, BearPair. BearPair needs to keep track of
its members, and allow members to ask some basic queries about other
members. For
example, you may want to find all members of a particular gender
whose age is between 18 and 21, find people
looking for friendship (not romance), find people whose hobbies
include soldering, etc.
For this assignment, you can capture whatever data
you want in Postgres. All we require is that you define at
least 2
tables, with some data in them. Then, we ask you to write at least 2
queries to go along with your tables – your queries should
return some data.
You will be required to turn in a script showing your data and queries.
Partners?
You will work individually on this assignment – no
partner is required or allowed.
What, Where and When to Turn In
You will need to use the unix submit program
to hand in your assignment:
This assignment will be due at 11:59 PM on
Tuesday, September 5th
1. Save your "hw0.script" file in a
directory called "hw0" [that's a zero at the end, not an "oh"] in your
cs186 course account home directory.
2. Create a "readme" [all lower case] file in
that same directory. The readme should briefly describe what your tables
are and what your queries mean. Be sure to include your
name,
SID and cs186 login somewhere visible in the file.
3. cd into hw0.
4. Run: submit
hw0
Note: For this assignment, there will be no
credit for late submissions!! So start early, and plan on getting
things
done with time to spare.
Detailed Instructions for Defining Tables &
Queries in Pgaccess
- Using any machine that runs X windows,
use ssh to connect to one of the Solaris x86 server machines
(e.g. rhombus.cs, pentagon.cs, sphere.cs, or
torus.cs). You should use the "-X" flag to ssh -- e.g. "ssh -X
cs186qq@rhombus.cs.berkeley.edu". That
will ensure that your
DISPLAY environment variable is set to
the machine you're sitting at. (Note, if you are connecting from a MacOS X
machine running X11, you should use the "-Y" flag to ssh rather than
"-X". Further info on X Windows for the instructional
machines is available
here).
- Type printenv
PGPORT and make a note of the port number. This is the
port you will use to communicate with PostgreSQL.
- The first time you run postgres, you have to
initialize your database directory, and create your database. At
a
shell prompt, type initdb.
You should get output ending in a message about "success".
- Ignore the instructions at the end of that
message.
Instead, simply type pg_ctl start
to start up the Postgres master process.
- Then type
createdb hw0 to create the database named
"hw0". [That's a zero, not an "oh"].
- Type pgaccess,
to start a simple graphical front-end to PostgreSQL. (note: you don't
have to use pgaccess in this assignment, you can also enter CREATE
TABLE and INSERT commands directly using psql if you are more
comfortable with the comand line.)
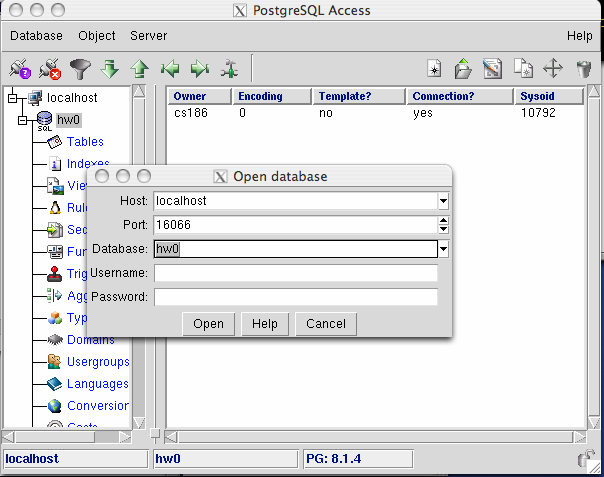
- The first time you run pgaccess, you will need to
tell pgaccess how to connect
to your Postgres server. To do this, go to
the Database menu and choose
the Open command. In the dialog box, you should leave the Host field
either as localhost or simply blank, enter the port number you got in step 2 above (if it's not
already showing), and type hw0
for the Database field.
You
can leave the other fields blank. Then press the Open button.
- Pgaccess will present you with a window of two
panes. The left-hand pane should display a hierarchical navigation
widget. Click on the +
next to localhost to
open
it.
- You will be presented with an icon for the
database for hw0. Click
on the + to open the database.
- You will now be presented with a number of
"leaf-level" icons for the localhost->hw0
database. The only icons that will interest us in this
assignment are the Tables and Queries icons. We will
work with the Tables icon first. Single-click on the Tables icon to proceed.
- Pgaccess provides a graphical interface for SQL’s create table
command. To use it, go to the Object
menu and choose New to create a new table.
- The resulting dialog allows you to name the
table, to define column ("field") names and types, and set some
properties for each field. Play around with it and you should be able
to
define fields and corresponding types without much trouble. Note that
the "drop-down" menu for type
enumerates the various types provided by default in SQL. For
example, you could create a table for members of BearPair
and put fields in the table for firstname, lastname, gender, age,
etc.
You may also want to keep track of member requests for dates,
member-to-member messages, and so on. You
can ignore the Inherits,Constraint, and Check options in the dialog
box.
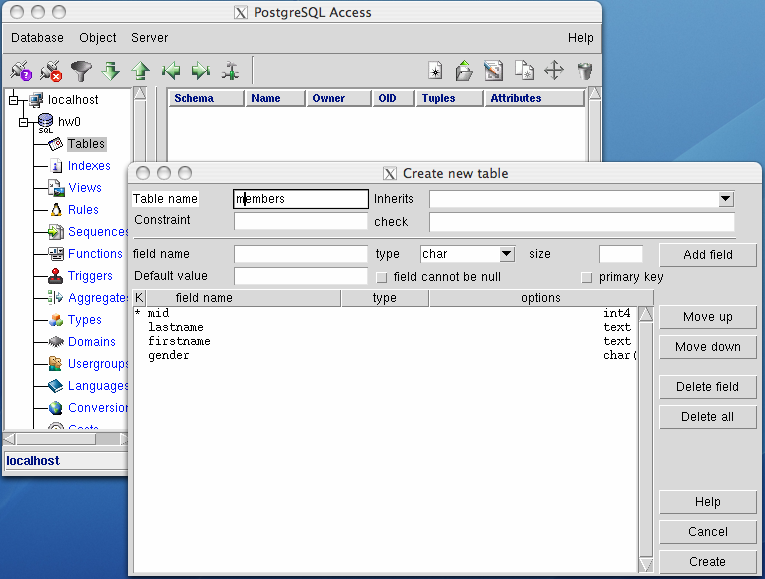
- When you’ve got the fields you want set up,
press Create to create
the table.
- Repeat this process for all the tables you want
to define.
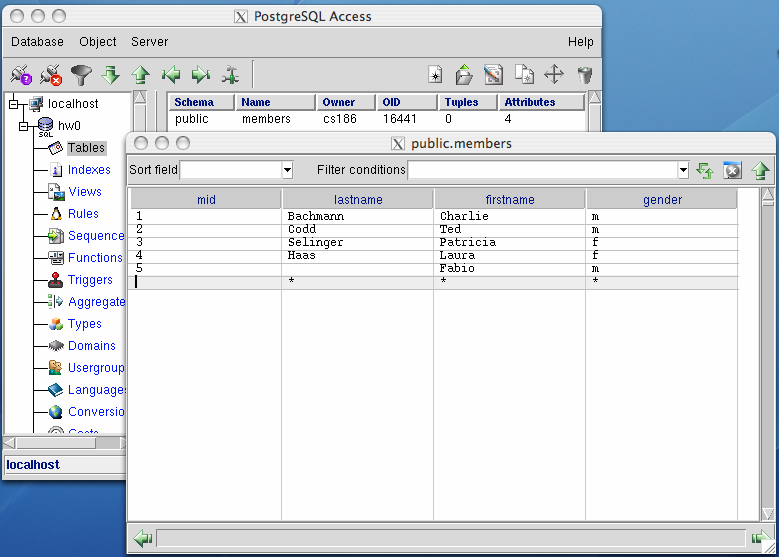
- You can manually insert data via pgaccess very
easily. Simply double-click on a table in the Tables tab, and
it
will pop up in "Datasheet View". It will show you all tuples
currently in the table, and will allow you to add a tuple at the bottom
of the table by clicking on the starred cells and typing in them. Add
some example data to all your tables.
- Once you have inserted data into your tables,
you are ready to write queries. We will use the psql command-line tool to issue the
queries. However, you may want to play with the pgaccess Visual
Designer interface to help you compose your SQL. (This is
optional). The Visual Designer is available by clicking on the
Queries icon, going to the
Object menu and choosing
New, and then pressing the
Visual designer button,
the fifth icon from the right in the query builder window. You
can
add tables, drag columns from one table to another, and drag columns
from the tables to the Fields at the bottom of the screen for
output. Press the Show SQL
button (leftmost icon in the right upper corner of the window) to view
the SQL you generate. You can type that text into an
editor and use it in the subsequent steps.
- When you are done with pgaccess, be sure to close
the database connection (under the Database menu) before you quit
pgaccess. This way, the connection to your Postgres server will be
closed properly.
- To use psql, return to a shell window, and type
psql hw0
at the prompt. Once psql is running, you can type \help for help with SQL, and \? for help with psql commands
(which
all begin with backslash). You can
list the tables in your database by typing \d and list the attributes of a
table by typing \d
<tablename>. (Note that pgaccess created a bunch of
tables for itself!)
- To try a query in psql, simply enter it at the
prompt. Each query must be
terminated by a semi-colon.
- You are advised to edit your queries in a
separate window, and cut-and-paste to the psql prompt. psql will print
out the results of the query on the screen.
- Use the \q
command or control-d to quit psql.
- When you have the tables and queries the way you
like, you need to generate a script to turn in. You will do this
via the script command.
- When you're ready, type script hw0.script at a shell prompt.
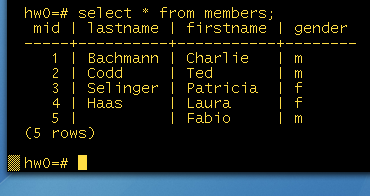
- Type psql hw0
to start psql.
- For each table you defined, run the query select * from table; so we can see
the contents of the tables.
- For each query you wrote, run that query.
- Quit psql via \q
or control-d.
- Type exit
to end the script program. It should tell you Script done, output file is hw0.script.
- Follow the instructions above for turning in your
hw0.script file.
Notes
- You do not have
to use pgaccess in this assignment -- you can issue create table and insert statements directly from
psql if you prefer.