lab01.pyLab 0 walked you through how to use the school computers for CS 61A. This lab explains how to use your own computer to complete assignments!
First, we need to find a good text editor. A text editor is like Microsoft Word — a program that allows you to write in one or more languages. You will be using a text editor to create, modify, and save files.
There are many editors out there, each with its own set of features. You can choose your own editor, but for the purpose of this class, your text editor must
In addition, almost all useful editors have
Here are the text editors that we recommend. We've written short guides for each one to get you started:
Each guide has a section on installing the text editor to your personal computer. For the sake of this lab, you can just jump to there.
Note: Please, please, please do not use Microsoft Word to edit programs. Word is designed to edit natural languages like English — trouble will ensue if you try to write Python with Word!
Note: Python usually comes with a text editor called IDLE. We do not recommend it because you won't gain as much experience using the command line to run your Python programs. This is very important once you start working on the projects for this class so we highly recommend that you use the command line to run your files from day 1!
In addition to text editors, which let you write Python code, you will need to install the Python interpreter, which allows you to run Python code.
You can get Python here. Download one of the installers (for example, "Windows X86-64 MSI Installer" or "MacOS X 64-bit ... Installer"). If your computer is a 64-bit machine, you should download the 64-bit installer. (In general, if your computer is new within the past 2 years, it is likely 64-bit. Ask a TA or lab assistant if you're not sure.)
MacOS users can refer to this video for additional help on setting up Python.
Windows users can refer to this video for additional help on setting up Python (up to 1:09 into the video).
You will also need to configure your
PATH; the same video describes how to do this from 3:00 to 5:54.
First, open up a terminal.
If you're on a Mac or are using a form of Linux (such as Ubuntu), you already have a program called
Terminalon your computer. Open that up and you should be good to go.
For Windows users, you have several options. We recommend downloading a program called GitBash, which behaves like a UNIX terminal.1
Note: the video in the previous section uses a built-in terminal called
cmd— this is not the same as GitBash.
Once you have your terminal open, we'll use what we learned from Lab 0: our handy Unix commands!
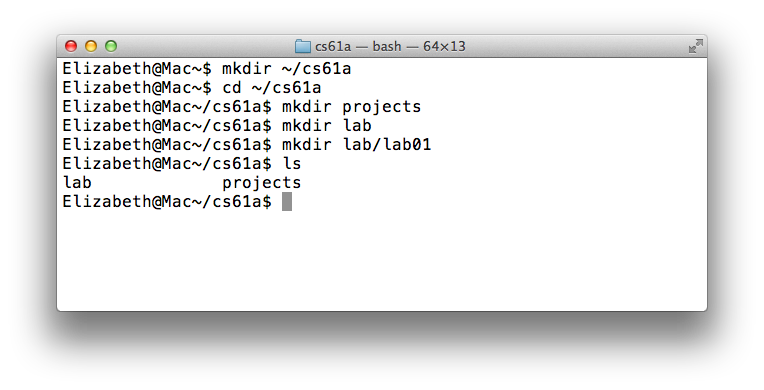
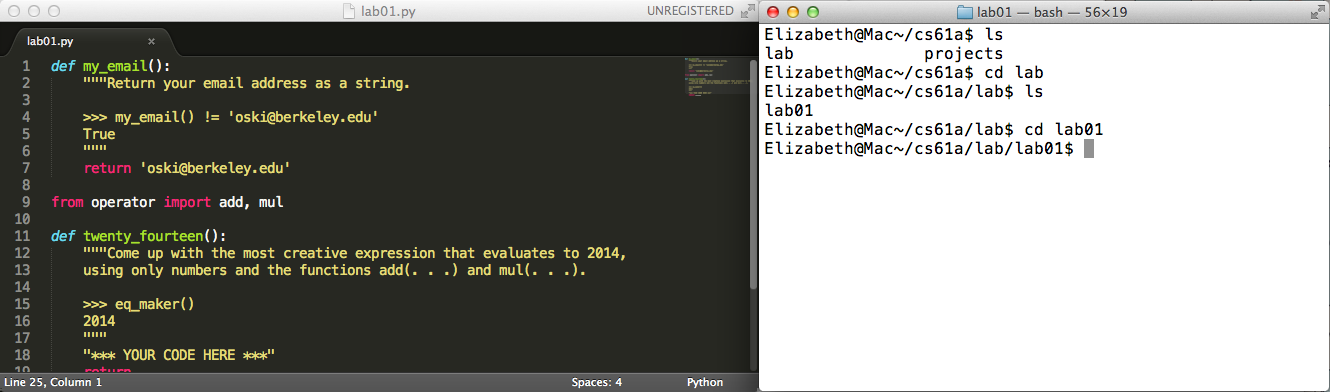
Right now, I'm in my home directory. Recall from Lab 0 that the
home directory is represented by the ~ symbol (outlined in green
above).
Don't worry if your terminal window doesn't look exactly the same; the important part is that the text on the left hand side is relatively the same (with a different name) and you should definitely see a
~(tilde).
We can use commands like cd and ls just like before. Let's make a
directory called cs61a to store all of the assignments for this
class.
mkdir ~/cs61aA folder called cs61a will appear in our home directory. Let's also
add a projects, lab, and a lab01 folder inside of our lab
folder.
cd ~/cs61a
mkdir projects
mkdir lab
mkdir lab/lab01
Now if we list the contents of the directory (using ls), we'll see
two folders, projects and lab.
Next, download the template file, lab01.py. Once you've done that, let's find our downloaded file:
On most computers, lab01.py is probably located in a directory
called Downloads in your home directory. Let's use the ls
command to check:
ls ~/DownloadsIf you don't see lab01.py, ask a TA or lab assistant for help.
Let's move our starter file into our new lab directory:
mv ~/Downloads/lab01.py ~/cs61a/lab/lab01This command will move the file located at ~/Downloads/lab01.py to
the directory ~/cs61a/lab/lab01.
Now, go back into the lab01 folder that we made earlier.
cd ~/cs61a/lab/lab01We're ready to start editing a file. Don't worry if this seems complicated — it will get much easier over time. Just keep practicing!
Let's start editing some files! For each assignment, we'll
provide you with some starter code (for example, lab01.py); all you
have to do is fill in the parts that are incomplete.
Open lab01.py in your editor of choice. You should see the following
text:
In our productive workflow, we suggest having at least two windows open at all times.
Here's a screenshot of a typical workspace. We've got our text editor on the left and our terminal on the right!
Again, the screenshots in this lab are using Sublime Text 2 on Mac OS X as our text editor; this particular setup might look different from yours. That's okay!
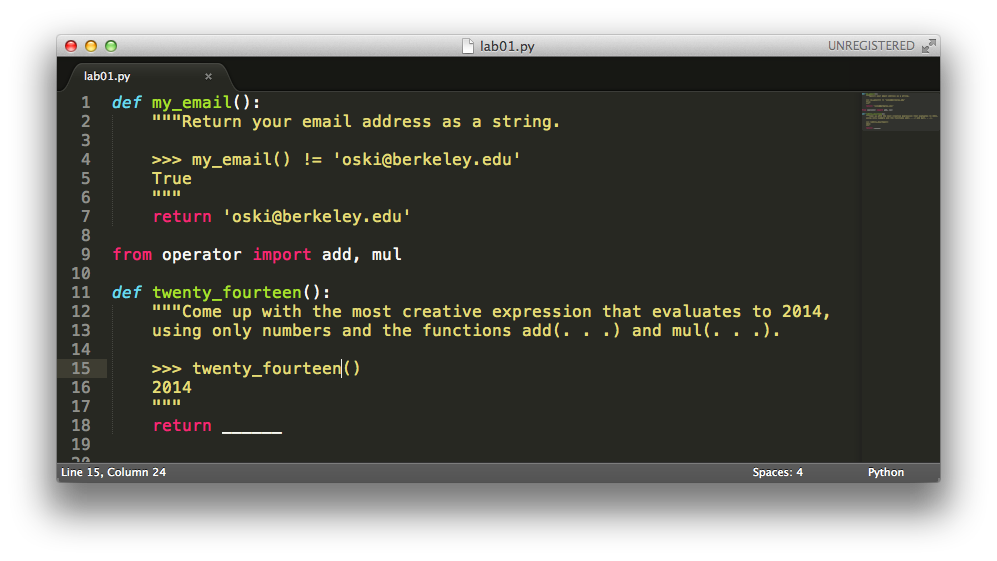
lab01.pyNotice the various blocks of green text that are wrapped within three
quotation marks """. That text is called a docstring, which is a
description of what the function is supposed to do.
Within the docstring, there are lines that begin with >>>. These
lines are called doctests. Doctests are a great way to
explain what the function does by showing actual Python code: "if we
input this Python code (the lines that say >>>), what should the
expected output be (the lines underneath the >>>)?"
In particular, let's look at the my_email() function:

The test in our docstring checks that you changed the return value from
the default 'oski@berkeley.edu'.
How do we use these tests? Glad you asked!
To run our doctests, switch over to our terminal and type in the following command:
python3 -m doctest lab01.pyIf you are using Windows and the
python3command doesn't work, try using justpythonorpy. If neither of those work, take another look at the video in the section on installing Python to make sure you are setting up your PATH correctly.
This will print out a lot of output that shows which tests we are currently failing. You should see something like this:
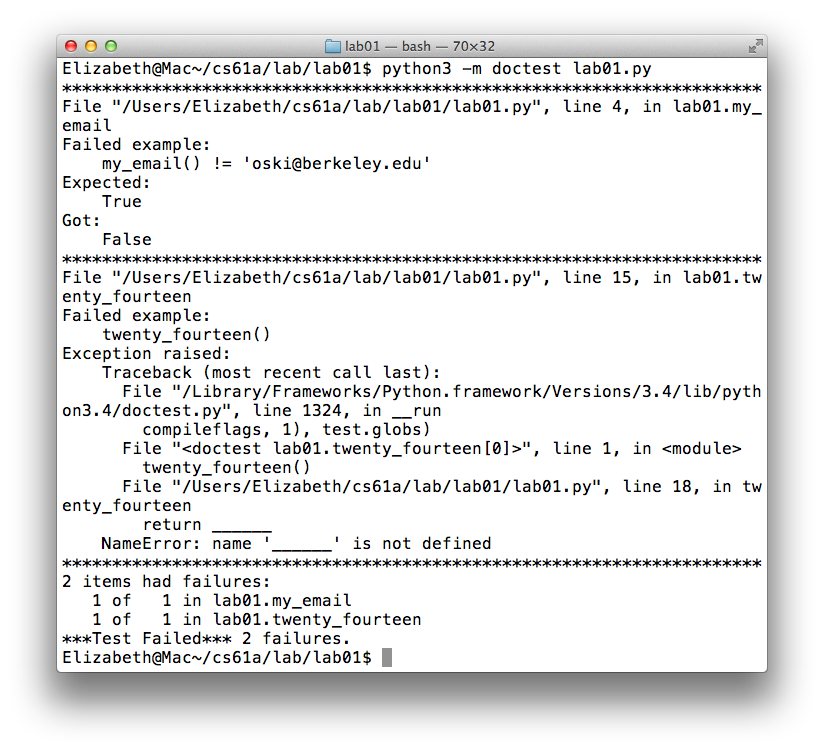
Oh man, we had 2 failures! :( Before we begin fixing our bugs, let's
see what this output says. In particular, look at the my_email test
that we failed:
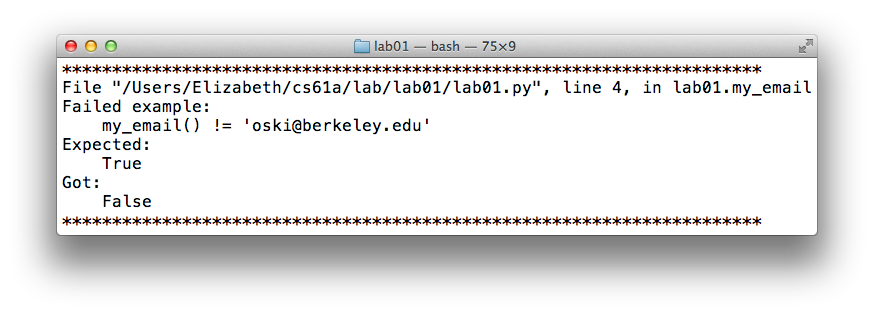
Notice it says we had an error in lab01.py on line 4, in the
function my_email. Now we know exactly where to look for the bug
(this is why line numbers are a must for text editors).
After we find line 4, let's try to understand what the test
is saying: the function my_email, when called with zero inputs,
should not return the string 'oski@berkeley.edu'. The
problem is, ours is returning that string! Change that to your
berkeley.edu email:
def my_email():
    """Return your last name as a string.

    >>> my_email() != 'oski@berkeley.edu'
    True
    """
    return 'jane.doe@berkeley.edu'
Once you've changed the return value of the function my_email
(make sure that you're returning a string, which has quotes around it),
try running the doctests again from your terminal:
python3 -m doctest lab01.pyThe test for my_email should pass. One down, one to go!
For the second function, twenty_fourteen, replace the blank line with
an expression that evaluates to the number 2014, using only integers
and the functions add and mul. There are many simple ways to do
this — try to come up with the most creative solution! Make sure your
doctests pass once you're done.
You might run your doctests and see that there is no output. This is actually good — it means all the tests passed. By default, doctests only print output when you have failures in your tests.
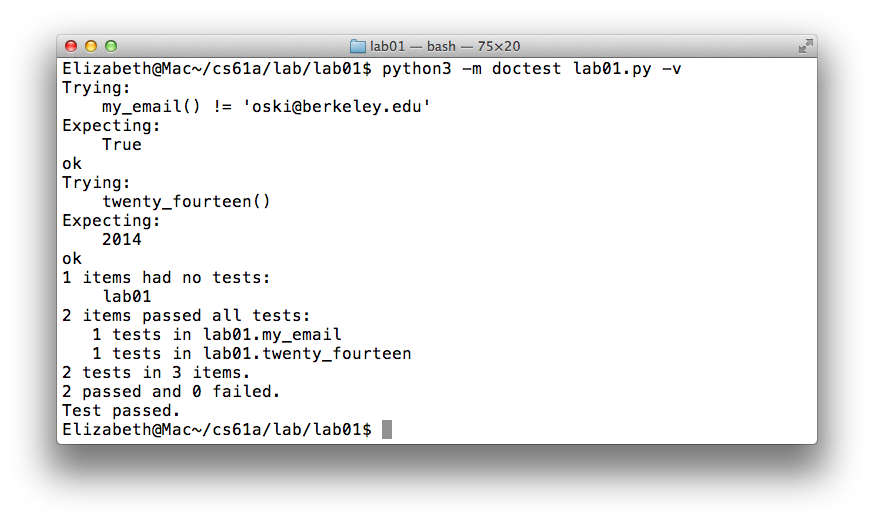
However, if you want to double-check that you are passing all of the tests, you can add a command line flag
-vto see all the output, including the tests that passed:python3 -m doctest -v lab01.pyThis is called "verbose" mode.
Once all of your tests pass, the verbose output of the doctests
(python3 -m doctest lab01.py -v) should look something like this:
For more help throughout the semester on fixing bugs, take a look at Albert's debugging guide.
Now that you have completed your first CS 61A assignment, it's time to turn it in. There are a couple of steps to do:
For Windows users: Steps 1 and 1.5 below assume you are using Git Bash as your terminal. If you chose one of the alternative methods in the footnote1, please see the appendix for help with steps 1 and 1.5.
Before you can turn in your assignment, you need to get it onto your class account first.
From your terminal, Navigate to your directory that contains lab01.py,
if you aren't there already:
cd ~/cs61a/lab/lab01To copy lab01.py to your class account, type in the following command
scp lab01.py cs61a-??@cory.eecs.berkeley.edu:~where ?? is replaced with your two (or three) letter login.
To understand what this command does, let's break it down into three parts.
scpstands for secure copy. It is used for transferring data over a network.lab01.pyis the path to the file(s) that you want to copy.
cs61a-??@cory.eecs.berkeley.edu:~is the destination. Unlike the normalcpcommand, the destination of thescpcommand can be a location on a remote computer.
cs61a-??is the username on that remote computer (in this case, your class login).cory.eecs.berkeley.eduis the name of the remote computer (also known as a server). A complete list of servers can be found here.- The
:separates the name of the server from the location on that server,~. Recall that~stands for the home directory. In other words, the destination is the home directory of your class account.
After typing this command, you'll be asked for your password and then the file will transfer over.
Great, now lab01.py is on the instructional servers. You're not done
quite yet! We have to actually submit our files.
To do this, we first have to log into our class account. Type in the following command:
ssh cs61a-??@cory.eecs.berkeley.eduwhere ?? is replaced with your two (or three) letter login.
Again, if you're interested, here's an explanation of what the command does:
sshis a secure shell (i.e. terminal) that connects to remote serverscs61a-??is the username on the remote servercory.eecs.berkeley.eduis the name of the remote server. Again, here is a list of servers that belong to Berkeley's CS department
You can also watch this video for help.
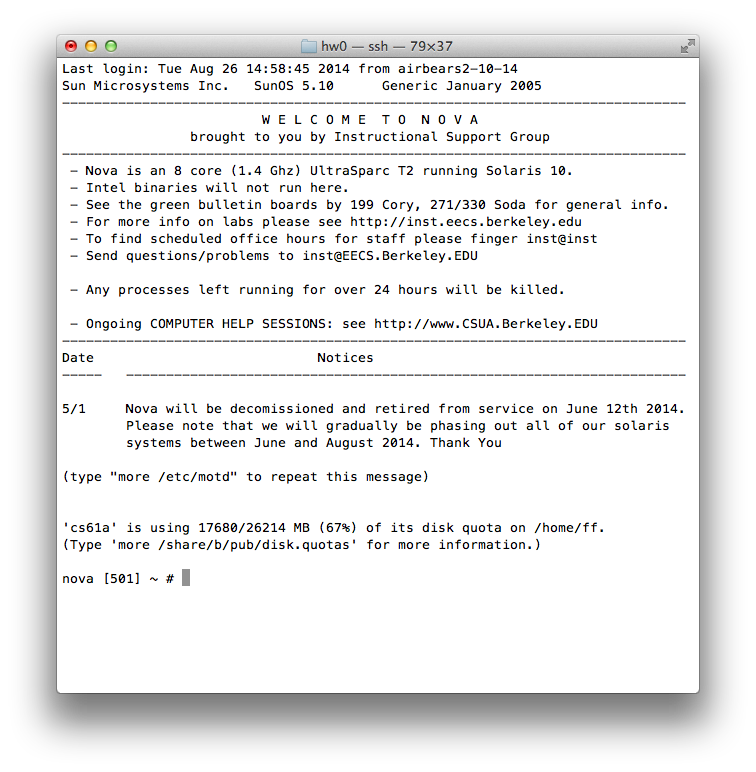
Once you are logged in, you'll see something like this:
If you copied your files over correctly, you should be able to type
ls and see your lab01.py file. If not, take another look at Step
1.
If you're really stuck, try posting on Piazza first. If that still doesn't help, come talk to one of the TAs in office hours.
To stay organized, we'll first create a folder on our class account to
hold lab01.py. In the future, you'll be submitting projects with
multiple files so it's good to get in a habit of creating a new folder
for each assignment. Let's make the lab01 directory, move our
lab01.py file into it, and then cd into our lab01 folder:
mkdir lab01
mv lab01.py lab01
cd lab01
We're all ready to submit our assignment. First, run the doctests one last time to make sure everything is passing:
python3 -m doctest lab01.pyFor Windows: now that we are logged into our class account, we will be using
python3, not justpythonorpy.
Good, the tests pass. But wait, there's more! Recall that, when you first received your class account, you were asked to enter registration information. Double check that this information is correct:
check-registerIf you find errors (e.g. you typed your last name as "ssh update"), fix them immediately by running the command:
re-registerNote: you don't have to do this every time you submit an assignment — we just want to make sure it is correct now before it's too late.
Okay, now we're ready to submit our assignment. From within the lab01
directory, type
submit lab01There will be a "sanity check" that verifies some simple details about your assignment. For
lab01, the sanity check makes sure you didn't fill inlab01.pyincorrectly. For regular assignments, the sanity check will do other things, like check for syntax errors.
To check that you successfully submitted, type in
glookup -tglookup is the name of the command that you will use this semester to
check your grades. At any time, you can simply enter glookup to check
your grades. Adding a -t to the glookup command allows you to
see all the times that you have successfully submitted an assignment.
You should see a successful submission of about 1 minute ago.
Congratulations, you just submitted your first CS61A assignment!
Appendix: Windows users who aren't using GitBash
This section goes over Steps 1 and 1.5 of the "Submitting Assignments" section for Windows users who decide not to use GitBash. This process involves installing two additional pieces of software, which is why we recommend using GitBash.
Step 1: Copying your assignment to your class account
If you decided to use Windows's built-in terminal
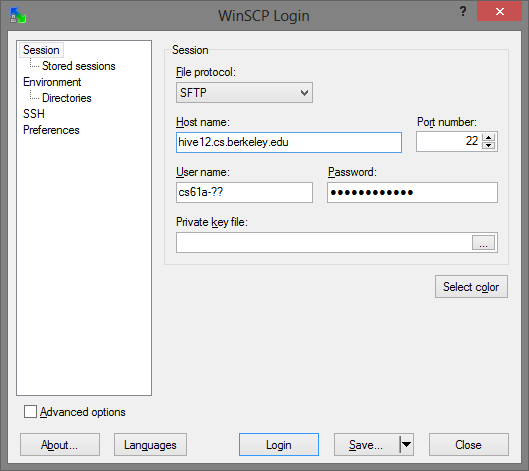
cmd, thescpcommand described earlier in the lab won't be available. Instead, you'll need to first download a program called WinSCP.After you've installed WinSCP, open it up and configure it so that you can log in to the server. Here's a screenshot of a typical log in:
Once you're logged in, all you have to do is navigate to your
cs61a/labfolder on the left and drag your file over to the server on the right.Step 1.5: Logging into your class account
In step 1, we used WinSCP to copy files from your personal computer to your class account. In step 1.5, we will use another program called PuTTY to log in to your class account. You can download PuTTY.
Take a a look at this video to learn how to setup PuTTY.
If you're on Windows, there are a few other options besides using
GitBash. Windows has a built-in terminal called cmd, which
behaves slightly differently than Unix (for example, ls is called
dir). Another option is a program called
Cygwin, which behaves more like
UNIX.