Lab 5, Radio Communication Via a Computer Interface, Part I
Now that you have gotten your radio and radio interfaces, we are ready to experiment with them. In this part of the lab we will learn how to use the interface and the radio, make sure that everything is working correctly so that you will be able to make progress on the second part as well as the project. It is important that you start early, since there may be many technical difficulties.
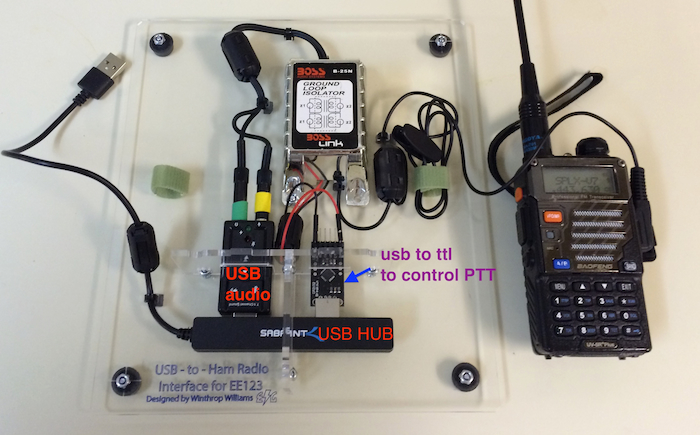
The interface you got contains a usb hub that connects to your labtop. The usb hub has two devices: A USB audio card in which you will send and receive audio to your radio, and the CP2102 USB to serial that enables you to key the radio from your python script using the pyserial library. The interface also has a ground-loop isolation box. It is has two audio transformers that prevent voltage potential from your computer to get to the radio. The isolation box has a Kenwood style audio connector with a 2.5mm and 3.5mm audio Jack that connects to your Baofeng radio.
Prerequisites:
- You will need to install pyserial by running the commandline:
>> pip install pyserial - You will need to install the usb-to-serial drivers from https://www.silabs.com/products/mcu/Pages/USBtoUARTBridgeVCPDrivers.aspx
When starting:
- Make sure that the channel you will use is not already in use by someone else
- Choose one of the experimental channels (101-108) in the programmed channels on your radio, preferably a UHF one (105-108)
- Transmit your call sign and that you intend to use this channel for performing experiments
- Connect the audio interface to the radio and to the USB hub to your computer
- Make sure in your computer settings that the volume on the USB interface is set to 3/4 of the max to prevent overloading the radio input and that both input and output are not on mute.
- Make sure the output volume on the radio is reasonable to prevent overloading of the usb interface. Turning clockwise when the radio is off for 1/4 of a turn works well for me.
During operation:
- If the green light on the radio turns on frequently, it means that someone is transmitting on your channel. In that case, switch to a different one.
- If the red light turns on, the radio is transmitting. If it is not supposed to, then something got messed up with the USB to TTL device. It's probably went AWOL due to RF interference. Unplug the USB hub and plug it back again. Don't forget to reset the notebook kernel
- Announce your callsign every 10 minutes
- Make sure that the antenna is not close to the audio cable and is as orthogonal as possible to it -- this will prevent RF to get into the audio interface.
- Sometimes, the usb audio device will stop working due to RF overloading. To prevent that, put your radio further away as possible from the interface.
- Use low-power (# key) when possible
When Finishing:
- Sign off with your call sign
# Import functions and libraries
%pylab
import numpy as np
import matplotlib.pyplot as plt
import pyaudio
import Queue
import threading,time
import sys
from numpy import *
from scipy import *
from rtlsdr import RtlSdr
from numpy.fft import *

import serial
%matplotlib inline
Let's first define the spectrogram function, which we will use later in the lab
# Plot an image of the spectrogram y, with the axis labeled with time tl,
# and frequency fl
#
# t_range -- time axis label, nt samples
# f_range -- frequency axis label, nf samples
# y -- spectrogram, nf by nt array
# dbf -- Dynamic range of the spect

def sg_plot( t_range, f_range, y, dbf = 60) :
    eps = 1e-3

    # find maximum
    y_max = abs(y).max()

    # compute 20*log magnitude, scaled to the max
    y_log = 20.0 * np.log10( abs( y ) / y_max + eps )

    fig=figure(figsize=(15,6))

    plt.imshow( np.flipud( 64.0*(y_log + dbf)/dbf ), extent= t_range  + f_range ,cmap=plt.cm.gray, aspect='auto')
    plt.xlabel('Time, s')
    plt.ylabel('Frequency, Hz')
    plt.tight_layout()


def myspectrogram_hann_ovlp(x, m, fs, fc,dbf = 60):
    # Plot the spectrogram of x.
    # First take the original signal x and split it into blocks of length m
    # This corresponds to using a rectangular window %


    isreal_bool = isreal(x).all()

    # pad x up to a multiple of m
    lx = len(x);
    nt = (lx + m - 1) // m
    x = append(x,zeros(-lx+nt*m))
    x = x.reshape((m/2,nt*2), order='F')
    x = concatenate((x,x),axis=0)
    x = x.reshape((m*nt*2,1),order='F')
    x = x[r_[m//2:len(x),ones(m//2)*(len(x)-1)].astype(int)].reshape((m,nt*2),order='F')


    xmw = x * hanning(m)[:,None];


    # frequency index
    t_range = [0.0, lx / fs]

    if isreal_bool:
        f_range = [ fc, fs / 2.0 + fc]
        xmf = np.fft.fft(xmw,len(xmw),axis=0)
        sg_plot(t_range, f_range, xmf[0:m/2,:],dbf=dbf)
        print 1
    else:
        f_range = [-fs / 2.0 + fc, fs / 2.0 + fc]
        xmf = np.fft.fftshift( np.fft.fft( xmw ,len(xmw),axis=0), axes=0 )
        sg_plot(t_range, f_range, xmf,dbf = dbf)

    return t_range, f_range, xmf
Buffered Audio I/O
In order to enable convinient audio processing in real-time we modified the I/O audio functions to use threading and python queues. The nice thing about queue is that it implements a buffered FIFO which we will use to fill in with captured samples or samples we would like to transmit.
We are also going to use a nice feature in PyAudio that lets you access different audio interfaces. For example, you can record audio from the USB dongle and play it on the computer built-in speaker at the same time.
The function play_audio has some other optional parameters for controlling the PTT of your radio. We will talk about that later.
def play_audio( Q, p, fs , dev, ser="", keydelay=0):
    # play_audio plays audio with sampling rate = fs
    # Q - A queue object from which to play
    # p   - pyAudio object
    # fs  - sampling rate
    # dev - device number
    # ser - pyserial device to key the radio
    # keydelay - delay after keying the radio

    # Example:
    # fs = 44100
    # p = pyaudio.PyAudio() #instantiate PyAudio
    # Q = Queue.queue()
    # Q.put(data)
    # Q.put("EOT") # when function gets EOT it will quit
    # play_audio( Q, p, fs,1 ) # play audio
    # p.terminate() # terminate pyAudio

    # open output stream
    ostream = p.open(format=pyaudio.paFloat32, channels=1, rate=int(fs),output=True,output_device_index=dev)
    # play audio
    while (1):
        data = Q.get()
        if data=="EOT"  :
            break
        elif (data=="KEYOFF"  and ser!=""):
            ser.setDTR(0)
            #print("keyoff\n")
        elif (data=="KEYON" and ser!=""):
            ser.setDTR(1)  # key PTT
            #print("keyon\n")
            time.sleep(keydelay) # wait 200ms (default) to let the power amp to ramp up

        else:
            try:
                ostream.write( data.astype(np.float32).tostring() )
            except:
                print("Exception")
                break

def record_audio( queue, p, fs ,dev,chunk=1024):
    # record_audio records audio with sampling rate = fs
    # queue - output data queue
    # p     - pyAudio object
    # fs    - sampling rate
    # dev   - device number
    # chunk - chunks of samples at a time default 1024
    #
    # Example:
    # fs = 44100
    # Q = Queue.queue()
    # p = pyaudio.PyAudio() #instantiate PyAudio
    # record_audio( Q, p, fs, 1) #
    # p.terminate() # terminate pyAudio


    istream = p.open(format=pyaudio.paFloat32, channels=1, rate=int(fs),input=True,input_device_index=dev,frames_per_buffer=chunk)

    # record audio in chunks and append to frames
    frames = [];
    while (1):
        try:  # when the pyaudio object is distroyed stops
            data_str = istream.read(chunk) # read a chunk of data
        except:
            break
        data_flt = np.fromstring( data_str, 'float32' ) # convert string to float
        queue.put( data_flt ) # append to list
To find the device numbers of the built in input/output and the USB devices, we wrote the following function, which prints out the device number followed by the device name. We are interested in four devices:
dout- Laptop Speakerdin- Laptop Microphonedusb_out- Radio-Laptop interface output ("speaker")dusb_in- Radio-Laptop interface input ("microphone")
Run the following code cell to see a list of available devices and manually set the device numbers dout, din, dusb_out and dusb_in to the desired device numbers in the next code cell. Match the following key words in the device name:
dout- Windows: "Output", "Speaker" Mac: "Built-in Output"din- Windows: "Input", "Microphone" Mac: "Built-in Microph "dusb_out- Windows: "USB", "Speaker", "Output", Mac: "USB PnP Sound Device"dusb_in- Windows: "USB", "Microph", "Input", Mac: "USB PnP Sound Device"
def printDevNumbers(p):
    N = p.get_device_count()
    for n in range(0,N):
        name = p.get_device_info_by_index(n).get('name')
        print n, name

p = pyaudio.PyAudio()
printDevNumbers(p)
p.terminate()
# CHANGE!!!!
dusb_in = 2
dusb_out = 2
din = 0
dout = 1
Testing the Buffered Audio:
The first test/example would be to see if we can capture audio from the radio and play it on the computer.
- Connect the audio interface to the radio and to the USB audio dongle. Insert the USB device.
- On the radio, press on the orange button to switch to FM radio mode. Tune to 94.1 KPFA. Set the volume at quarter of a turn. You can also tune to the SPLXCAL frequency (ch4 or 146:430MHz on your radio) and ask a friend to transmit to you to see if you can hear the result through the speakers.
- The following code records the audio that is coming out of the radio into the usb port and plays it on the computer built-in speakers. Study it! It will be very usefull in the future.
# create an input output FIFO queues
Qin = Queue.Queue()
Qout = Queue.Queue()


# create a pyaudio object
p = pyaudio.PyAudio()

stop_flag = threading.Event()
# initialize a recording thread. The USB device only supports 44.1KHz sampling rate
t_rec = threading.Thread(target = record_audio,   args = (Qin,   p, 44100, dusb_in  ))

# initialize a playing thread.
t_play = threading.Thread(target = play_audio,   args = (Qout,   p, 44100, dout ))

# start the recording and playing threads
t_rec.start()
t_play.start()

# record and play about 10 seconds of audio 430*1024/44100 = 9.98 s
for n in range(0,430):

    samples = Qin.get()


    # You can add code here to do processing on samples in chunks of 1024
    # you will have to implement an overlap an add, or overlap an save to get
    # continuity between chunks

    Qout.put(samples)


# must wait for the queue to empty before terminating pyaudio
Qout.put("EOT")
while not(Qout.empty()) :
    time.sleep(1)


# kill the pyaudio device. The thread will have an exception and will quit.
stop_flag.set()
p.terminate()
Testing Radio Transmit control
The next step is to test if the PTT control using pyserial works
- Follow the preparation steps listed in the beginning of the document (identify your callsign and announce testing)
- Set the power of the radio to low (short press the # key)
- Pick an experimental channel 101-107
The following code generates a series of 10 short key-on, key off. To key the radio you need to set the DTR pin of the USB to serial device to '1' and to stop keying set it back to '0'
If the red light turns on and off, you are good to go!
***Windows users: Check the com port of your usb-to-serial device and use the right one in the code
if sys.platform == 'darwin':  # Mac
    s = serial.Serial(port='/dev/tty.SLAB_USBtoUART')
else:                         #windows
    s = serial.Serial(port='COM1') ##### CHANGE !!!!!!
s.setDTR(0)
for n in range(0,10):
    s.setDTR(1)
    time.sleep(0.25)
    s.setDTR(0)
    time.sleep(0.25)
Controlling the PTT through the play_audio function
To make it easier on you, we integrated the option of keying and unkeying the radio through the play_audio function. When the function play_audio pulls from the Queue the command "KEYON" it will set DTR to 1 (which will key the radio) and then wait for 200ms for the radio to turn on. If it pulls "KEYOFF" it wills set DTR to 0 (which will key off the radio). If the function pulls "EOT" from the queue, it will quit.
Below is the a code that: 1) keys the radio 2) plays a 2KHz tone for 2 second 3) unkeys the radio 4) plays for 2 seconds without transmitting 5) keys the radio and plays a 1KHz tone for 2 seconds 6) unkeys the radio.
Use a friend's radio or the SDR to make sure you hear the audio.
# creates a queue
Qout = Queue.Queue()

# initialize a serial port
s.setDTR(0)
# create a pyaudio object
p = pyaudio.PyAudio()


t = r_[0:2*44100.0]/44100.0
sig2 = 0.5*sin(2*pi*2000*t)
sig1 = 0.5*sin(2*pi*1000*t)


Qout.put("KEYON")
Qout.put(sig2)
Qout.put("KEYOFF")
Qout.put(sig2)
Qout.put("KEYON")
Qout.put(sig1)
Qout.put("KEYOFF")
Qout.put("EOT")

# play audio from Queue
play_audio(Qout,   p, 44100, dusb_out, s,0.2)

p.terminate()
Below is a similar code, but running with threads in the background.
# creates a queue
Qout = Queue.Queue()

# initialize a serial port
s.setDTR(0)
# create a pyaudio object
p = pyaudio.PyAudio()


t = r_[0:2*44100.0]/44100.0
sig2 = 0.5*sin(2*pi*2000*t)
sig1 = 0.5*sin(2*pi*1000*t)


t_play = threading.Thread(target = play_audio,   args = (Qout,   p, 44100, dusb_out, s ,0.2 ))


# play audio from Queue
t_play.start()

Qout.put("KEYON")
Qout.put(sig2)
Qout.put("KEYOFF")
Qout.put(sig2)
Qout.put("KEYON")
Qout.put(sig1)
Qout.put("KEYOFF")
Qout.put("EOT")

# must wait for the queue to empty before terminating pyaudio
while not(Qout.empty()) :
    time.sleep(1)


p.terminate()# kill a playing thread.
Measuring the Frequency Response of the Radio's Bandpass Audio Filter
The audio input to the radio is filtered by a bandpass filter. Because later we are going to use the audio interface to transmit data, we need to know how this data is going to be affected by the filter. Much like in Lab1, we will use a chirp signal to estimate the magnitude frequency response. We will trasmit with the radio and receive using the SDR.
- Connect the SDR to an empty USB port.
- Disconnect the antenna from the SDR -- the signal will be stong anyways
Place the radio as far away from the SDR as possible to minimize interference
Generate a 5 second chirp pulse with frequencies ranging from DC to 8KHz.
- Make sure the volume on the USB device is 2/3 of the way.
- Scale the chirp signal down by a factor of 2 to avoid non-linearities (amplitude = 1/2).
- Transmit the signal using the radio and receive using the SDR. Put a delay of 300ms of zero sampled before the chirp so you make sure you capture it all.
- Plot the Spectrogram of the received signal. Explain what you see.
# Your code here:
def genChirpPulse(Npulse, f0, f1, fs):
    #     Function generates an analytic function of a chirp pulse
    #     Inputs:
    #             Npulse - pulse length in samples
    #             f0     - starting frequency of chirp
    #             f1     - end frequency of chirp
    #             fs     - sampling frequency
# Your code here:

# Generate Chirp
# Transmit using radio
# Read from sdr
# plot spectrogram
In order to look at the frequency response, we will need to FM demodulate the signal.
- Demodulate the received FM signal by filtering and taking the derivative of the phase (like in lab 3)
- Low-pass filter the result with a cutoff frequency of 8KHz and decimate by a factor of 16
- Plot the spectrogram of the demodulated signal. Do you see non-linear effects?
# Your code here:
Now,
- Crop the portion in which the carrier is active (signal, not noise)
- Compute and plot the frequency response in db. Scale the graph that you can see things well.
- What is the lowest frequency that passes? What is the highest?
# Your code here:
Transmitting your callsign in Morse code
The next step is to see if you can transmit something more meaningful. If you are going to transmit for the first time using a computer, you might as well transmit your callsign in Morse code!
Morse code is composed of dots ( . dit) and dashes ( - dah). The timing is relative to a dot duration which is one unit long. A dah is three units long. Gap between dots and dashes within a character is one unit. A short gap between letters is three units and a gap between words is seven units.
Here's a dictionary of Morse code:
- Implement a function
sig = text2Morse(text, fc, fs,dt). The function will take a string and convert it to a tone signal that plays the morse code of the text. The function will also take 'fc' the frequency of the tones (800-900Hz sounds nice), 'fs' the sampling frequency and 'dt' the morse unit time (hence the speed, 50-75ms recommended). - Transmit your call sign! You can use this function to identify yourself before, during and after a transmission from now on.
- Validate the code by capturing a spectrogram using the SDR
def text2Morse(text,fc,fs,dt):
    CODE = {'A': '.-',     'B': '-...',   'C': '-.-.',
        'D': '-..',    'E': '.',      'F': '..-.',
        'G': '--.',    'H': '....',   'I': '..',
        'J': '.---',   'K': '-.-',    'L': '.-..',
        'M': '--',     'N': '-.',     'O': '---',
        'P': '.--.',   'Q': '--.-',   'R': '.-.',
     	'S': '...',    'T': '-',      'U': '..-',
        'V': '...-',   'W': '.--',    'X': '-..-',
        'Y': '-.--',   'Z': '--..',

        '0': '-----',  '1': '.----',  '2': '..---',
        '3': '...--',  '4': '....-',  '5': '.....',
        '6': '-....',  '7': '--...',  '8': '---..',
        '9': '----.',

        ' ': ' ', "'": '.----.', '(': '-.--.-',  ')': '-.--.-',
        ',': '--..--', '-': '-....-', '.': '.-.-.-',
        '/': '-..-.',   ':': '---...', ';': '-.-.-.',
        '?': '..--..', '_': '..--.-'
        }

        # Your code here:
# Your code here: