Fun with Frequencies!
Due Date: 11:59pm on Monday, Sept. 28, 2015 (updated)
Part 0: Warmup
Pick your favorite image and "sharpen" it using the unsharp masking technique we covered in class.
Part 1: Hybrid Images
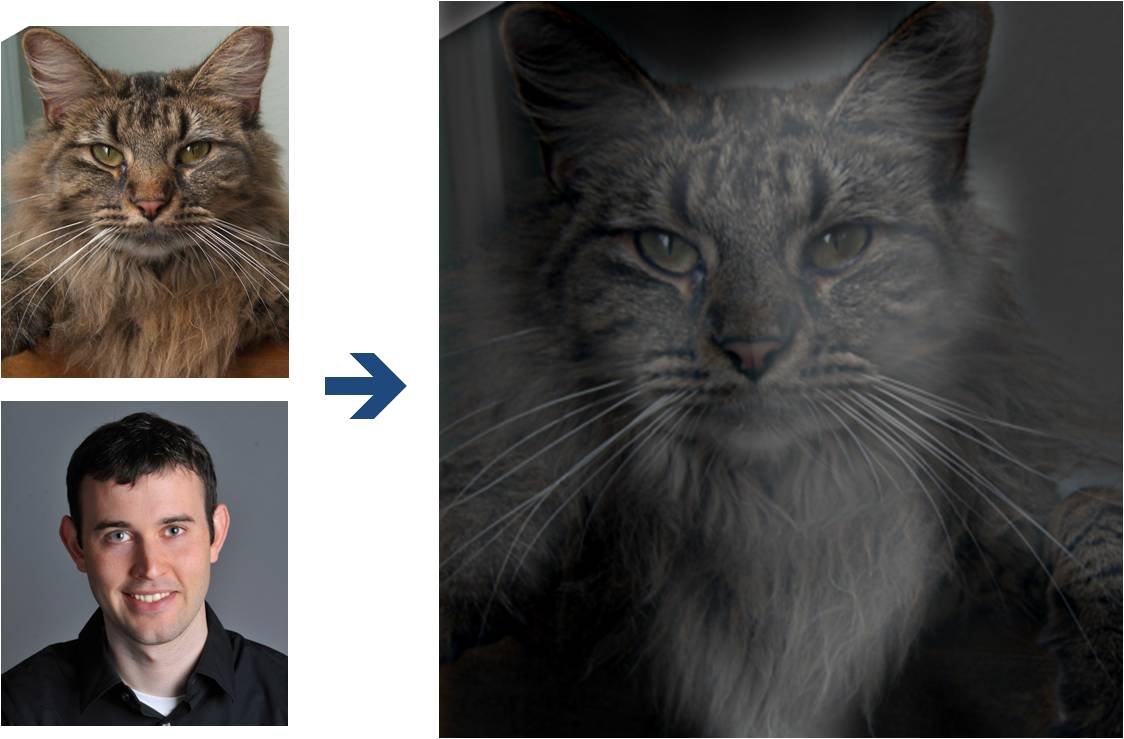
(Look at image on right from very close, then from far away.)
Overview
The goal of this part of the assignment is to create hybrid images using the approach
described in the SIGGRAPH 2006 paper
by Oliva, Torralba, and Schyns. Hybrid images are static images that
change in interpretation as a function of the viewing distance. The basic idea is that high frequency tends
to dominate perception when it is available, but, at a distance, only the low
frequency (smooth) part of the signal can be seen. By blending the high frequency portion of one image with the low-frequency portion of another, you get a hybrid image that leads to different interpretations at different distances.
Details
Here, we have included two sample images (of Derek and his former cat Nutmeg) and some matlab
starter code that can be used to load two images and align them. Here is the python version. The alignment is important because it affects
the perceptual grouping (read the paper for details).
-
First, you'll need to get a few pairs of images that you want to make into
hybrid images. You can use the sample
images for debugging, but you should use your own images in your results. Then, you will need to write code to low-pass
filter one image, high-pass filter the second image, and add (or average) the
two images. For a low-pass filter, Oliva et al. suggest using a standard 2D Gaussian filter. For a high-pass filter, they suggest using
the impulse filter minus the Gaussian filter (which can be computed by subtracting the Gaussian-filtered image from the original).
The cutoff-frequency of
each filter should be chosen with some experimentation.
- For your favorite result, you should also illustrate the process through frequency analysis. Show the log magnitude of the Fourier transform of the two input images, the filtered images, and the
hybrid image. In MATLAB, you can compute and display the 2D Fourier transform with
with:
imagesc(log(abs(fftshift(fft2(gray_image)))))and in Python it's plt.imshow(np.log(np.abs(np.fft.fftshift(np.fft.fft2(gray_image)))))
- Try creating a variety of types of hybrid images (change of expression,
morph between different objects, change over time, etc.).
The site has several examples that
may inspire.
Bells & Whistles (Extra Points)
Try using color to enhance the effect.
Does it work better to use color for the high-frequency component, the
low-frequency component, or both? (5 pts)
Part 2: Gaussian and Laplacian Stacks
Overview
In this part you will implement Gaussian and Laplacian stacks, which are kind of like pyramids but without the downsampling. Then you will use these to analyze some images, and your results from part 1.
Details
-
Implement a Gaussian and a Laplacian stack. The different between a stack and a pyramid is that in each level of the pyramid the image is downsampled, so that the result gets smaller and smaller. In a stack the images are never downsampled so the results are all the same dimension as the original image, and can all be saved in one 3D matrix (if the original image was a grayscale image). Note that there is one subtlety here: since we are not downsampling the image, we must use a larger and larger sigma for the Gaussian filtering at each level. A good rule of thumb is to double the sigma at each level of the pyramid (e.g. sigma = 2,4,8,16...), and to always use the resulting Gaussian filter on the original image. In this way we will get a stack that behaves similarly to a pyramid that was downsampled to half its size at each level. If you would rather work with pyramids, you may implement pyramids other than stacks. However, in any case, you are NOT allowed to use matlab's impyramid() and its equivalents in this project. You must implement your stacks from scratch!
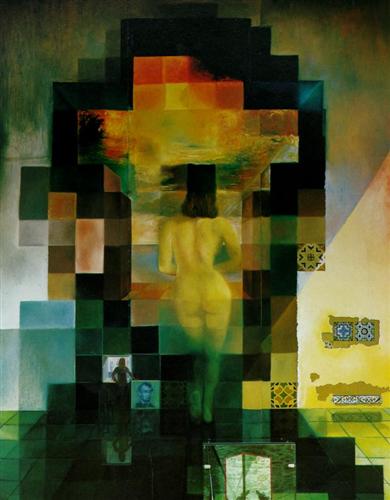
- Apply your Gaussian and Laplacian stacks to interesting images that contain structure in multiple resolution such as paintings like the Salvador Dali painting of Lincoln and Gala we saw in class, or the Mona Lisa. Display your stacks computed from these images to discover the structure at each resolution.
- Illustrate the process you took to create your hybrid images in part 1 by applying your Gaussian and Laplacian stacks and displaying them for your favorite result. This should look similar to Figure 7 in the Oliva et al. paper.
Part 3: Multiresolution Blending (a.k.a. the oraple!)
Overview
The goal of this part of the assignment is to blend two images seamlessly using a multi resolution blending as described in the 1983 paper by Burt and Adelson. An image spline is a smooth seam joining two image together by gently distorting them. Multiresolution blending computes a gentle seam between the two images seperately at each band of image frequencies, resulting in a much smoother seam.
Details
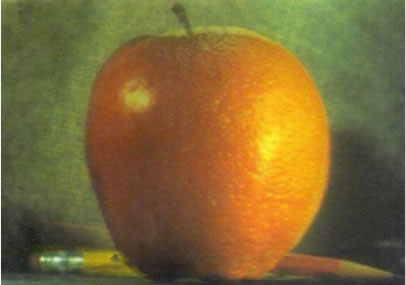
Here, we have included the two sample images from the paper (of an apple and an orange).
- First, you'll need to get a few pairs of images that you want blend together with a vertical or horizontal seam. You can use the sample
images for debugging, but you should use your own images in your results. Then you will need to write some code in order to use your Gaussian and Laplacian stacks from part 2 in order to blend the images together. Since we are using stacks instead of pyramids like in the paper, the algorithm described on page 226 will not work as-is. If you try it out, you will find that you end up with a very clear seam between the apple and the orange since in the pyramid case the downsampling/blurring/upsampling hoopla ends up blurring the abrupt seam proposed in this algorithm. Instead, you should always use a mask as is proposed in the algorithm on page 230, and remember to create a Gaussian pyramid for your mask image as well as for the two input images. The Gaussian blurring of the mask in the pyramid will smooth out the transition between the two images. For the vertical or horizontal seam, your mask will simply be a step function of the same size as the original images.
- Now that you've made yourself an oraple (a.k.a your vertical or horizontal seam is nicely working), pick a couple of images to blend together with an irregular mask, as is demonstrated in figure 8 in the paper.
- Blend together some crazy ideas of your own!
- Illustrate the process by applying your Laplacian stack and displaying it for your favorite result and the masked input images that created it. This should look similar to Figure 10 in the paper.
Bells & Whistles (Extra Points)
- Try using color to enhance the effect. (5 pts)
- Implement Style transfer for headshot portraits From this exciting SIGGRAPH 2014 paper by Shih et. al. It's amazing to see just how far Gaussian and Laplacian stacks can take you! (20 pts)
Deliverables
Use both words and images to show us what you've done (describe in detail your algorithm parameterization for each of your results).
Submit all code to bCourses. Make sure each part of the project has a main.m file that can execute that part of the assignment in full and include a README describing the contents of each file.
In the website in your uploaded directory, please:
For the warmup:
- Show us your sharpened image, including the original one.
For the hybrid images:
- Show us your favorite result. Include: 1) the original and filtered input images; 2) the hybrid image; 3) and the FFT images. Briefly (a few sentences) explain how it
works, using the included images as illustrations. Explain any clever
ideas that you've incorporated and any parameters. This should be with your own
images (not the included samples).
- Next, show us at least two more results, including one that doesn't work so well (failure example). Briefly explain how you got the good results (e.g., chosen cut-off frequencies, alignment tricks, other techniques), as well as any difficulties and the possible reasons for the bad results. If you are so fortunate that everything that you try works well, try to figure out what shouldn't work.
- Describe and bells and whistles under a separate heading.
For the Stacks:
- Display the multiple resolutions of image structure you found using your Laplacian stacks on at least one cool image (like the Lincoln one).
- Display your multiresolution analysis of your favorite hybrid image result.
For the multiresolution blending:
-
Show us your favorite result. Include: 1) the original images; 2) the blended images; and 3) the stack analysis. Briefly (a few sentences) explain how it
works, using the included images as illustrations. Explain any clever
ideas that you've incorporated and any parameters. This should be with your own
images (not the included samples).
-
Next, show us at least two more results, including one with a non-trivial mask and one that doesn't work so well (failure example). Briefly explain how you got the good results, as well as any difficulties and the possible reasons for the bad results. If you are so fortunate that everything that you try works well, try to figure out what shouldn't work.
- Describe and bells and whistles under a separate heading.
Tell us what is the coolest/most interesting thing you learned from this assignment!
Scoring
The core assignment is worth 100 points, as follows:
- 50 points for the implementation of all three parts of the project.
- 50 points for the project html page description: 5 points for the warmup; 15 points for hybrid images and the Fourier analysis; 5 points for including at least two hybrid image examples beyond the first (including at least one failure); 15 points for multiresolution blending and the Fourier analysis; 5 points for including at least two multiresolution blending examples beyond the apple+orange, one of them with an irregular mask! 5 points for clarity.
You can also earn up to 30 extra points for the bells & whistles mentioned above
or suggest your own
extensions (check with prof first).
Acknowledgements
The hybrid images part of this assignment is borrowed
from Derek Hoiem's
Computational Photography class.
 Programming Project #3 (proj3)