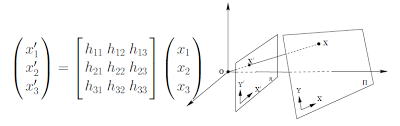
Panoramas with Automatic Stitching

George Geng

Part 1


In the first part of this project I explore the powerful properites of homographic transformations, which can be used to create neat effects such as panoramic images.

Computing the Homography

Homographic Transformation

 
Given a set of at least 4 input points, and a target set of corresponding points, we can find the homography H. We begin with the following equation:
$\begin{bmatrix} a & b & c \\ d & e & f \\ g & h & 1 \end{bmatrix} \begin{bmatrix} x \\ y \\ 1 \end{bmatrix} = \begin{bmatrix} wx' \\ wy' \\ w \end{bmatrix}$

 
With a little bit of linear algebra, we can find the following equation to solve for the elements of H:
$\begin{bmatrix} x & y & 1 & 0 & 0 & 0 & -xx' & -yx' \\ 0 & 0 & 0& x& y & 1 & -xy'& -yy' \end{bmatrix} \begin{bmatrix} a \\ b \\ c\\ d\\ e\\ f\\ g\\ h \end{bmatrix} = \begin{bmatrix} x' \\ y' \end{bmatrix}$

 
When we use more than 4 points, we use least squares approximation. In general, the more points the better for aligning images.

Image Rectification

Once I found the homography, we can rectify images if we specify points we would like to transform and the final points of the transformation. Here I test it on a rectangle that doesn't look so rectangulary at first.

Rect

Rectified Rect

 
I tried it also on one of my favorite illustrated books, based on one of my favorite short animated films, The Dam Keeper .


Panorama

Now, I can stitch together photos into a panoramic mosaic. First, I warp one image to another's perspective plane. Here are some pictures of Berkeley's mural.


Although the images are aligned in the correct perspective, there are a lot of artifacts in the overlap region. I resolve this by blending images with a linear alpha blend.
Mural Panorama

 
Here, are some lovely pictures of the Elmwood District, where you'll find Ici's icecream parlor and a bird store! I did not expect the panorama to turn out this successfully, due to the incoming sunglight from the left and the drastically different lighting conditions of the original image. However, linear alpha blending seemed to take care of this very nicely.


Elmwood Original
Elmwood Cropped

 
I added a third image to the panorama on the right. However, you see more distortion on the left because the left two images are shifted into the perspective plane of the third addition.
Elmwood Distortion

 
A remedy I have not explored yet would be to warp the rightmost image towards the center in this case, instead of warping images from the left to the right.

Part 2


Previously, I had the user define correspondances between the two images, which were used to compute the homography transformation. This required relying on manual input to find matching features between the two images. However, now I can automate this process by implementing the algorithms described in “Multi-Image Matching using Multi-Scale Oriented Patches” by Brown et al.
The algorithm itself is quite simple, but takes several stages of pruning to find good correspondance points for the homography. I first took the previous pictures from Elmwood which I had previously performed manual stitching and mosacing on, and then first find the Harris corners, with a threshold of 0.01.


However, this gives us too many points. To filter out some of the points and eliminate false positives, I implemented adaptive non-maximal supression (ANMS). For every Harris point $p_i$, I find it's supression radius $r_i$, which is the smallest distance between $p_i$ and a point $p_j$ such that the corner strength of $p_i$ happens to be less than $c$ times the corner strength of $p_j$, that is $f_h(p_i) < c * f_h(p_j)$. Here, $c$ is calibrated to be 0.9. By selecting the largest 250 points with the largest supression radii, we get the pointswhich exhibit the maximal corner strengths compared to all the points in an area around them. The result of performing AMNS on my previous Elmwood images are shown below.


See how we have reduced the number of potential points significantly. Now, I implement feature matching. I extract descriptors from each image by downsampling a 40 x 40 patch aronud each point into an 8 x 8 patch with bilinear interpolation, then normalize the patch such that the pixels have a mean of 0 and a stdv of 1. From there, I match features by computing the SSD between descriptors, matching two patches only where the first best SSD is significantly larger than the 2nd best by a calibrated threshold to get rid of false positives. The result of feature matching between our images is shown below.


Still, at this stage, we are left with some outliers. We do have some good matches, such as the back wheel of the grey van. But note that some of the features that were selected, corners of the buildings in particular, resemble each other but do not actually signify a correspondance. We can do our best guess at finding the "inliers" using the RANSAC algorithm, to find our best guess for the 4 correspondance points. The results are shown below for 10,000 iterations.


Because of the harsh lighting in this scene and the complexity going on, as well as the reflections of objects in the mirror, it took several tries for RANSAC to find a suitable pair of points. I fine tune this by adjusting the margin threshold, but believe that everything would work better still with better lit photographs of another scene with less complexity. Finally, we can find the transformations and warp the images just as before in part 1.
Autostitch Elmwood