Pass low-frequency and high-frequency filters to two images separately to have a hybrid image
Blend two images applied with filter stack with a mask applied with filter stack to have smooth blending effects.
In this part, we can import a blurry image and apply gaussian filter on it to detect followed by this equation
Challenge: I downloaded a picture of Emma Stone and first applied a gaussian filter with sigma=2, kernel=5, and it works pretty well. Then I was happy to use my photography to be sharpened. However, the effects were so bad. Then I realized that my photo's size is big, so I shoul try to increase sigma and kernel size a lot. Then I get this:


Emma Stone, from left to right: original, gaussian filtered, edge detected, sharepened


The Scream(by Edvard Munch) from left to right: original, gaussian filtered, edge detected, sharepened
I spent much time to search some cute pictures to work for this section. The idea is to use a low-frequency filter on one image and a high-frequency filter on another, and then hybrid them together into one. Therefore, you will have very distinct visual effects depending on your distance to the image.

Low pass (sigma 10 kernel 20): Sheldon, High pass(sigma 20, kernel 40): Spock

Low pass (sigma 5 kernel 10): Kid Hermione, High pass(sigma 10, kernel 20): Old Hermione
This one contains both time change and facial expression change. The kid Hermione is smiling and happy, but mature Hermione is still super cool!

Low pass (sigma 15 kernel 30): panda, High pass(sigma 30, kernel 60): red panda
This set aligns so well because of the picture quality and so far is my favorite!


I did a frequency analysis on the black and white hybrid of yound and old Hermione. The sigma for low pass is 10, and for high pass is 20. The kernel size is 20 and 40 respectively. The gallery displays the log magnitude of the Fourier transform of the two imput images, the filtered images(low pass and high pass), and the hybrid image.


Kid Hermione, Old Hermione, filtered Kid Hermione, filtered Old Hermione, Hybrid Image
In this section, we simply make a stack of filtered images, each of which is used some filter, gaussian or laplacian, with different sigma and kernel values. Thanks to some genius artists, like Dali and , we have artworks that were created with . Check out this cool gaussian stack:


I also created a stack of proper clipped laplacian stack which I could barely see something


At the same time, my naive coding skills yielded me some really aesthetic pictures of laplacian stack because I had forgot to clip the element limit values. They are visually COOL!!!


From last part, we know how to build a gaussian stack or a laplacian stack. Then in this section, we adopted the idea in this paper (page ) to implement multi-resolution blending.
First, we need to I also blended my favorite pad thai and spaghetti. True fusion dish! Also check out my jupyearth and enjoy the beauty of universe!


Left:Apple Middle:BW Orapple, Color Orapple Right: Orange


Left:Spaghetti Middle:BW Padghetti, Color Padghetti Right: Pad Thai


Left:Earth Middle:BW Jupyearth, Color Jupyearth Right: Jupiter


Left:Desert and Beach Middle:Desert surf on beach? Right: irregular mask
For this set, I constructed an irregular mask using np.triu_indices to fill 1 into the matrix. Due to the images do not match perfectly, the blended effect of surfing (aka walking on a desert hill) does not look convincing.
In this part, we walk through a toy example with a toy image to set up a linear system of equations and reconstruct the toy image from itself.
In this part, we select a source image and target image, trying to blend some part of the source image into the target image seamlessly.
In this part, we want to reconstruct a image, that is to say, from itself to itself. I set up a linear system by inserting contraints, aka, building the sparse matrix A for the coefficients of v. The most challenging part is indexing. To understand the contraints, we then can utilize a indexing matrix (im2var) to help us build the sparse matrix A.


Left: Orginal toy image, Right: Reconstructed toy image
This is so far the most challenging part of the project for me. I first thought I had understood: I just need to use the sparse matrix of A to blend. Obviously, I was too naive. From the above part, we only constrained the first half of the equation plus a top left corner. Then my result blended image was really blurry on border. Then I reread, aha, I need to add another set of contraints to build the linear system of equations. I thought I understood again. But what exactly is my t, s, v? I got so many outputs from the starter code. Thanks to all the staff, Mrina and Piazza people, I figured out that I used the wrong inputs. Ok, all materials prepared, what's next?
MATH!
Thanks to myself, a math major with all-time stubborn soul to make mathematical understanding before implementation try-outs. I finally built the sparse matrix for solving v with proper number of contraints rows and put 1 or -1 at proper position.

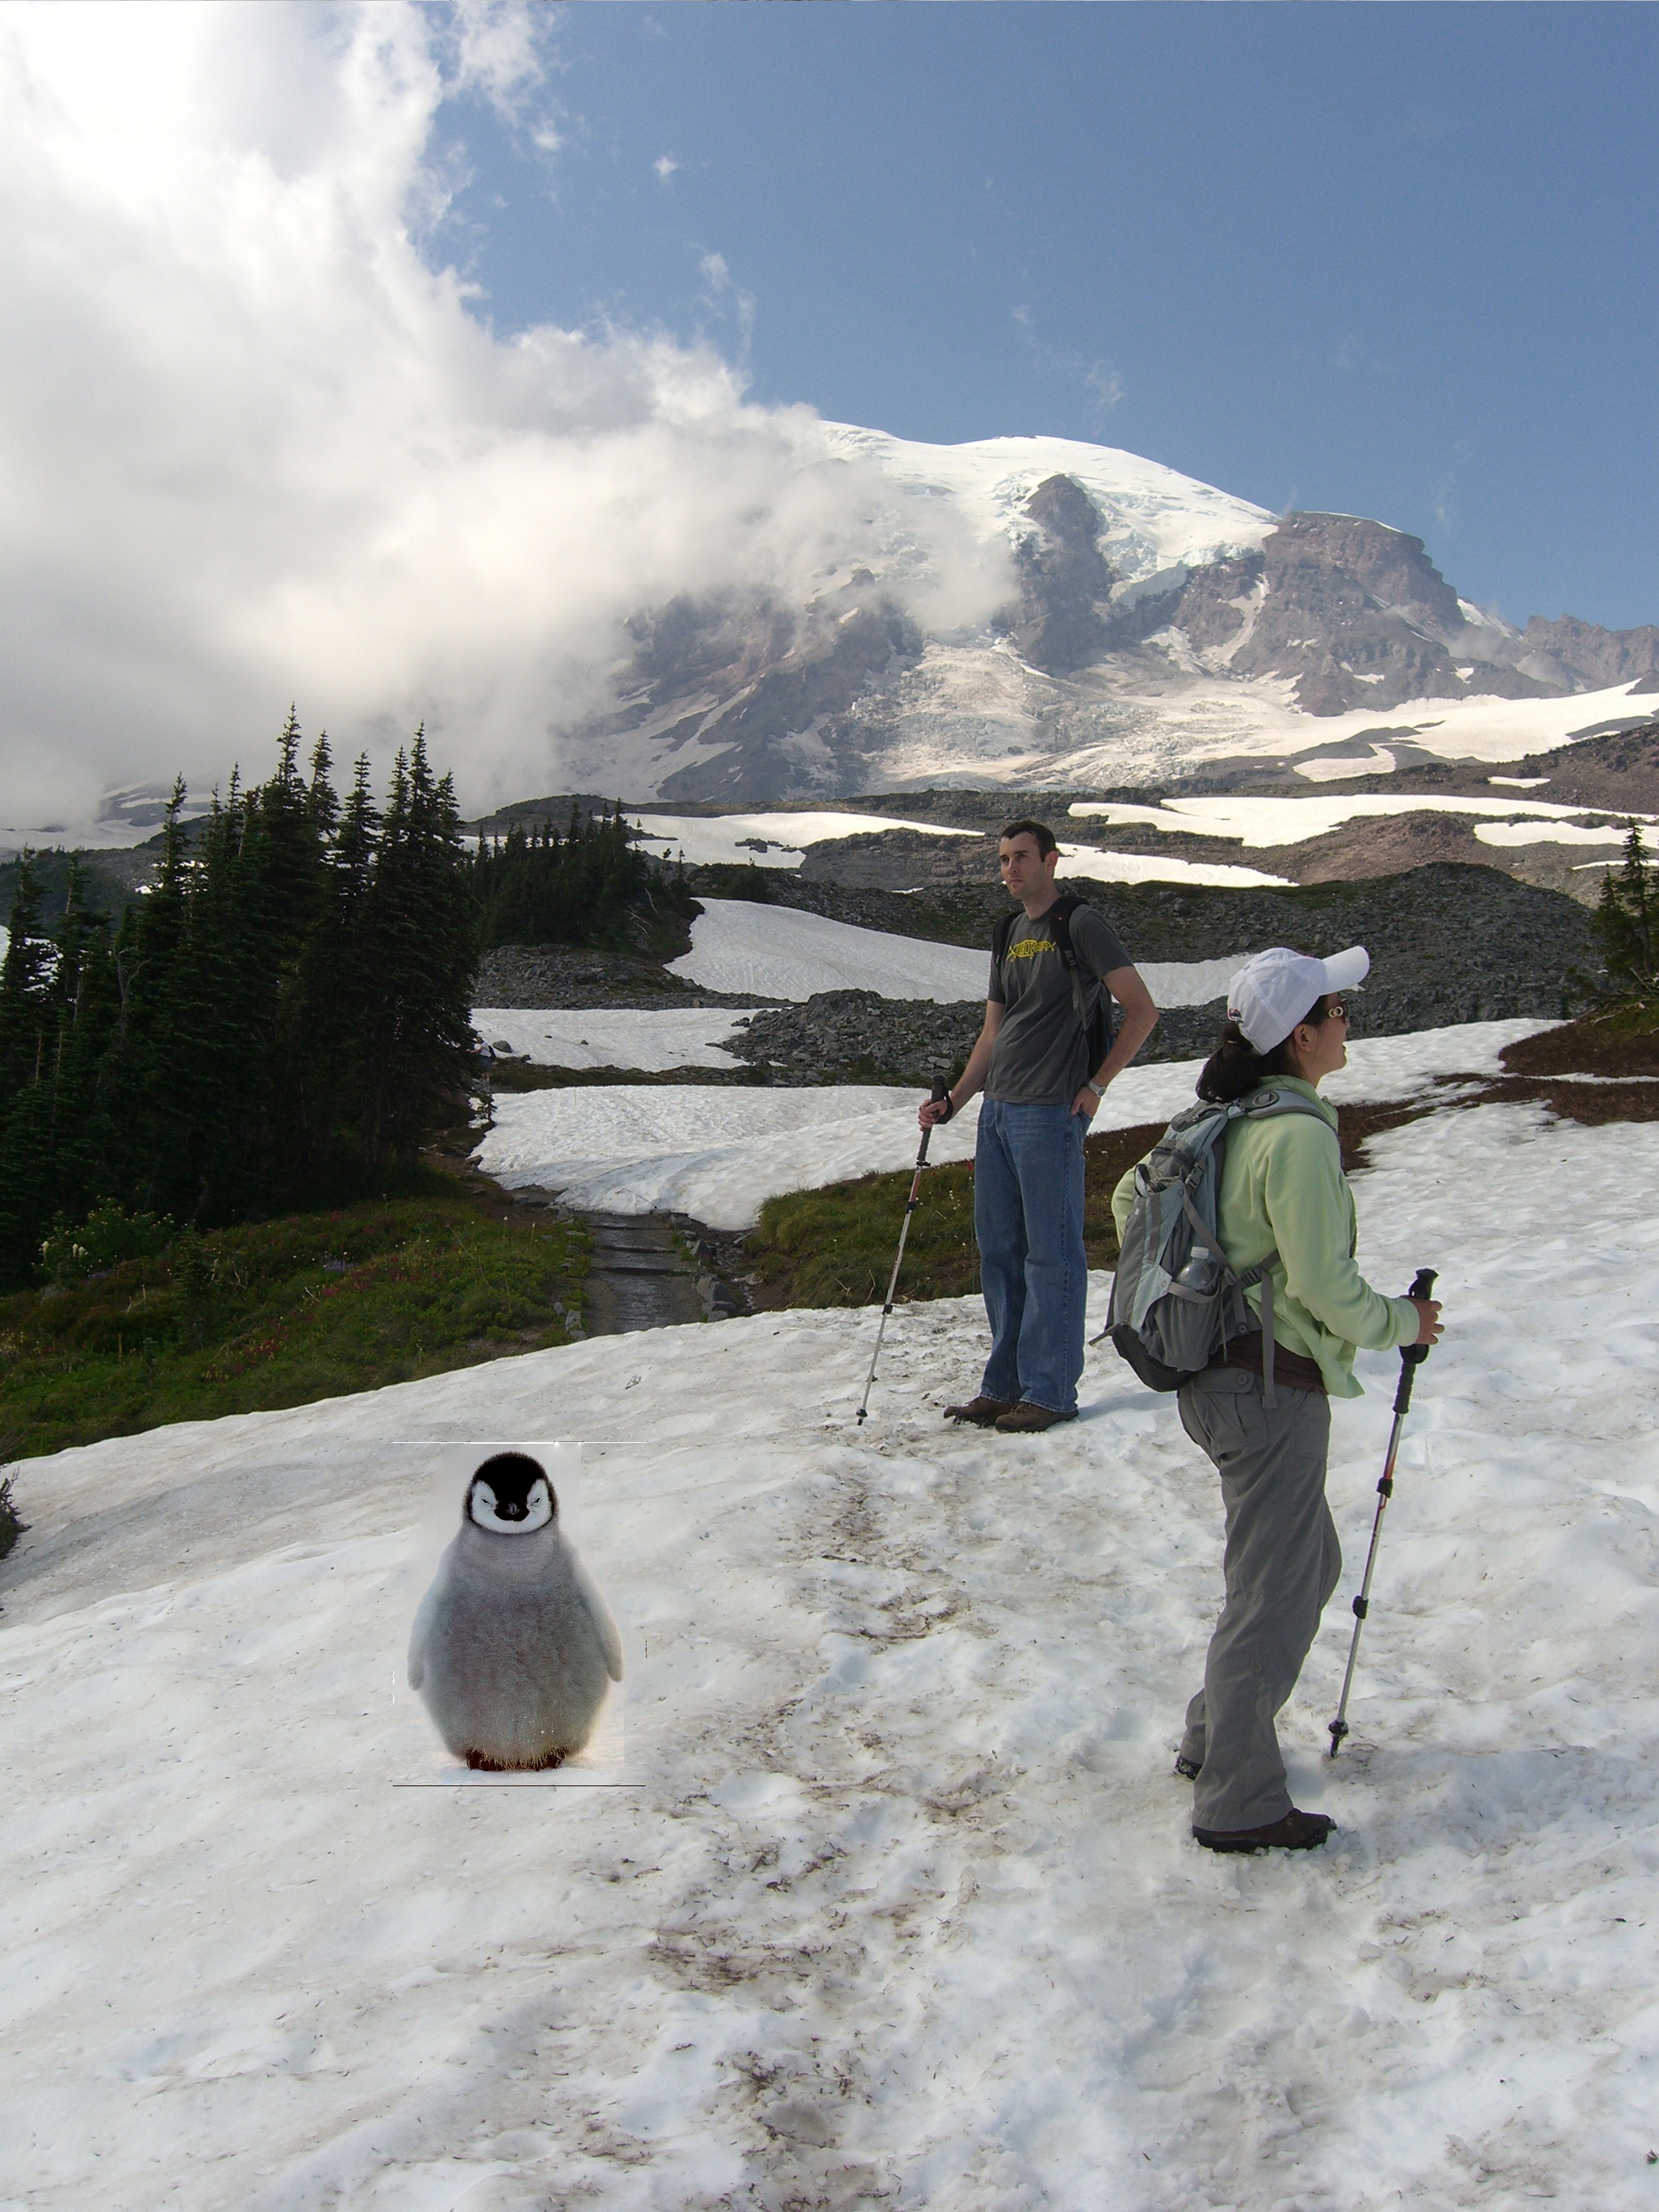


After figuring out the math at 2am in Cory Hall, I first plotted out a black and white picture. It looks pretty nice, so I modified the implementation to go through each color channel. You can see one with little kid penguin and another with giant penguin with the same background because I thought I used another but not... However, I always like zooming in photo for fun. Then I realized there is an issue in the images, there one thin line at the top (white) and another at bottom (black). I removed conditions for the first line of pixel but it did not solve the problem. Therefore, I suspect that I might have some off-by-1 issue somewhere else.
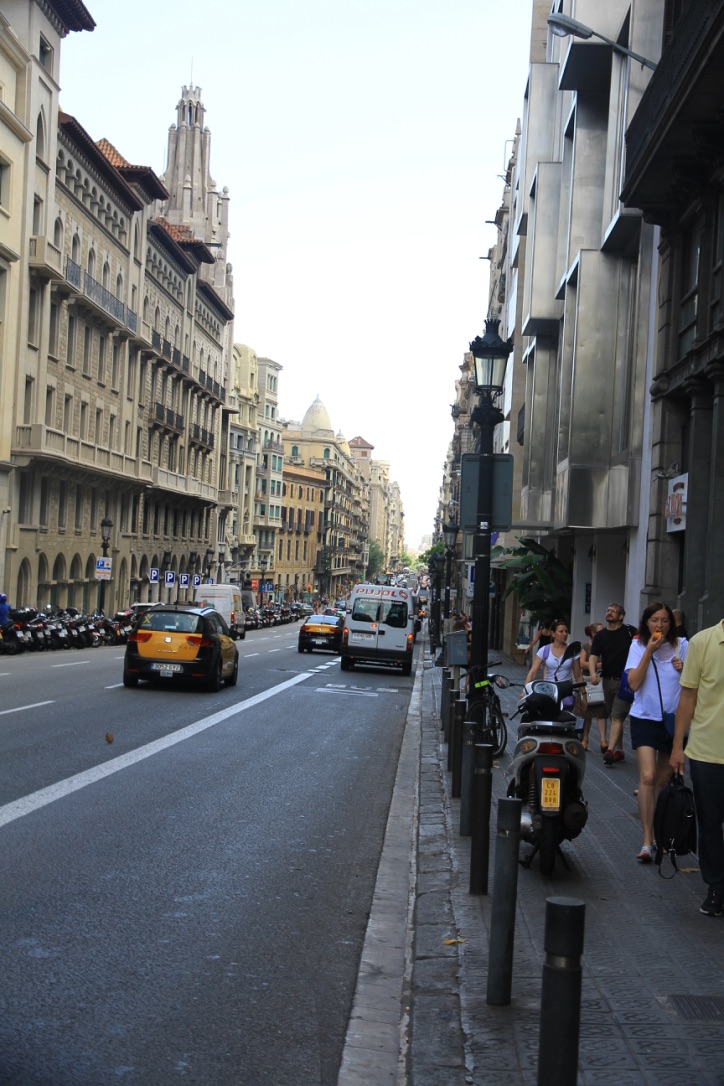


I blended a happy walking oski on the street in Barcelona. However because the original image has a noisy background, the final blended image looks a bit weird. The similarity of background between source and target images is very important!


Left, Middle: Multi resolution blending Right: Poisson Blending
Though I do not have a color version for multiresolution blending, I believe it better than the poisson blending in this case. Poisson blend still results in some non-smooth pattern at the transition area.
Update: After some sleep and reread the paper, I finally got the idea to color my image. Indeed, I found I might have a misunderstanding of the stack before. But now everything gets color!!! I still found the multi-resolution is better, look at that shrimp! Also the plate color changed with poisson blending, or my bug because of jumping back and forth with cv2 and matplotlib...

Since I went over the duedate and even slip days anyway, I went straight to the mixed gradients this afternoon. I modify my contraints implementation from poissoin blending to the new equation. But it does not look very well from the result. The color channel also gets messed. Again, I went back to read the hint to suggest using a plain background writing picture. Therefore, I am waiting for the new attempt to see any improvements because of the input data (or crash my laptop) (which I did 8 times in this project before vectorizing stuff)
It has been a super busy week for me and I again ran into bad ETA issue. But I really really love this project and hope to work out other parts later. I just fell asleep... when wrapping up this webpage and convert all my notebooks into .py files. I ran out of coffee at home to stay awake. Ooops what I am typing now. Many thanks to all people, images and buildings who supported me to grow up from a baby coder. Now I need to find some tea to know what I am doing now...
Update: I am still waiting for the result for the mixed gradient and my laptop seems to burn... This is my first time to write a webpage other than a plain html, check project 1 for my first plain html work... Though I used a really nice book but I still could not change all the parts that I want. I hope you enjoy my work, some bugs, math (linear algebra!) in the project, and cool arts!
BTW, I started to blog random stuff bilingually MiAN.Z


