Final Project
CS194-26: Image Manipulation and Computational Photography
Xin Chen afh
Seam Carving
Overview
The goal of this project is to do a simple implementation of the seam carving algorithm described in the Seam Carving for Content-Aware Image Resizing paper by Shai Avidan and Ariel Shamir.
Implementation
Energy Function
As mentioned in the paper, we need to remove pixels in a judicious manner. In order to remove pixels that are unnoticeable, we need to use an energy function. We will first start using a very simple energy function as shown below:
where is an image.
We will use Sobel filters to compute the images gradients in x and y directions. Then, we will sum their absolute values to get our final energy function.
The original image(left), and the final energy function(right) is displayed below:


Optimal Seam using Dynamic Programming
1. Compute the Culmulative Minimum Energy
Next, we will use dynamic programming to compute the culmulative minimum energy . We will traverse the image from the second row to the last row and iterating from the left to the right in each row.
The for all possible 8-connected seams for each entry :
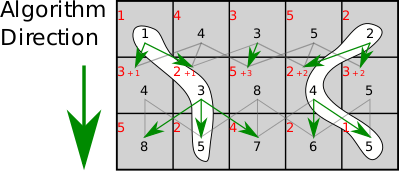
The graph below are graphs from Wikipedia page to demostrate how the dynamic programming algorithm work for vertical seam carving. Horizontal seams are similar.

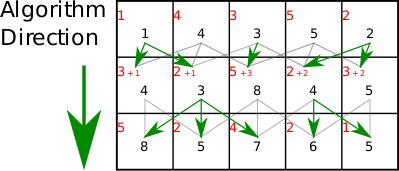
Backtrack
Now that we have , the minimum value of the last row in is the end of the minimal connected vertical seam. We will backtrack from this minimum entry to find the path for the optimal vertical seam.
Results
This image of the waterfall I got from the paper.
Horizontal carving by 300px; Vertical carving by 250px


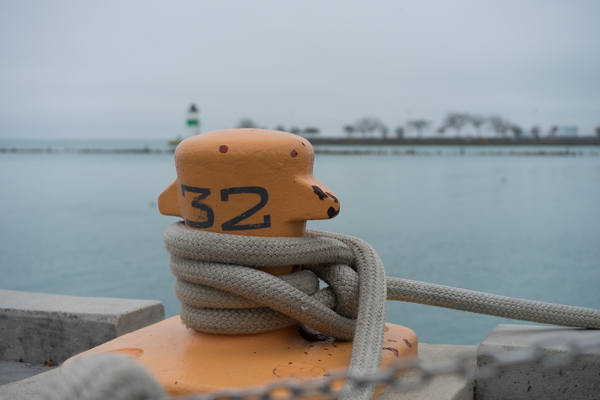
All the the images below are taken by myself with either a 35mm or 55mm prime lens straight out of the camera without any edits. Here are some results that show my implementation of seam carving. Most of the images are 600x400 with a few exceptions of slightly higher dimensions.
Horinzontal Carving only by 200px


Vertical Carving only by 100px.


Horizontal carving by 150px; Vertical carving by 100px


Horizontal carving by 150px; Vertical carving by 100px. I really enjoy the result of this one. Since the image is composed in a way such that the family is positioned relatively at the center and the edges of the image is comparatively empty(walls, roof and floor).


Horizontal carving by 100px; Vertical carving by 200px

Horizontal carving by 80px; Vertical carving by 210px


Horizontal carving by 300px and Vertical carving by 100px. We can see the result is not particulary satisfying as the road became very obviously distorted.

Horizontal carving by 100px; Vertical carving by 150px. This is an example image with artifact as the person in the photo gets distorted.


The Vertigo Shot
Overview
Vertigo shot(also know as Dolly Zoom) is acheived by zooming an optical zoom lens to adjust the field of view(FOV) while at the same time moving toward or away from the object. This technique was first introduced by Alfred Hitchcock in his film the Vertigo.
In this project, I will take a seqence of photos, changing the zoom and moving away or toward to the subject of my photos. For this project, I used a Sony A7II with a 28-70mm f3.5-5.6 zoom lens. The focal lens for each sequence may vary, but I've fixed the aperture to f5.6 to ensure consistent depth of view.
Results
The Cute Chick
I though it would be interesting to do a close up shot. So I chose the chick as my subject. To be able to see the change of FOV, I've placed the chick on a table in the kitchen. On the table, the chick is some distance away from the background, giving a pretty good shallow depth of field and blurring effect of the background while staying focused on the chick. The range of the zoom is 35-70mm for this sequnce. I've taken 12 photos in total for the sequence with focus length (starting at)35mm, 37mm, 39mm, 42mm, 46mm, 50mm, 53mm, 56mm, 64mm, 68mm, (ending at)70mm. To ensure that the chick stay relatively the same size throughout the sequence, I took the inital 35mm photo first, zoomed the lens to 37mm, moved away from the chick so that the chick looks relatively the same size as before, and do the same steps again. To move the camera smoothly, I put the camera on the book on a table and move that book accordingly. On the side of the table there is a table length ruler mearusing the distance from the camera to the chick to guarentee accuracy and good result of the vertigo shot.


Garage
For the next shot, I did it with the same lens and settings but on a tripod. When shotting, I used the "Maximum Vehicle Height" bar as a reference by looking at its relative size in the camera monitor with respect to the rule of third grids. I started with 28mm and I moved the camera back as I zoom the lens towards 70mm. I have taken 8 photos in the scene. As you can see, the result is somewhat worse than the previous one as it was very hard to adjust the angle of the camera as I move the camera when it's on a tripod. The result would be a lot better if I have an actual trolly.


Bells and Whistles
Assemble Sequence into Animcated GIFs
Try different combinations of moving the subject and camera.
I also tried to take a video with a DJI drone. Though the lens on the drone is not a zoom lens, I've seen videos online that can turn the footage into vertigo shot using Adobe Premiere. You can see the effect if you look closely at the tress in the video.