CS194-26 Project 1 - Xidong Wu
CS194-26: Computer Vision and Computational Photography
Project 1 - Images of the Russian Empire:
Colorizing the Prokudin-Gorskii photo collection
Xidong Wu
Overview
The goal of this project is to automatically generate a color image with image processing techniques according to the methods designed by Prokudin-Gorskii. The Python programming language is used.
Methodology
Blue filter
Green filter
Red filter
Basically, there are three photos of the exact same scene. Each has a different colored filter (Seen below). The main idea is to align the R, G, B layer images to get the final color image and the filter order from top to bottom is BGR. The two recommended metrics are SSD and NCC.
&space;=&space;\sum_{(x,y)\in&space;N}\left&space;[&space;I_{1}(u+x,v+y)&space;-&space;I_{2}(x,y)&space;\right&space;]^{2} "ssd(u,v) = \sum_{(x,y)\in N}\left [ I_{1}(u+x,v+y) - I_{2}(x,y) \right ]^{2}")
&space;=&space;\frac{\sum_{(x,y)\in&space;N}\left&space;[&space;I_{1}(u+x,v+y)&space;-&space;\bar{I_{1}}\right&space;]\left&space;[&space;I_{2}(x,y)&space;-&space;\bar{I_{2}}&space;\right&space;]}{\sqrt{\sum_{(x,y)\in&space;N}\left&space;[&space;I_{1}(u+x,v+y)&space;-&space;\bar{I_{1}}\right&space;]^{2}&space;\sum_{(x,y)\in&space;N}\left&space;[&space;I_{2}(x,y)&space;-&space;\bar{I_{2}}\right&space;]^{2}}} "ncc(u,v) = \frac{\sum_{(x,y)\in N}\left [ I_{1}(u+x,v+y) - \bar{I_{1}}\right ]\left [ I_{2}(x,y) - \bar{I_{2}} \right ]}{\sqrt{\sum_{(x,y)\in N}\left [ I_{1}(u+x,v+y) - \bar{I_{1}}\right ]^{2} \sum_{(x,y)\in N}\left [ I_{2}(x,y) - \bar{I_{2}}\right ]^{2}}}")
The SSD is used in this project. First, the input image is divided into three images of the same size. Then the image is cropped by 5% in the x direction while 2% in the y direction. The B layer works as the pivot. By exhaustively searching over a window of possible displacements, the displacement with the lowest SSD is used as the final displacement for R and G layer.
Results
Naive Solution for jpg image
First, we processed the JPG formate image. As mentioned in the methodology, I divided the input image and cropped it. I then rolled the image and the range of search is [-15,15] in both the x and y direction. Then I choose the displacement with the lowest SSD value. Finally, I applied that displacement vector to the original image and stack three channel images.
G Chanel Offset: (2, -3)
R Chanel Offset: (2, 3)
G Chanel Offset: (3, 3)
R Chanel Offset: (3, 6)
G Chanel Offset: (2, 5)
R Chanel Offset: (3, 12)
While this method works well for the JPG images with small sizes, this method is not suitable for TIF format pictures with much bigger sizes. I use the image pyramid to speed up the image proesssing.
Optimization - Image Pyramid
To process TIF images in a short time, the Image Pyramid method is introduced. An image pyramid represents the image at multiple scales with a factor of 2 in this project. The processing is done sequentially starting from the smallest image and going down the pyramid to the original images by recursion. The number of layer is set as 6 (From 5th layer to the 0th layer).
In order to further reduce processing time, we set different range of search in the different layer. The range of research in the smallest image is [-15, 15] while that for the original image is [-3, 3]. In the middle layer, the range is set as the [-10, 10]. The runtime is reduced to less than one minute. For this project, the range in the toppest layer could set as [-1,1] to further reduce runtime. But in order to imrpove generalization, I keep it as [-3, 3].
G Chanel Offset: (0, 53)
R Chanel Offset: (-12, 99)
G Chanel Offset: (24, 50)
R Chanel Offset: (-751, 36)
G Chanel Offset: (11, 53)
R Chanel Offset: (9, 112)
G Chanel Offset: (3, 35)
R Chanel Offset: (4, 98)
G Chanel Offset: (8, 82)
R Chanel Offset: (12, 179)
G Chanel Offset: (26, 52)
R Chanel Offset: (36, 109)
G Chanel Offset: (5, 44)
R Chanel Offset: (32, 93)
G Chanel Offset: (17,40)
R Chanel Offset: (23, 89)
G Chanel Offset: (29, 81)
R Chanel Offset: (36, 179)
G Chanel Offset: (16, 60)
R Chanel Offset: (13, 126)
G Chanel Offset: (8, 55)
R Chanel Offset: (10, 114)
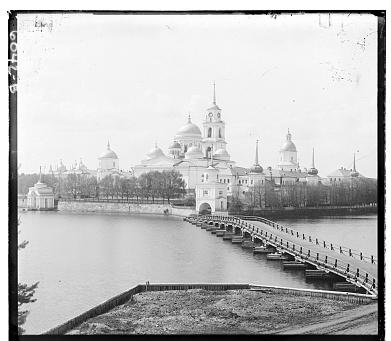
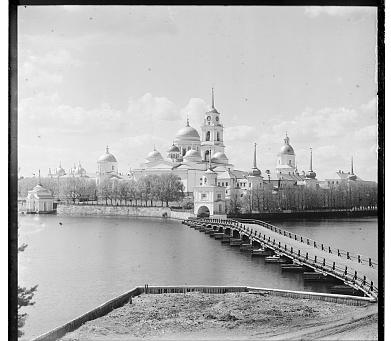
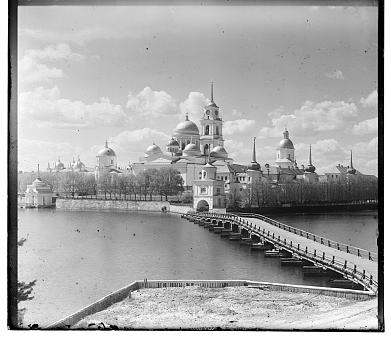
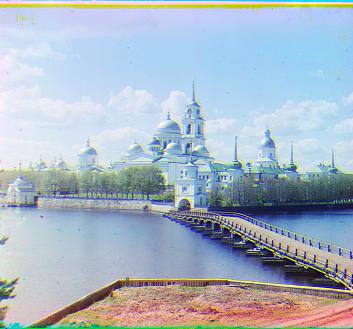
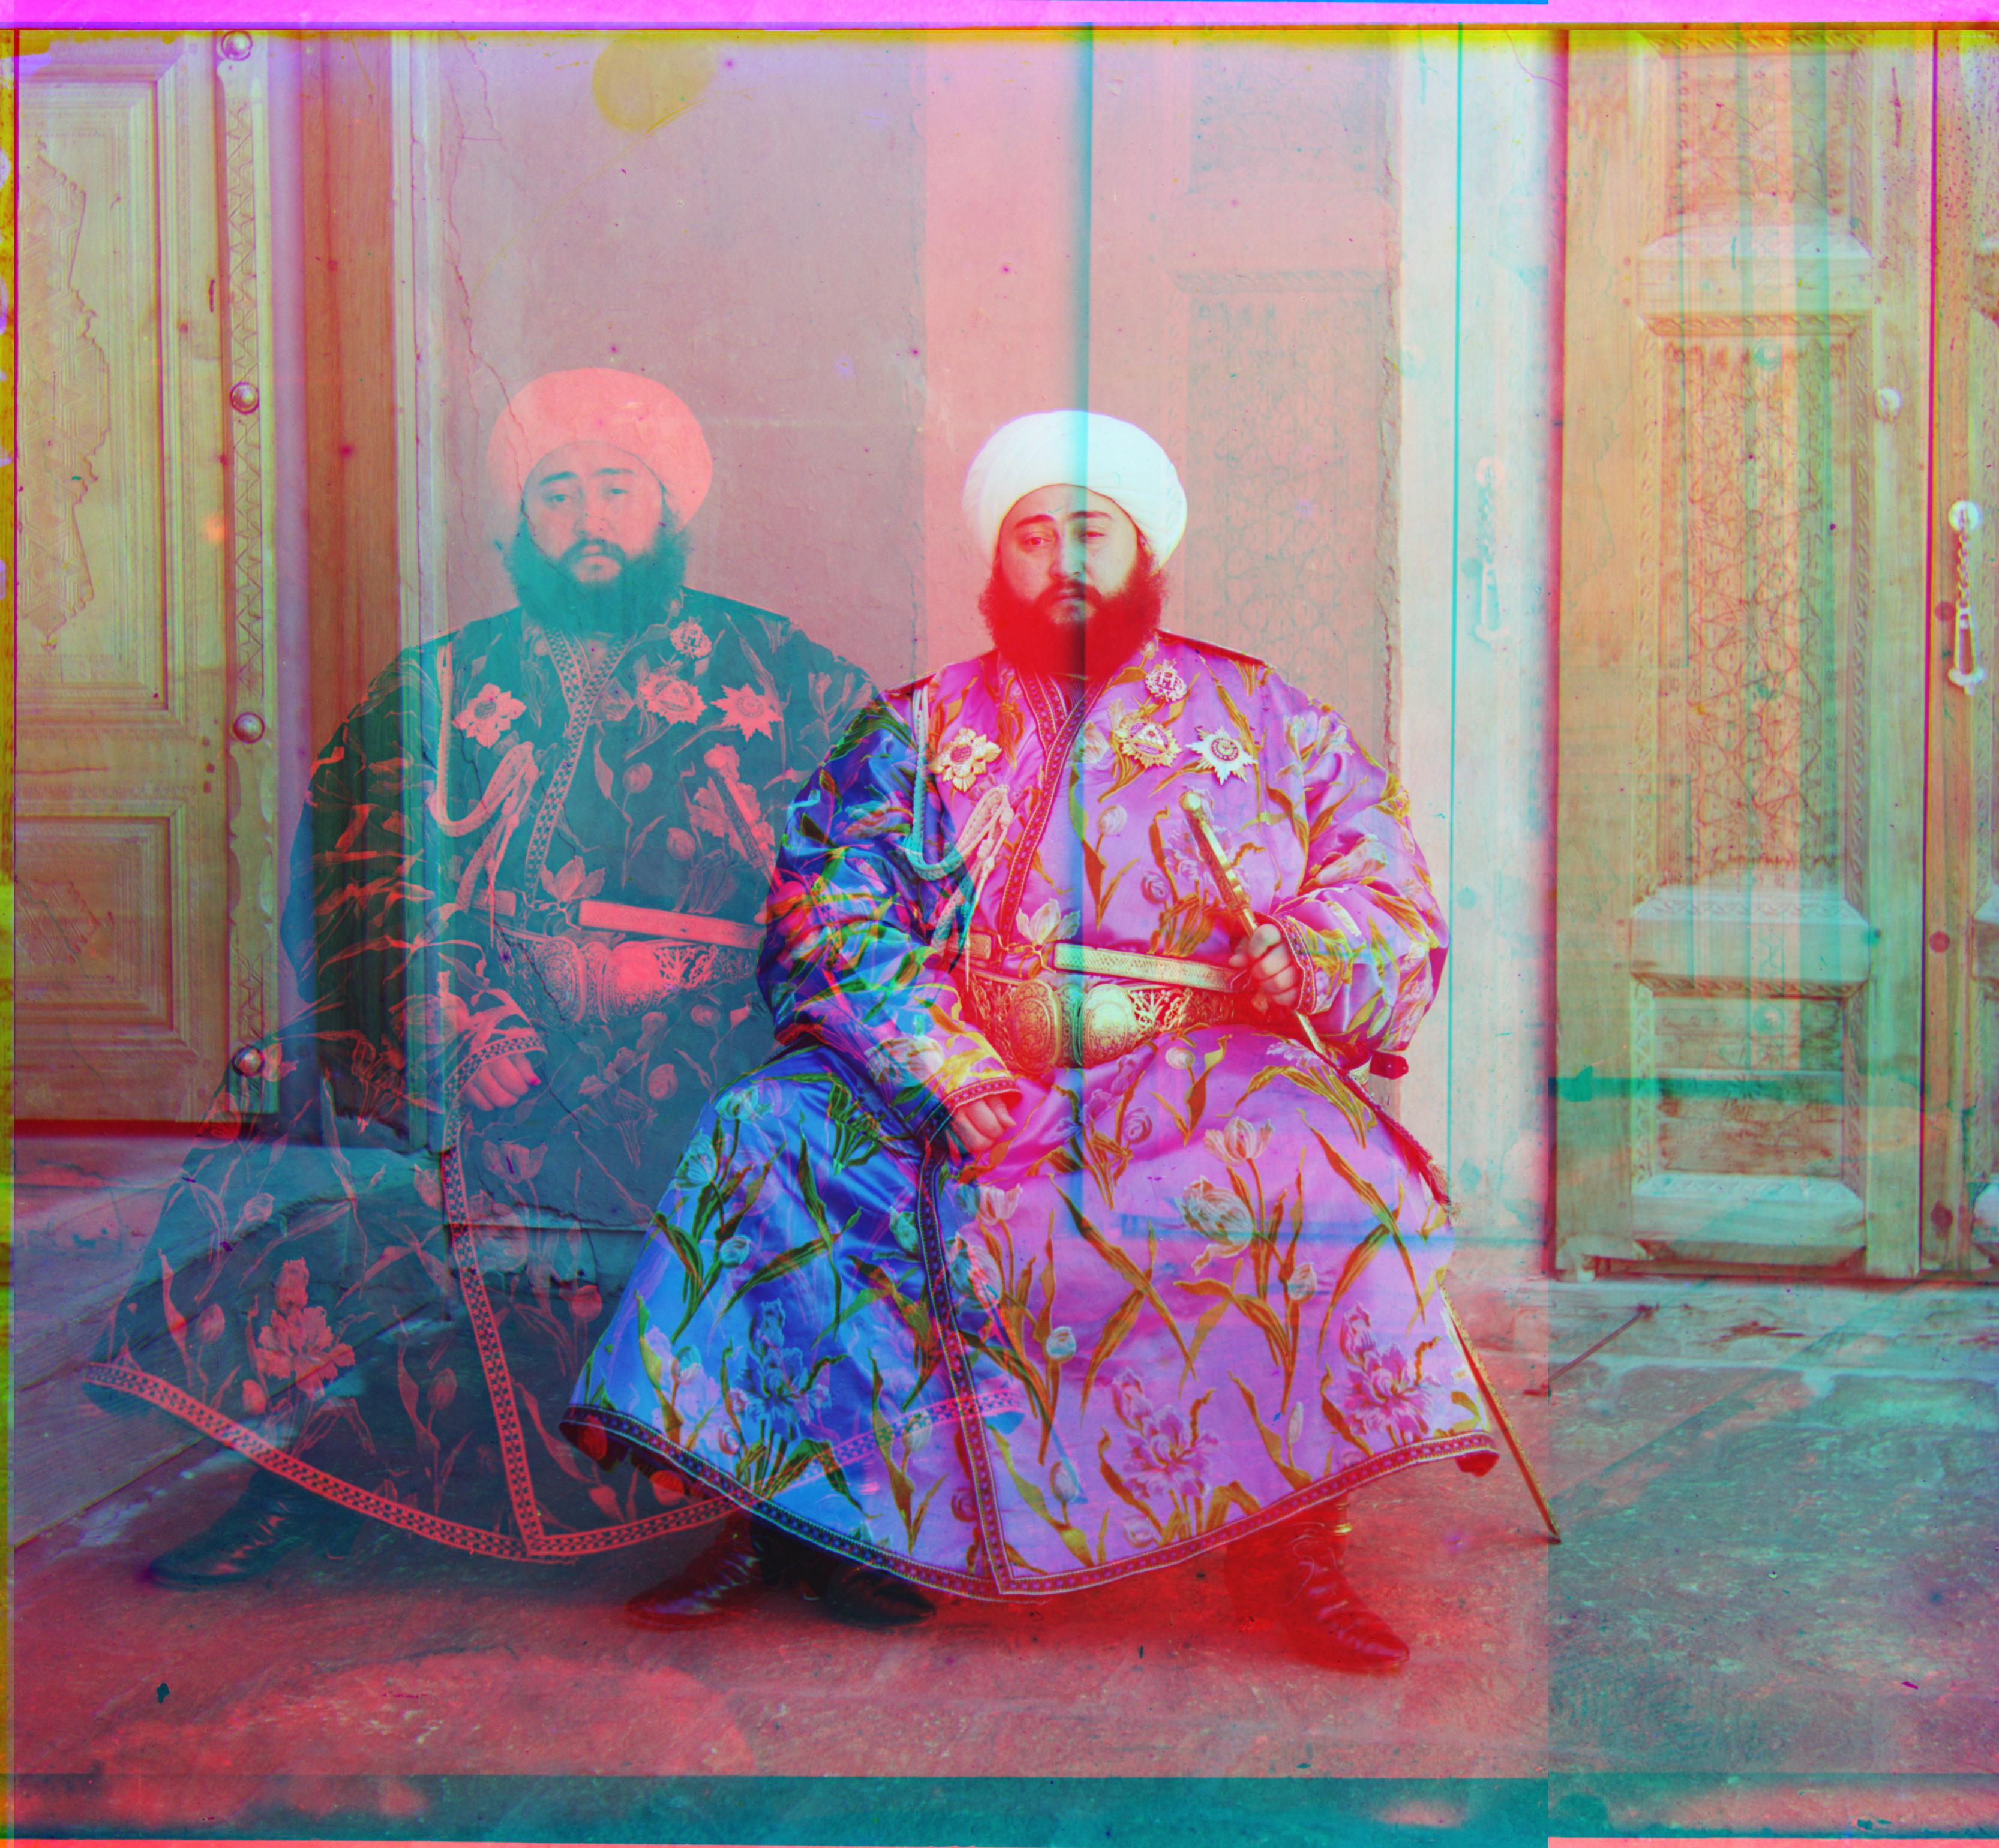
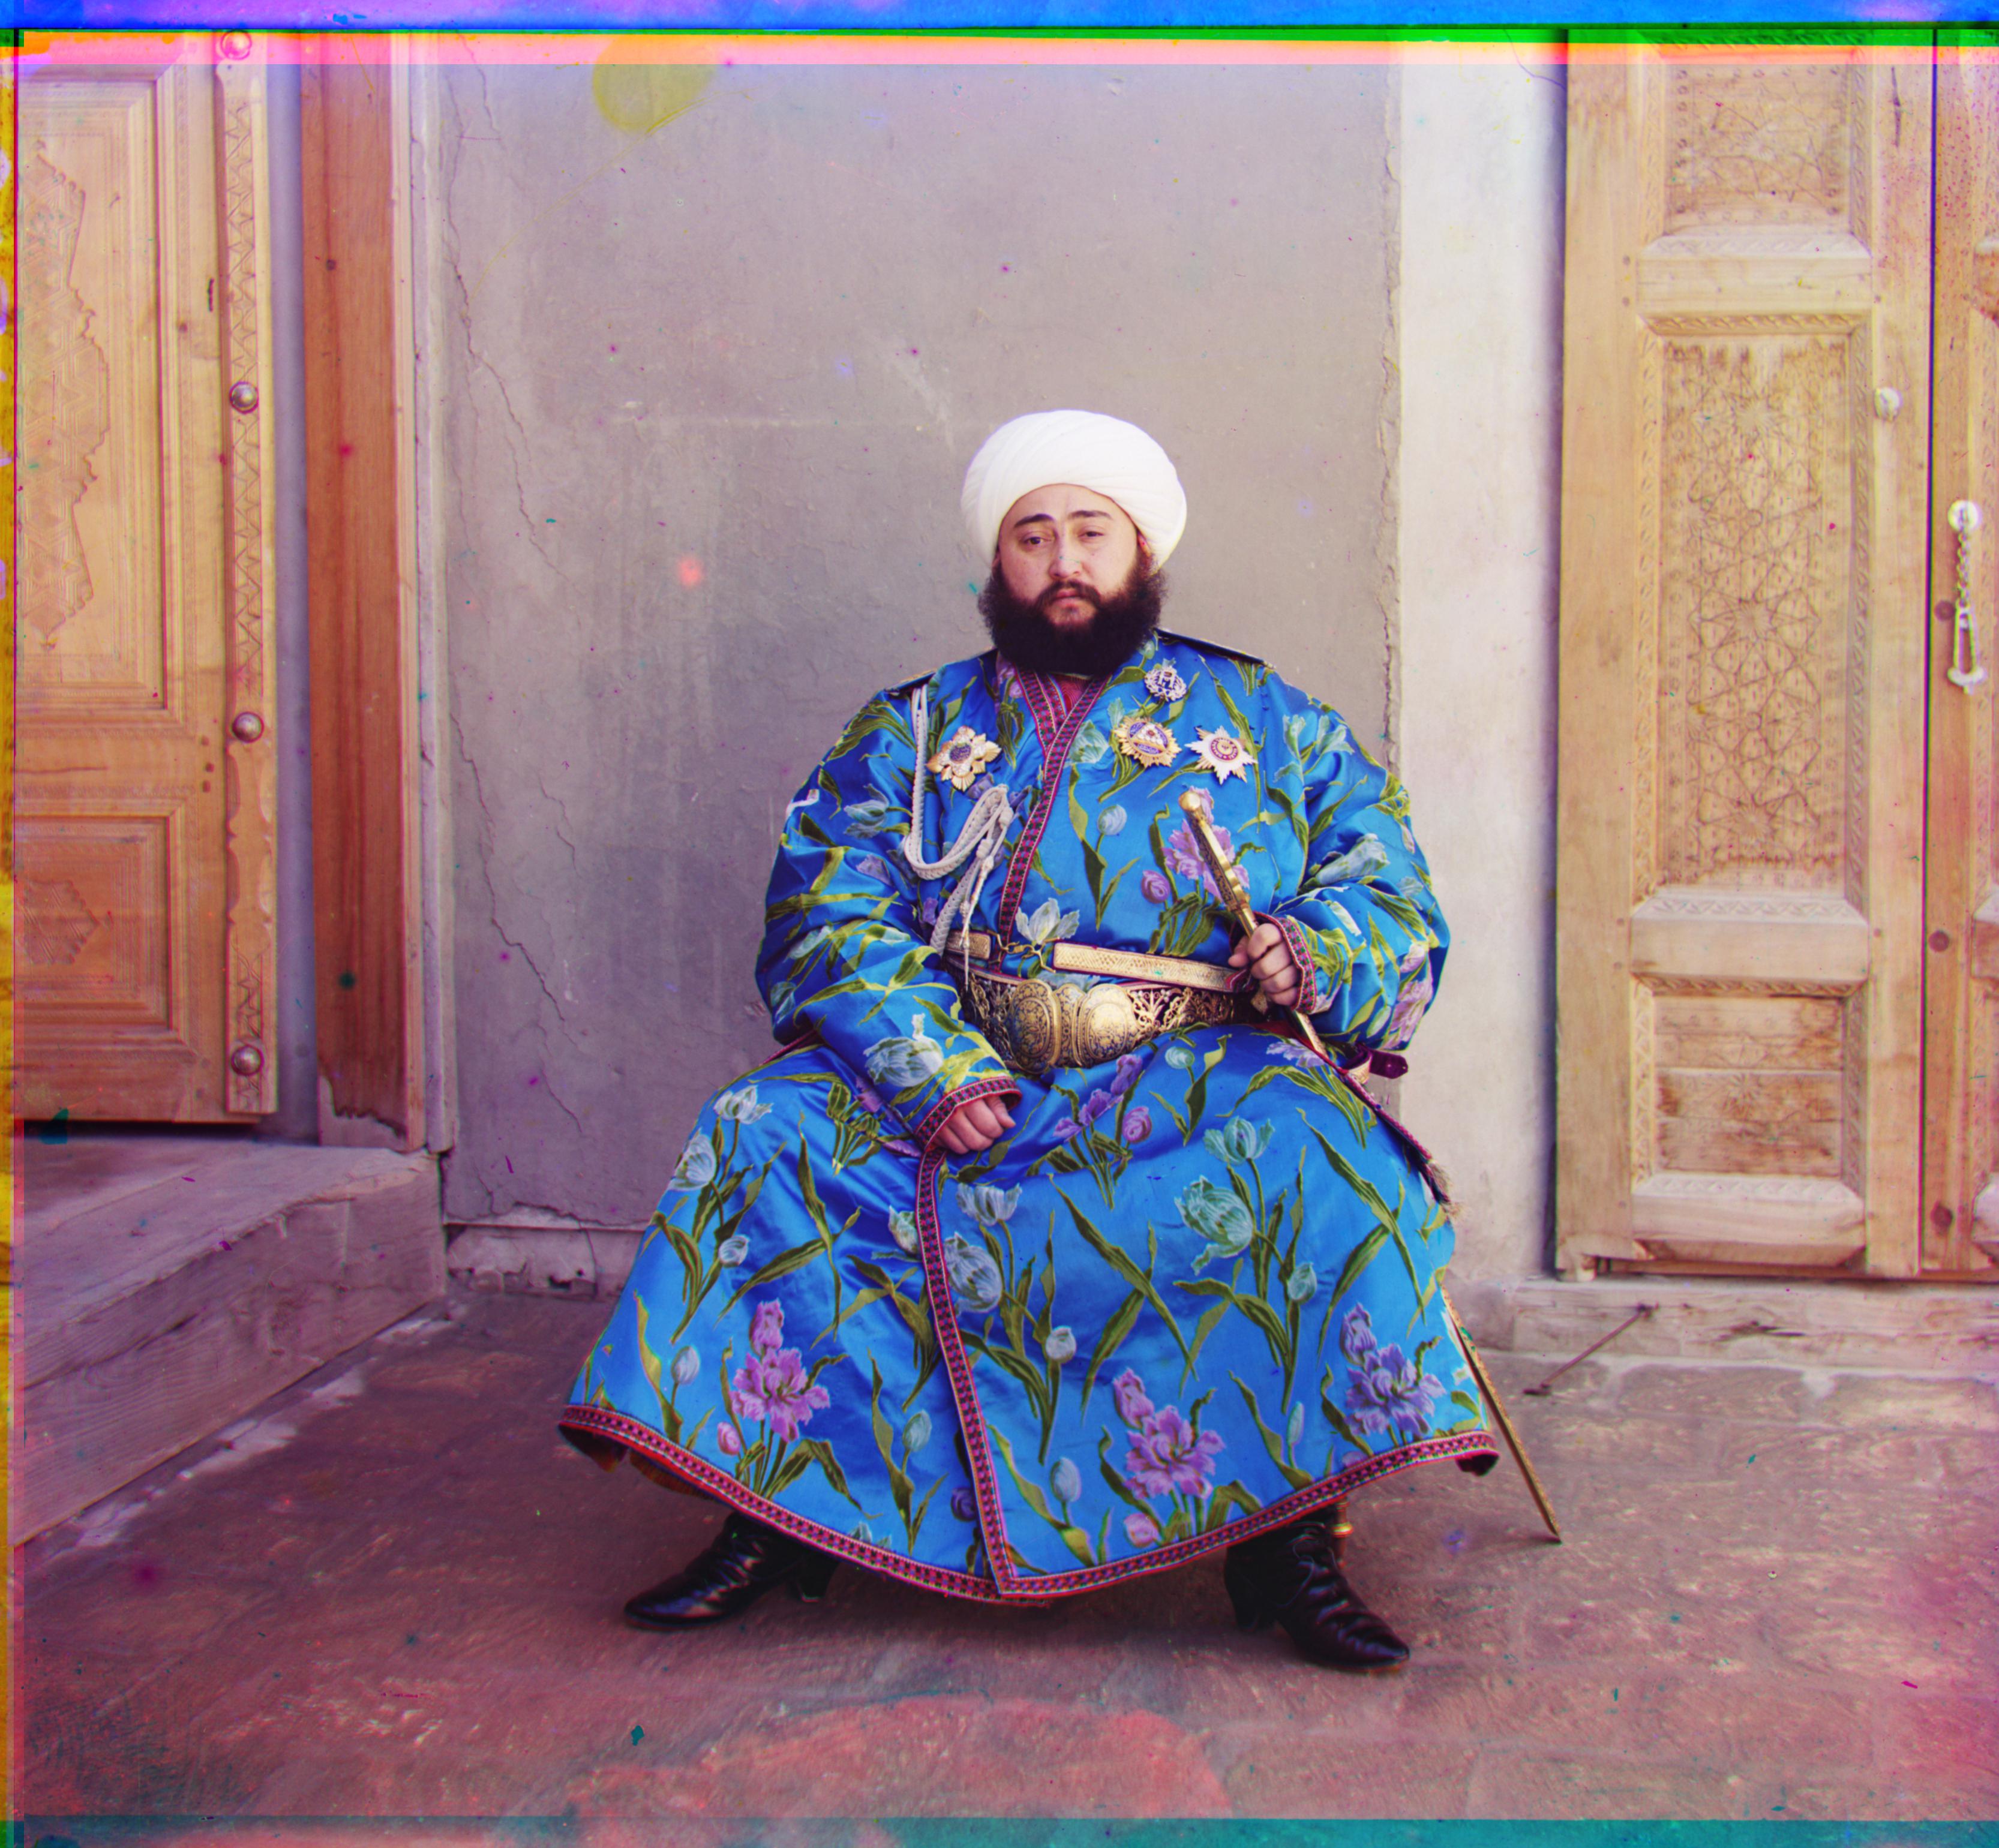
We could see that the image pyramid has a good performance except for the case of the Emir of Bukhar. It is because different color channels of this image do not actually have the same brightness values. So, new features need to be introduced to process this case.
Optimization - Image Gradient
I built the image gradient function with the Prewitt operator referring to Wikipedia [1]. The raw pixels matrix were convolved with the two 3×3 kernels and then we calculated the squre root of the sum of square of the matrix to get final feature matrix. I still used the SSD as the metric.
Previous result
Result with self-defined gradient
Result with OpenCV Sobel operator
 G Chanel Offset: (24, 50)
R Chanel Offset: (751, 36)
G Chanel Offset: (23, 49)
R Chanel Offset: (40, 107)
G Chanel Offset: (23, 49)
R Chanel Offset: (40, 107)
G Chanel Offset: (24, 50)
R Chanel Offset: (751, 36)
G Chanel Offset: (23, 49)
R Chanel Offset: (40, 107)
G Chanel Offset: (23, 49)
R Chanel Offset: (40, 107)
Bells & Whistles (Extra Credit)
1. Better Features: Although I impletmented the self-defined image gradient function, it took much time to finish convolution. I used the OpenCV Sobel operator [2] and it reduced time to less than one minute. The reulst is listed above and the displacement is the same with the result from the self-defined function.
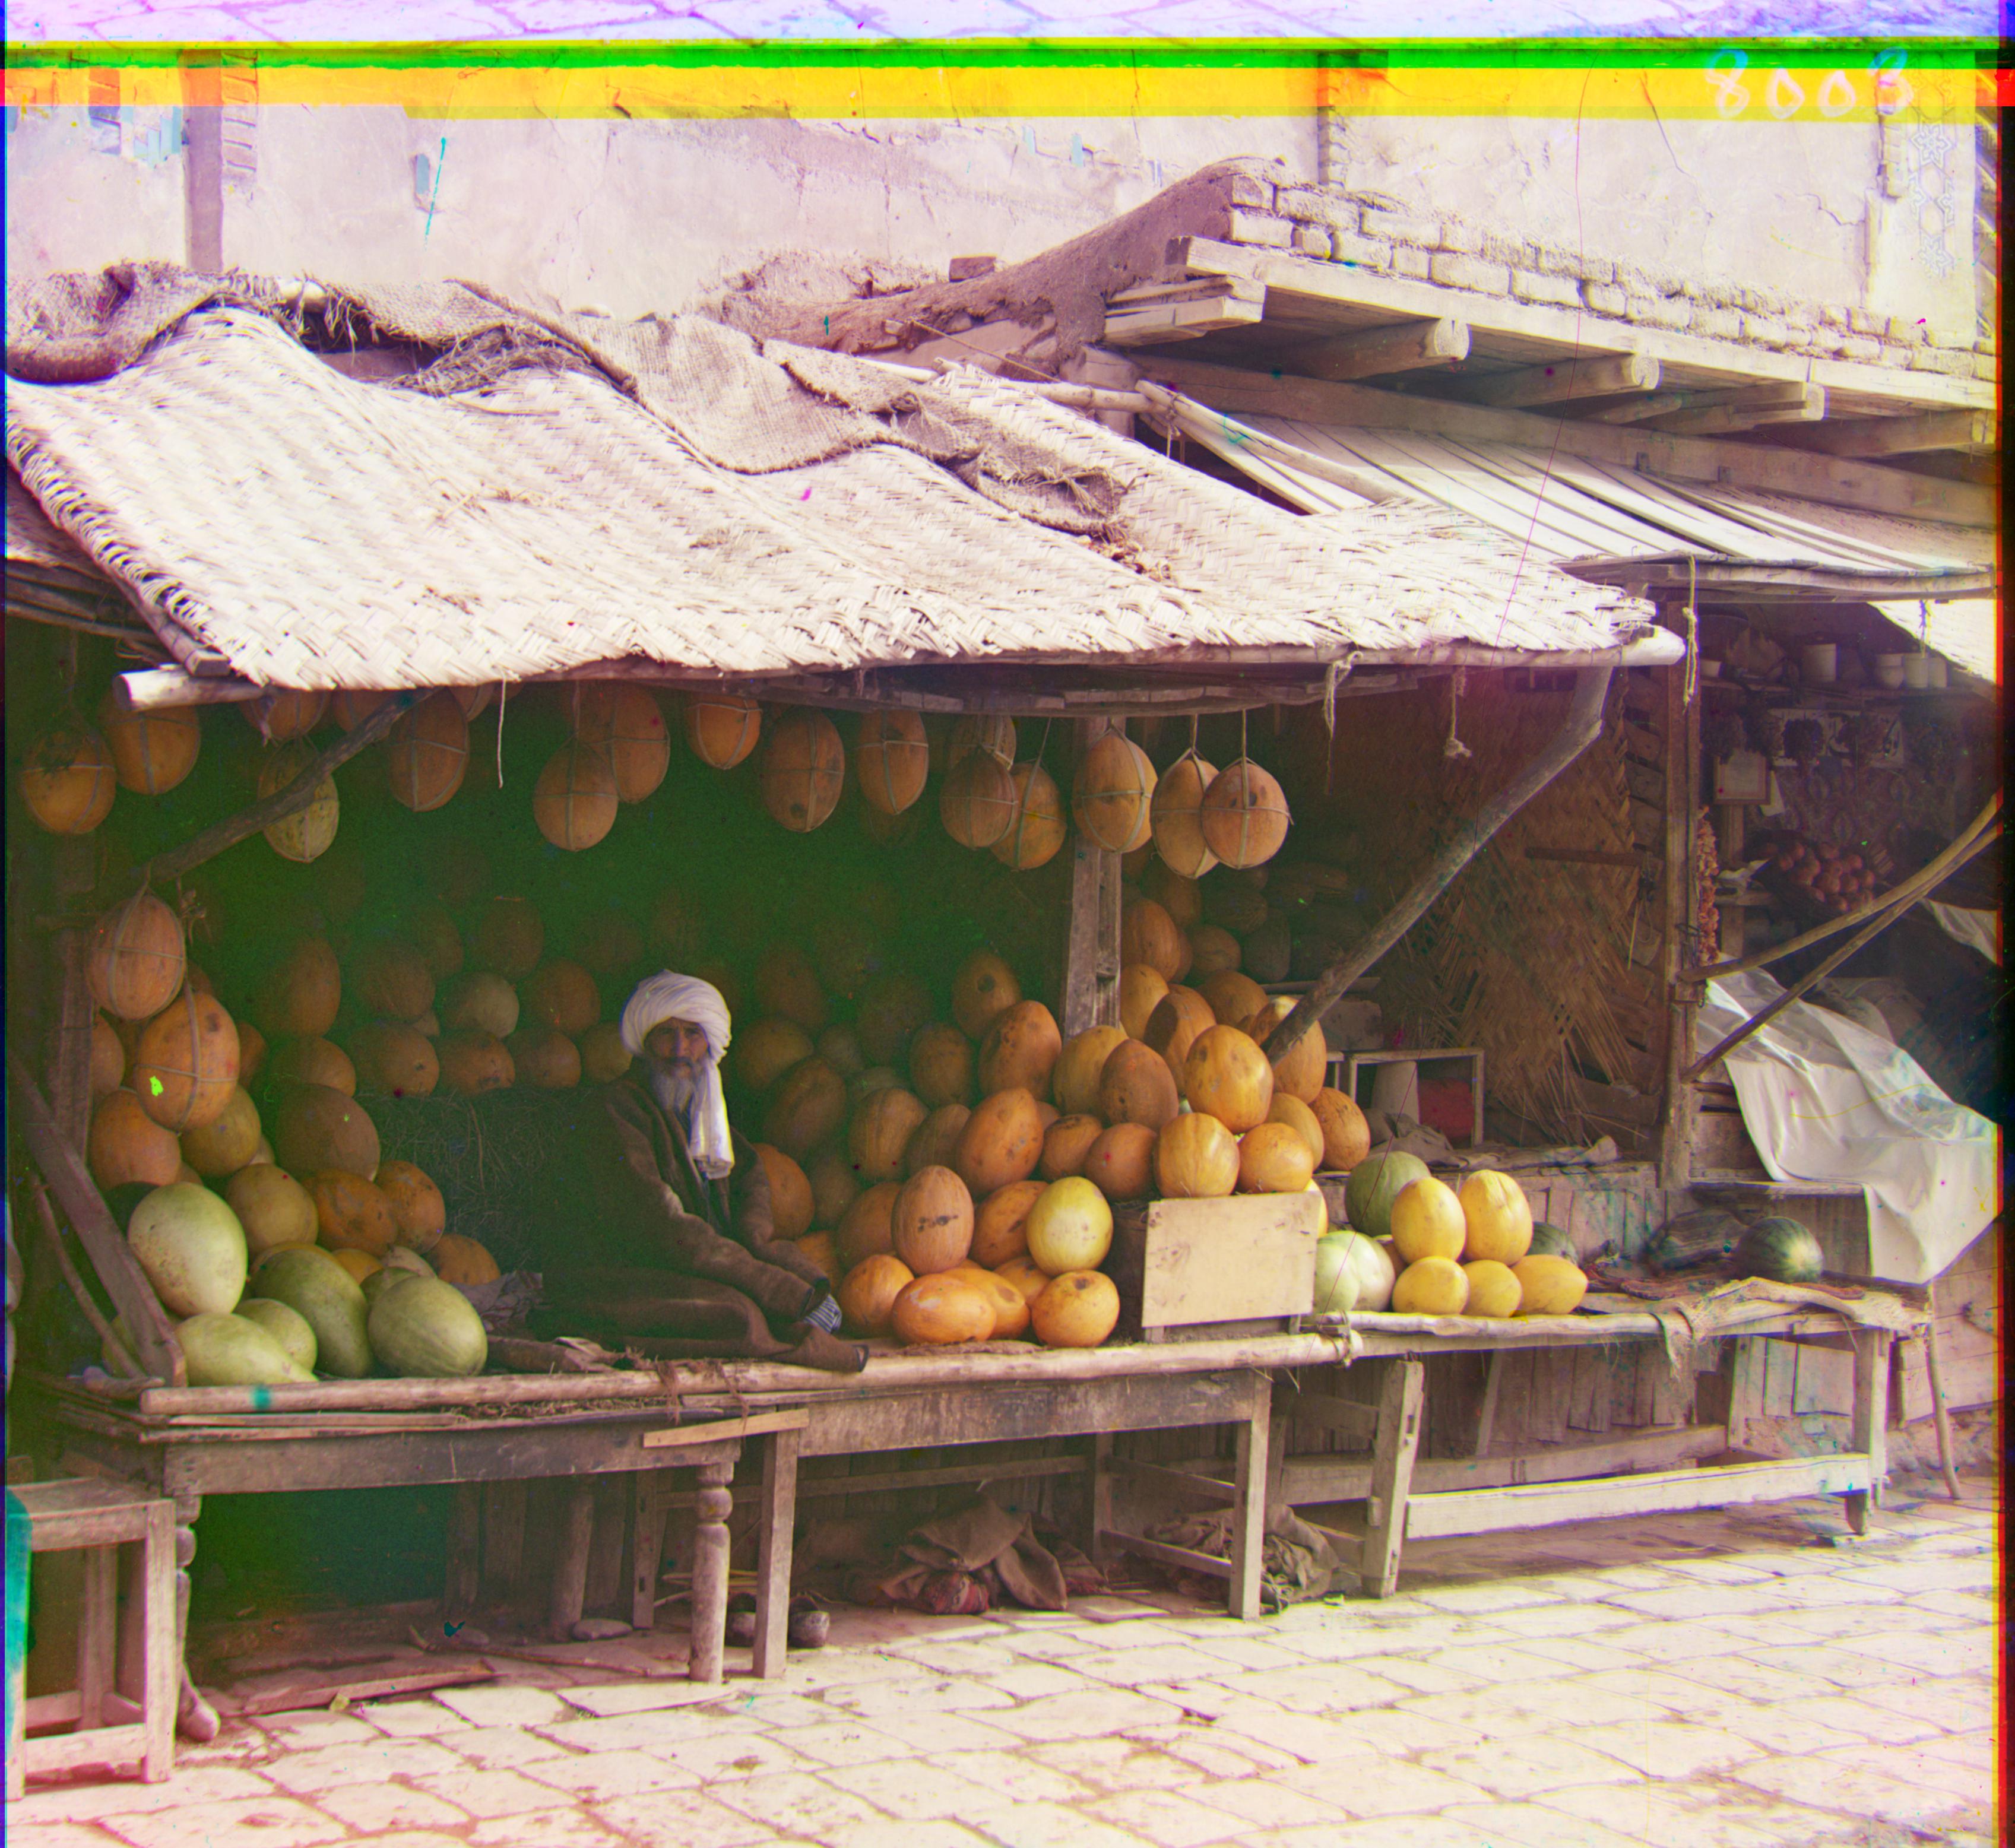
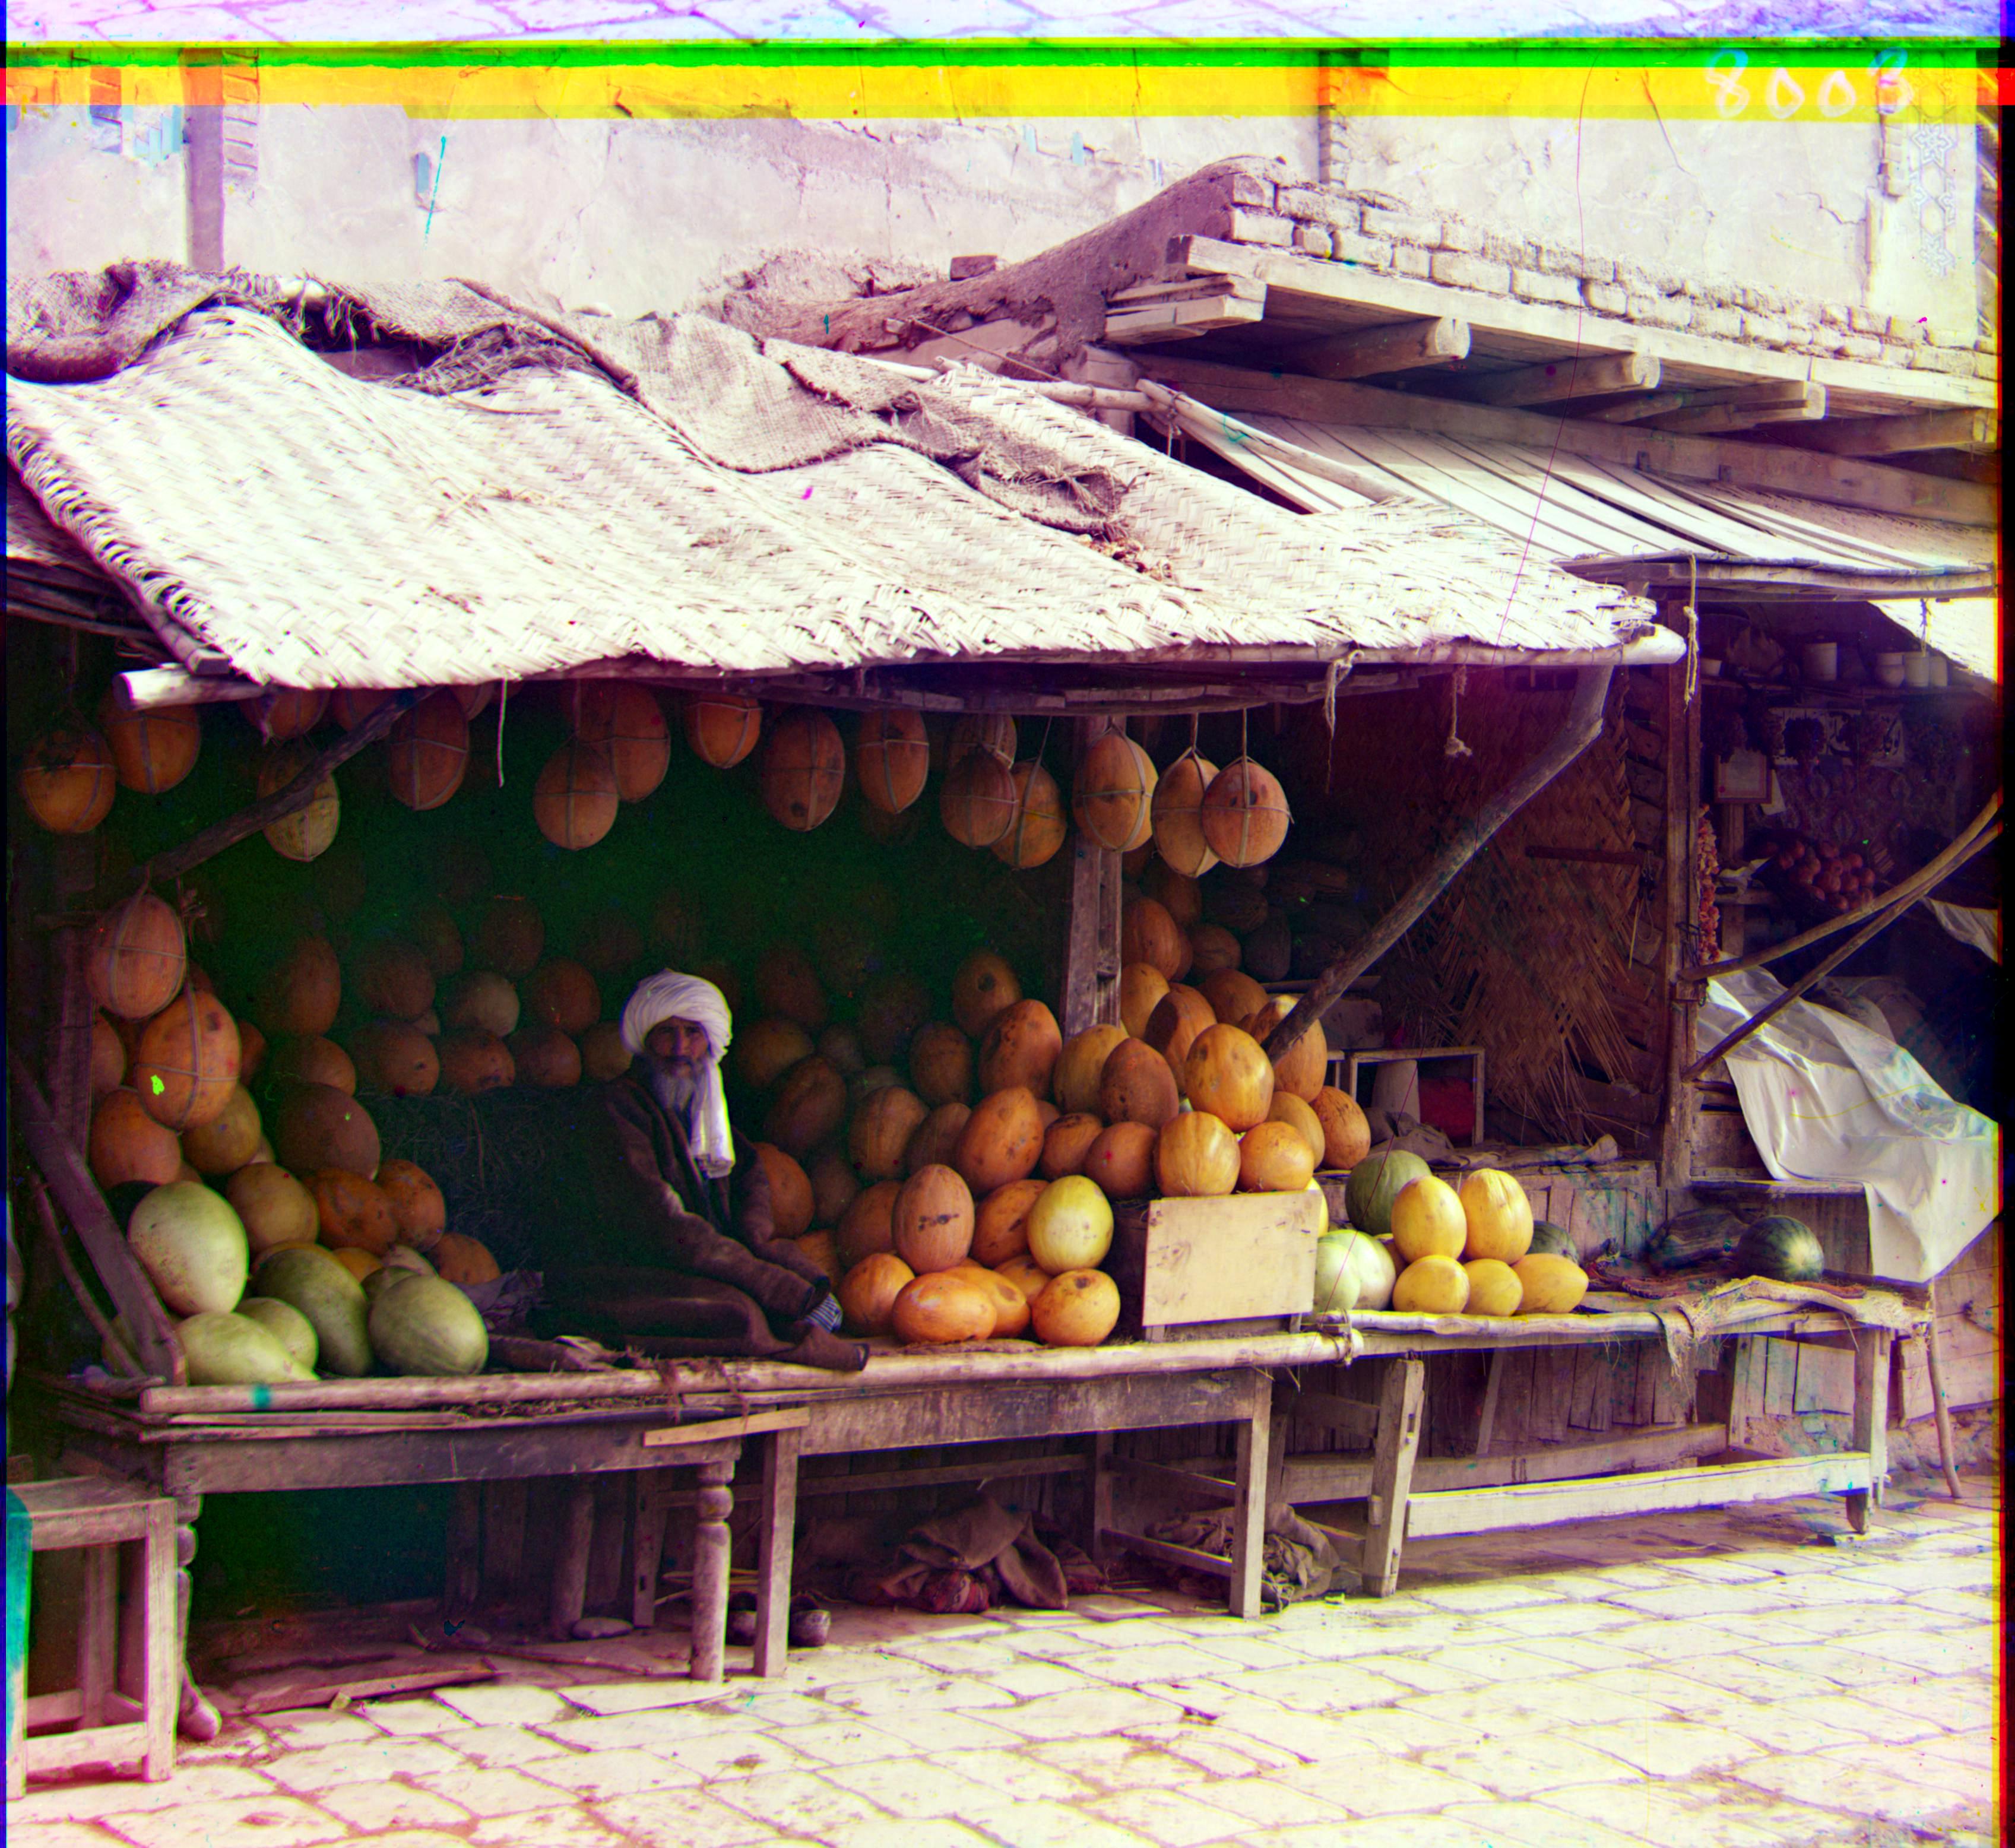
2. Automatic Contrasting: Due to the sunlight, the top of the shed is well lit, causing the light to be overexposed. The lack of light under the shed makes it difficult to see the person and fruits.
Firstly, I followed the formula: (Matrix - Matrix_min) / (Matrix_max - Matrix_min) to rescale the image.
Then, I used Python Imaging Library (PIL) to automatically adjust image contrast.[4]. This function calculates a histogram of the input image, removes cutoff percent of the lightest and darkest pixels from the histogram, and remaps the image so that the darkest pixel becomes black (0), and the lightest becomes white (255). After processing, the image looks more colorful and the items under the shed looks more clear.
Previous result
Result with rescale
Result with auto contrasting

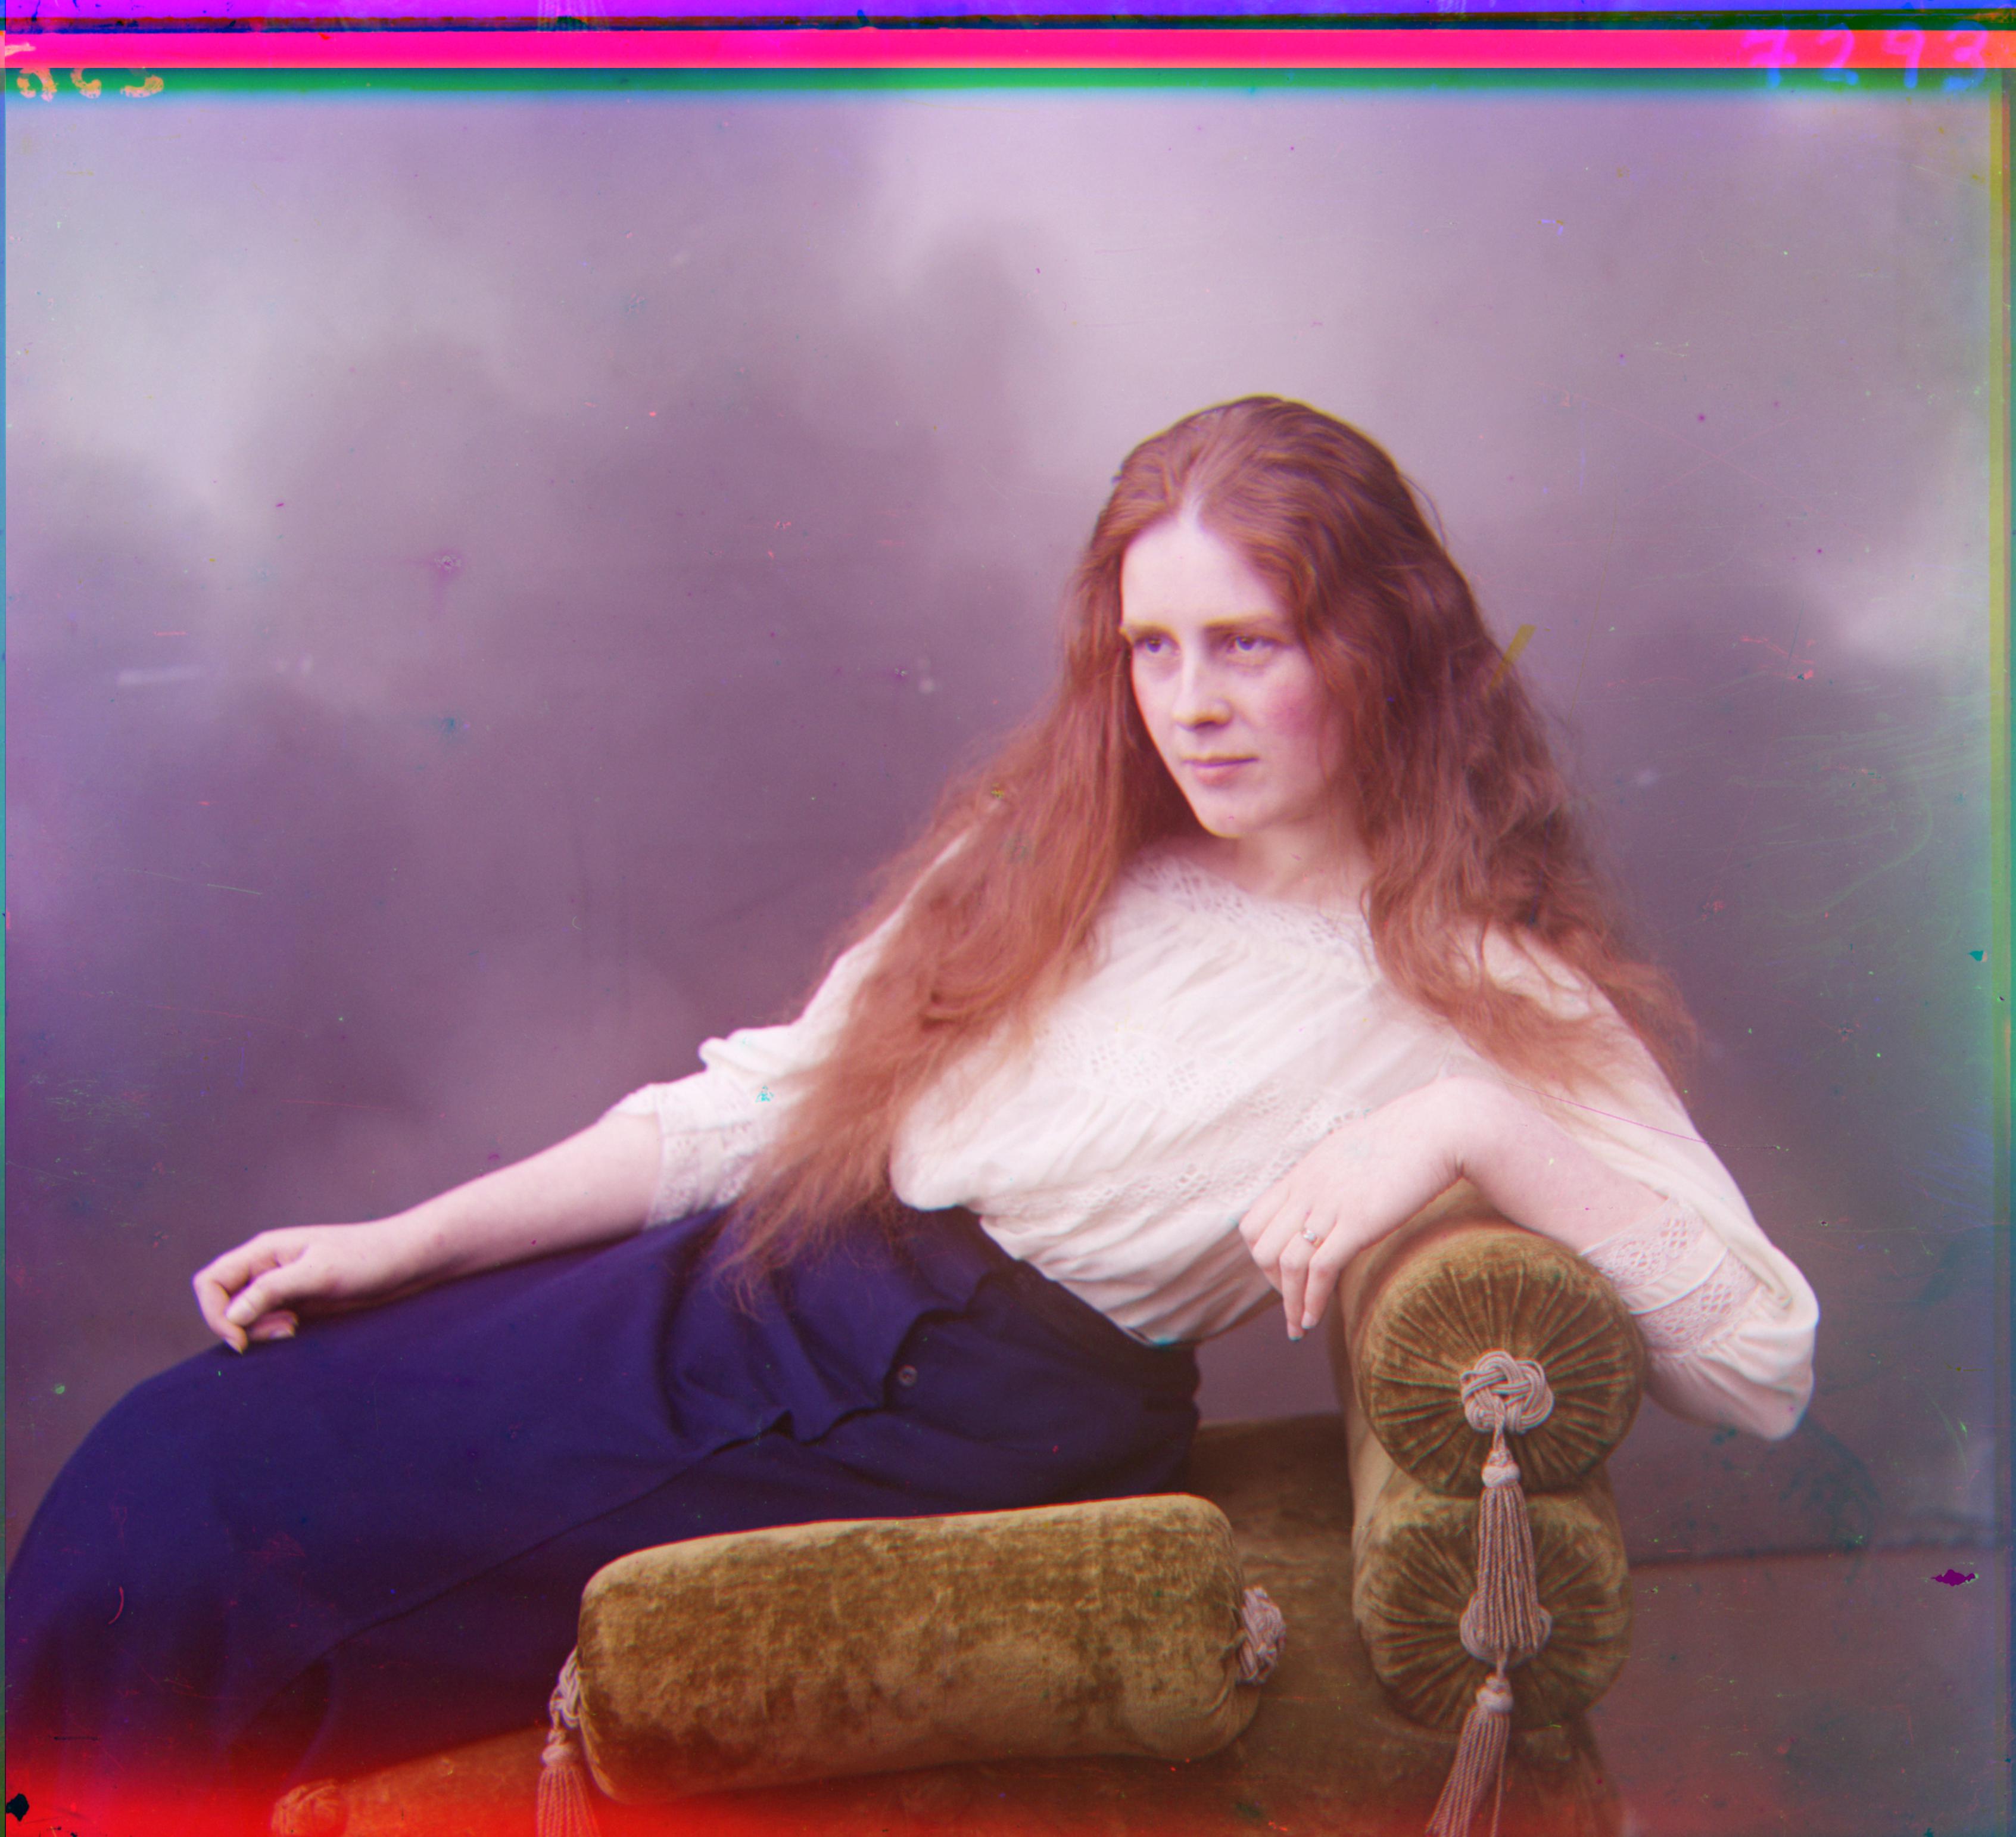
3. Automatic White Balance: Although the lady image shows a good alignment, its color looks not natural. Take the white blouse as an example. This white blouse looks red. So, I used the OpenCV to automatically adjust it [3]. After processing, it looks better. The white blouse becomes more white.
Previous result
Result with automatic white balance

4. Automatic cropping: Because the original boundary is black, this is designed to remove the black borders. We removed the line with more than 0.75 pixel values more than 0.9. From the below image, without cropping, result is very bad. By automatically cropping, the image (size: 341 X 391) is cropped 10, 9, 8 and 6 on left, right, upper and lower boundary.
Rresult without cropping
Rresult with a fixed size cropping
Rresult with an automatic cropping
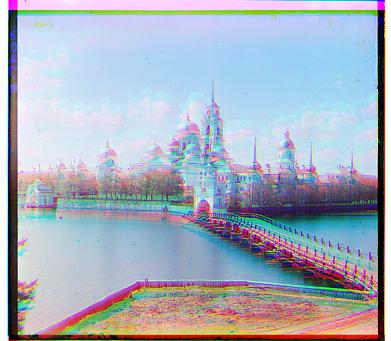
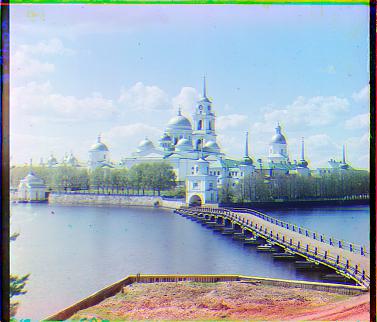
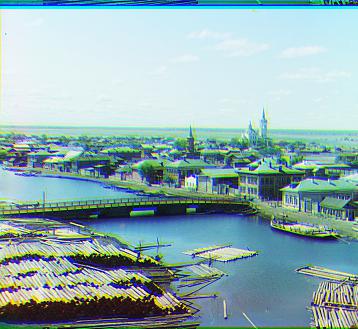
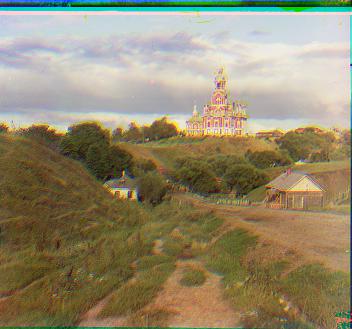
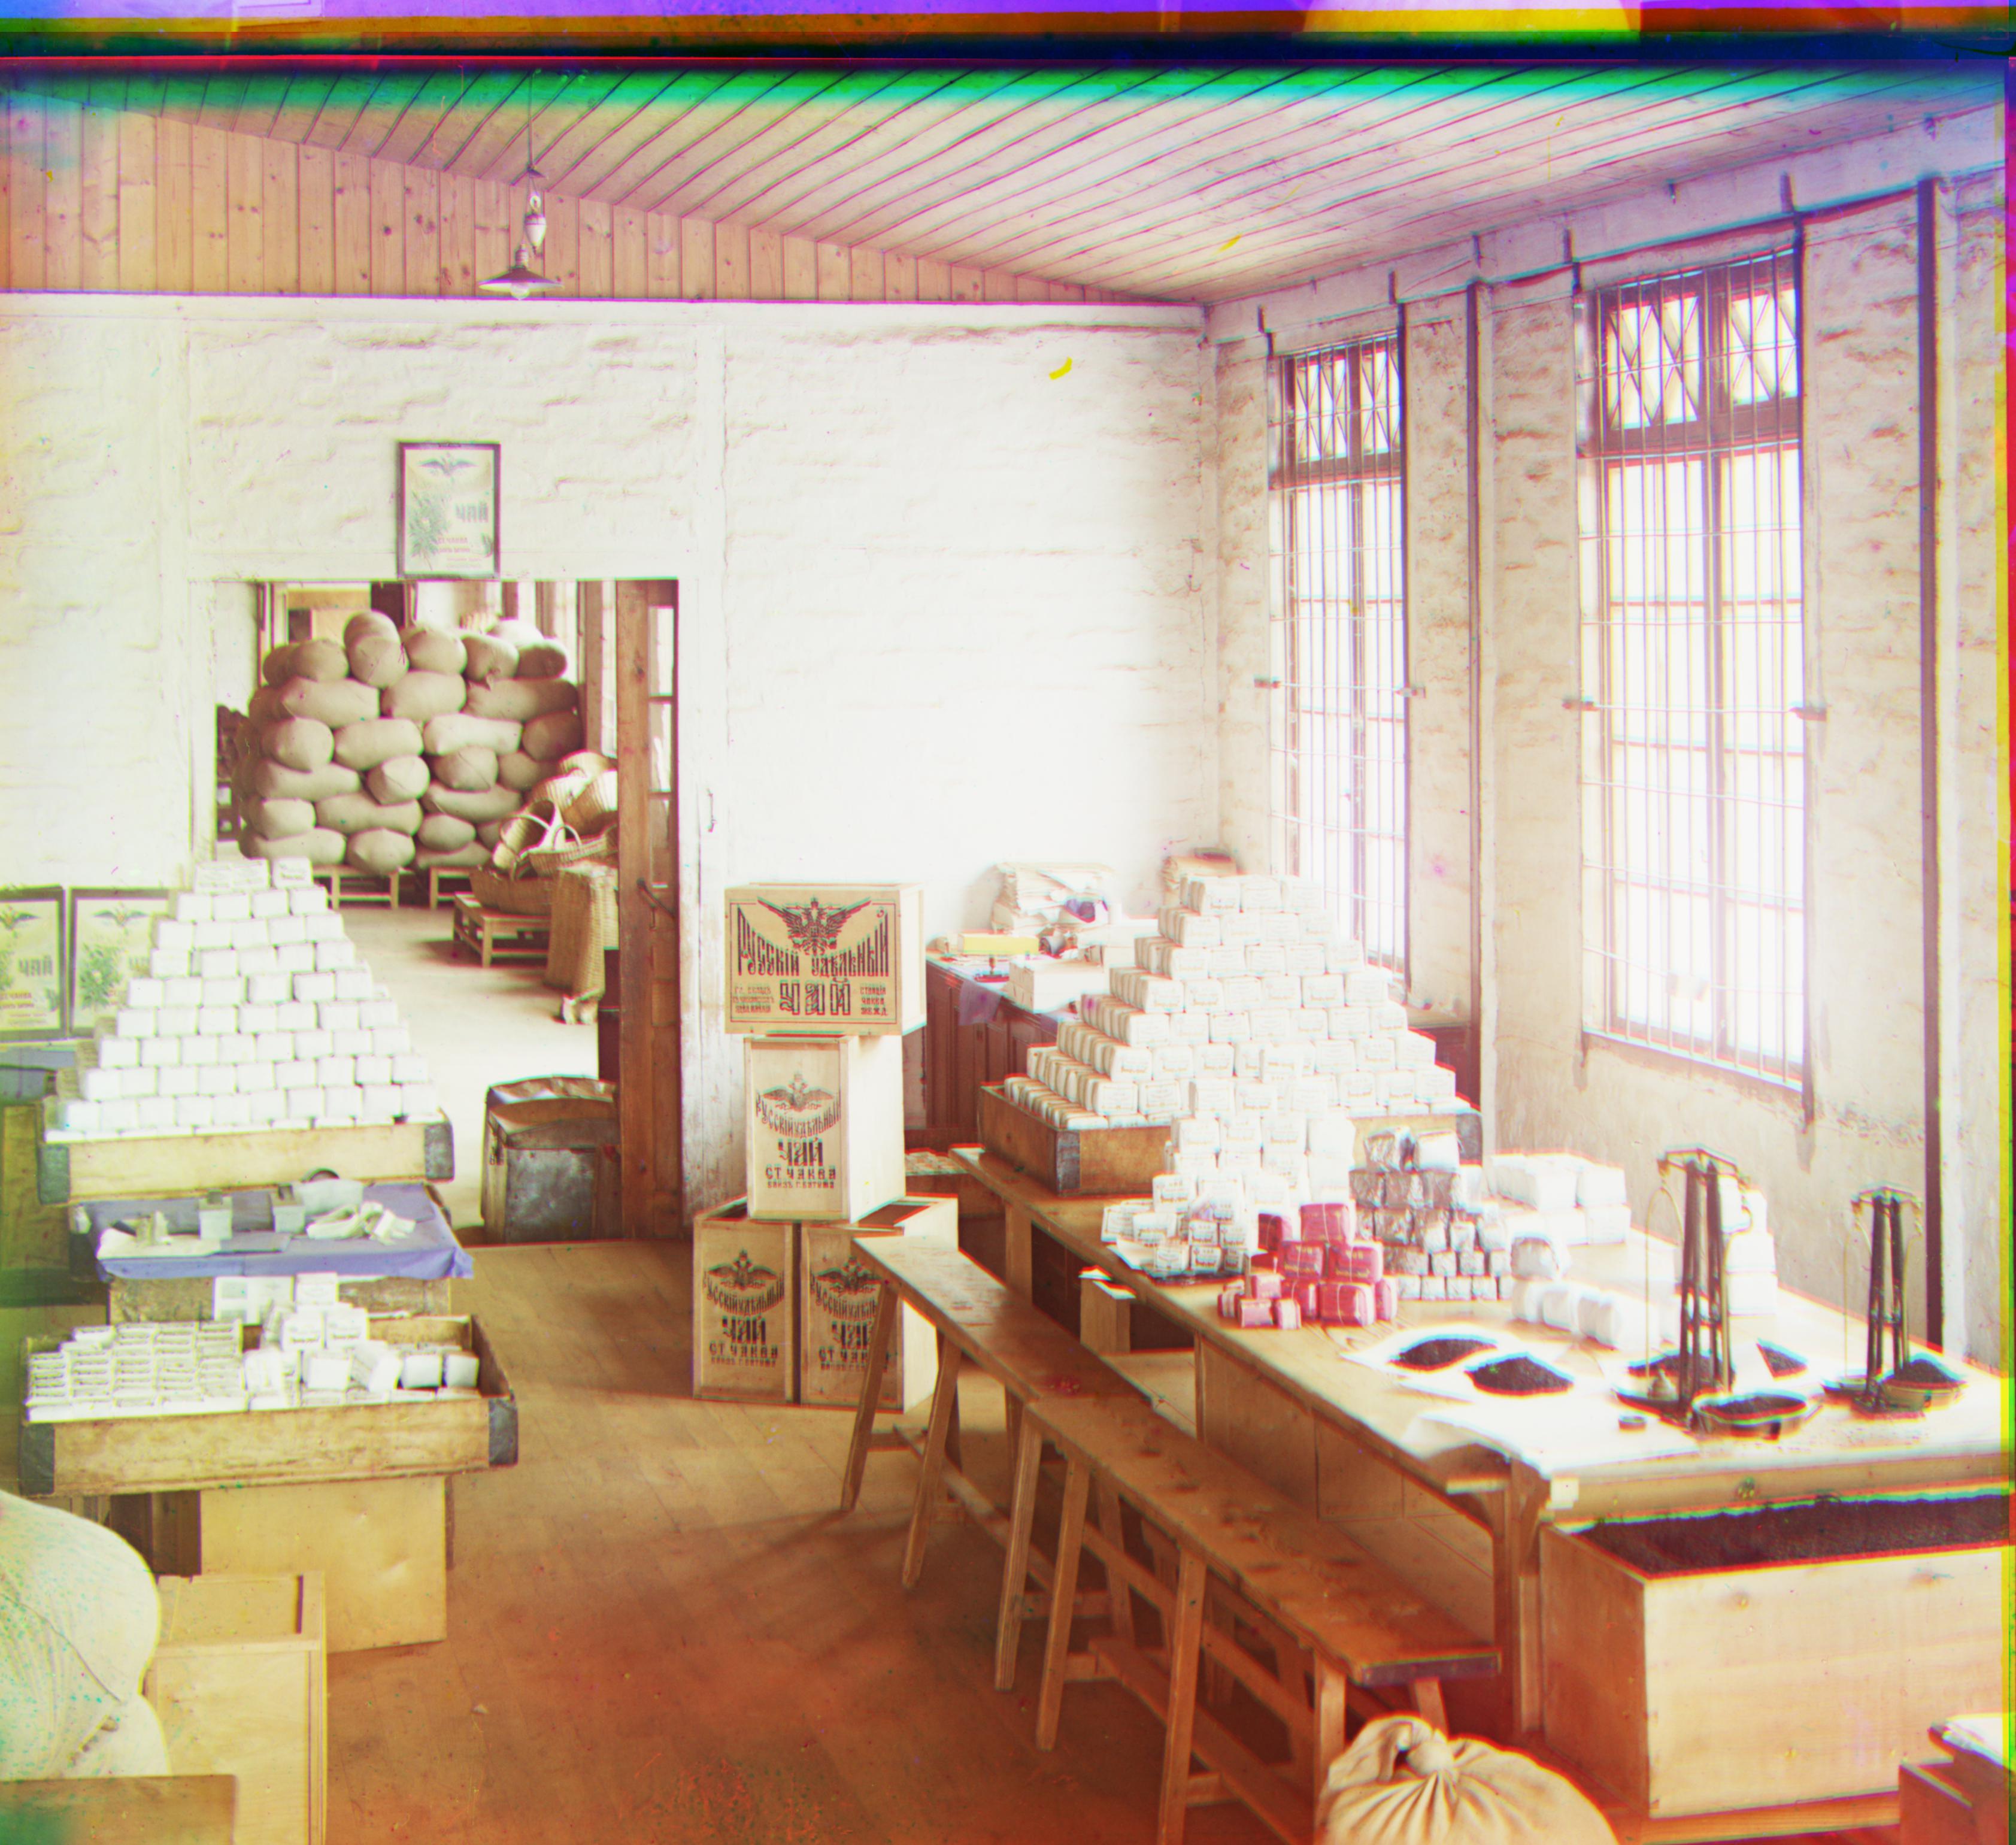
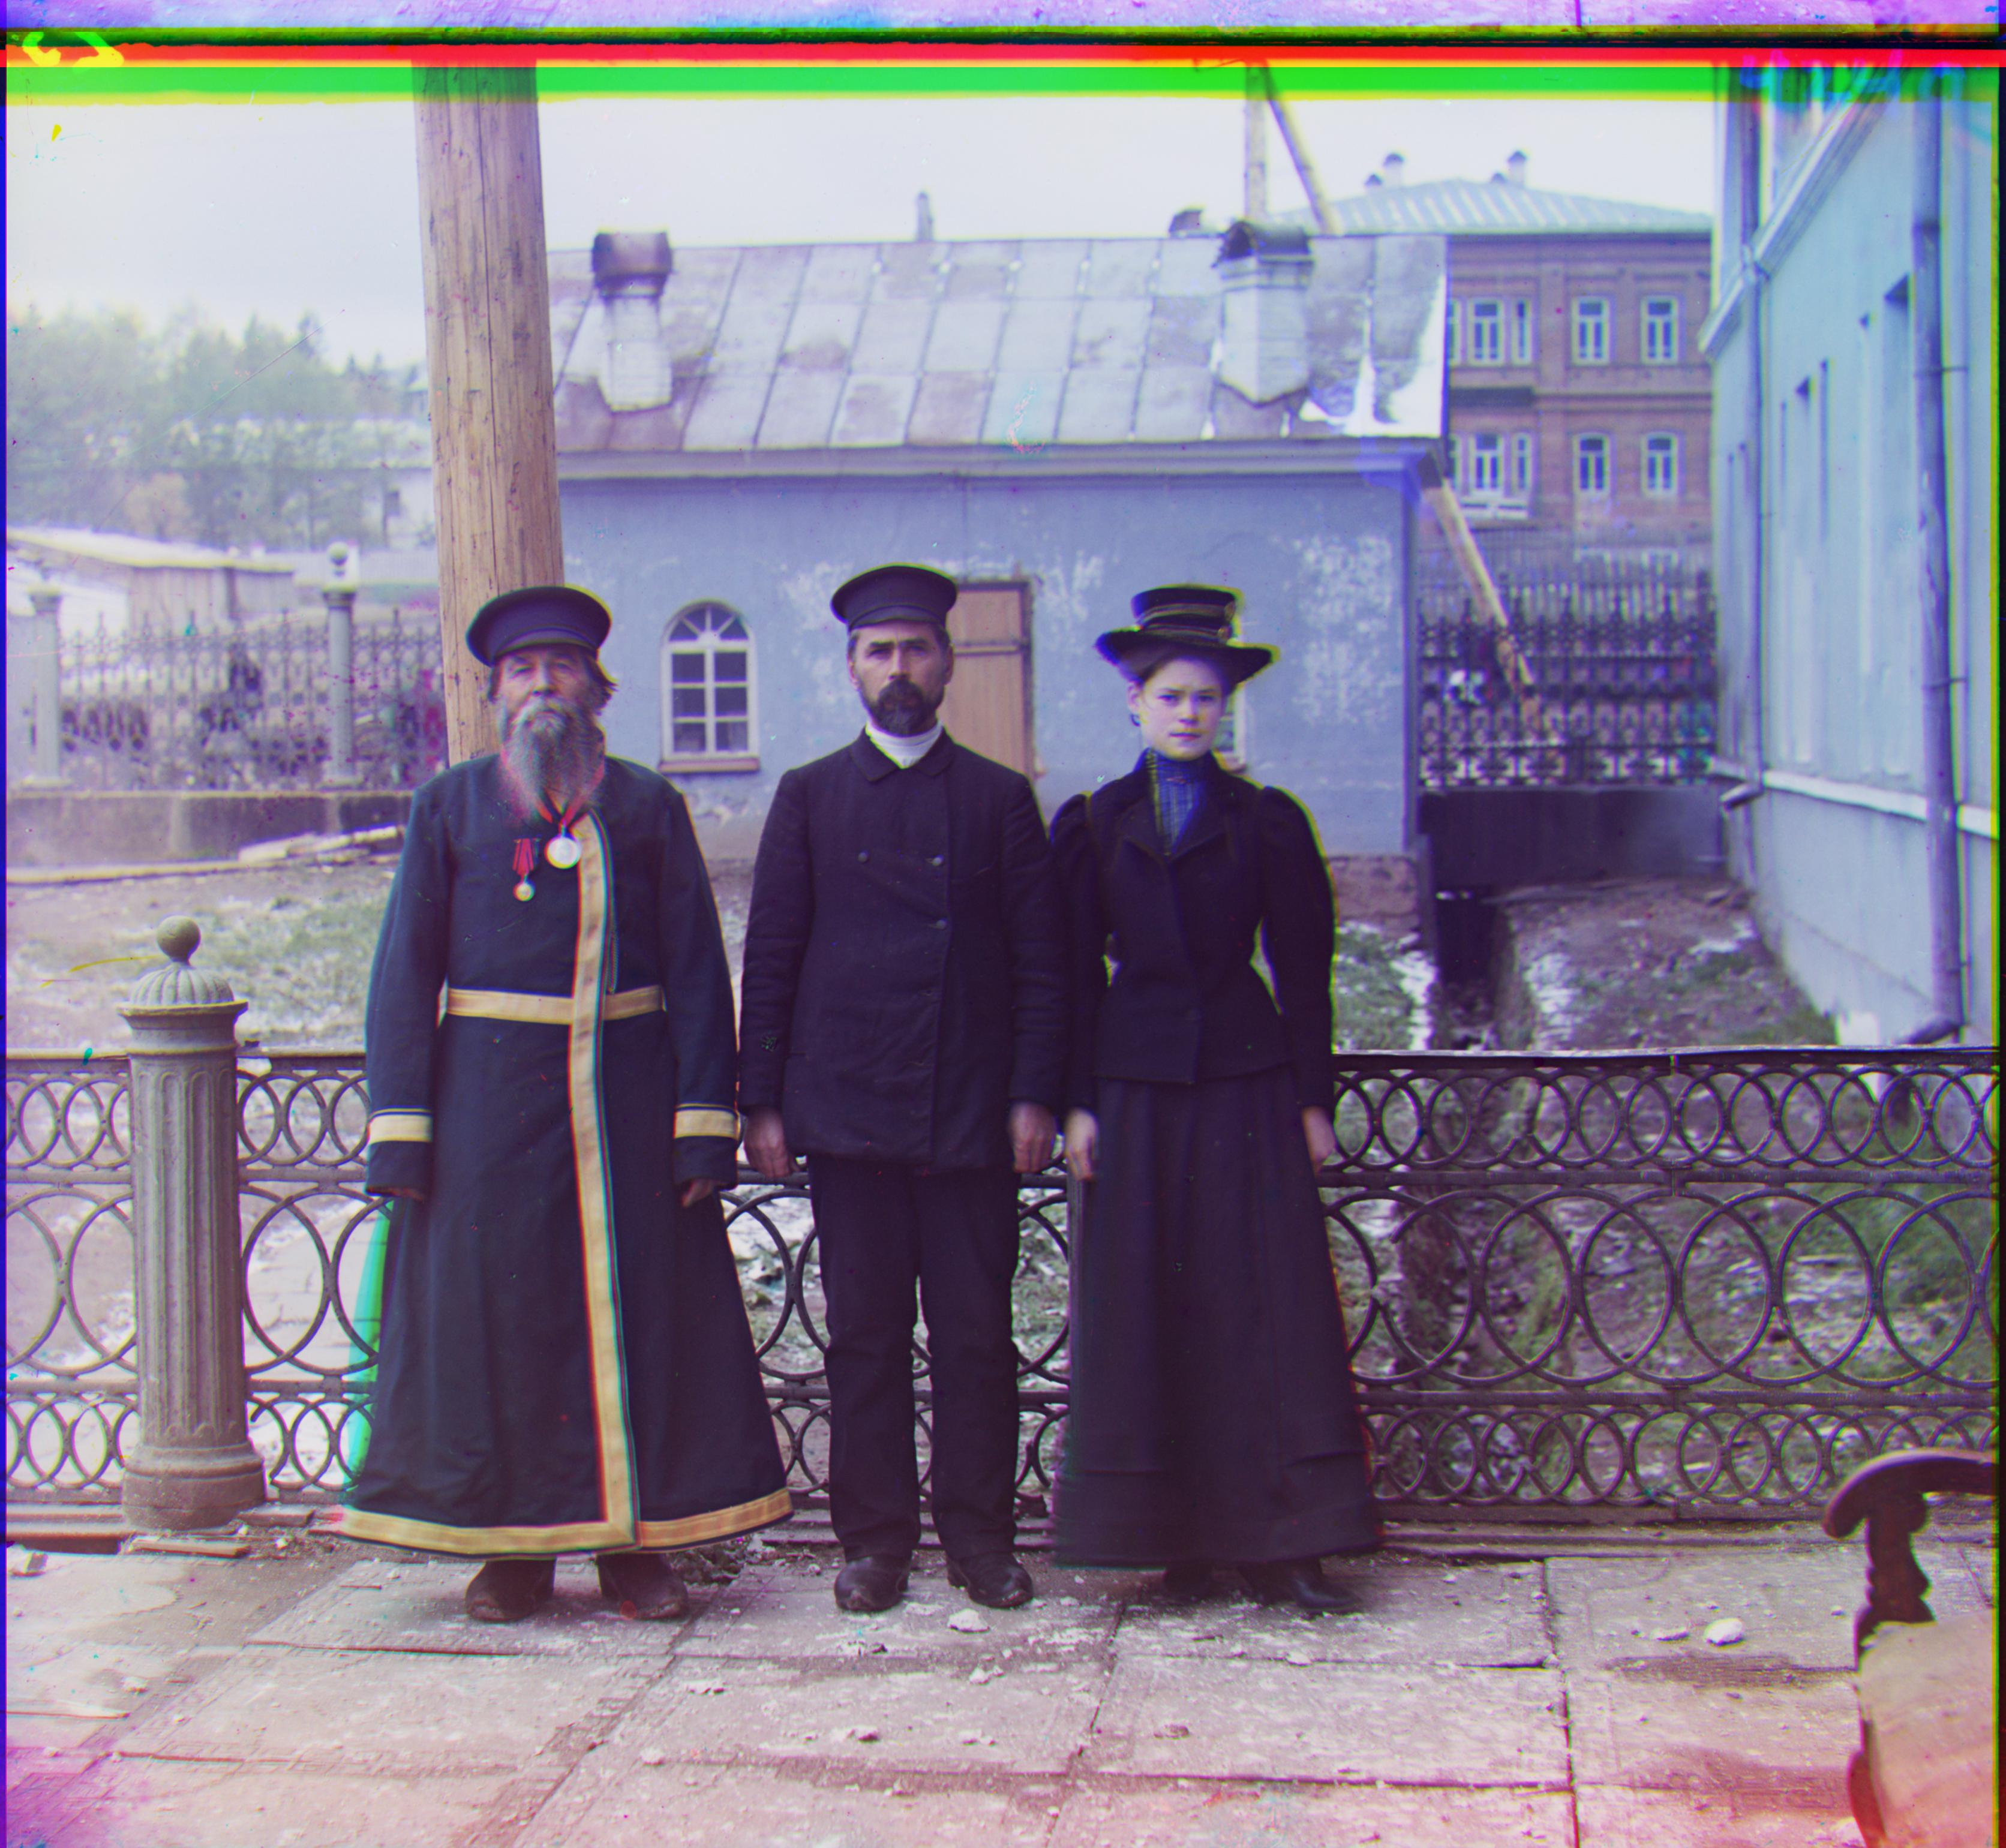
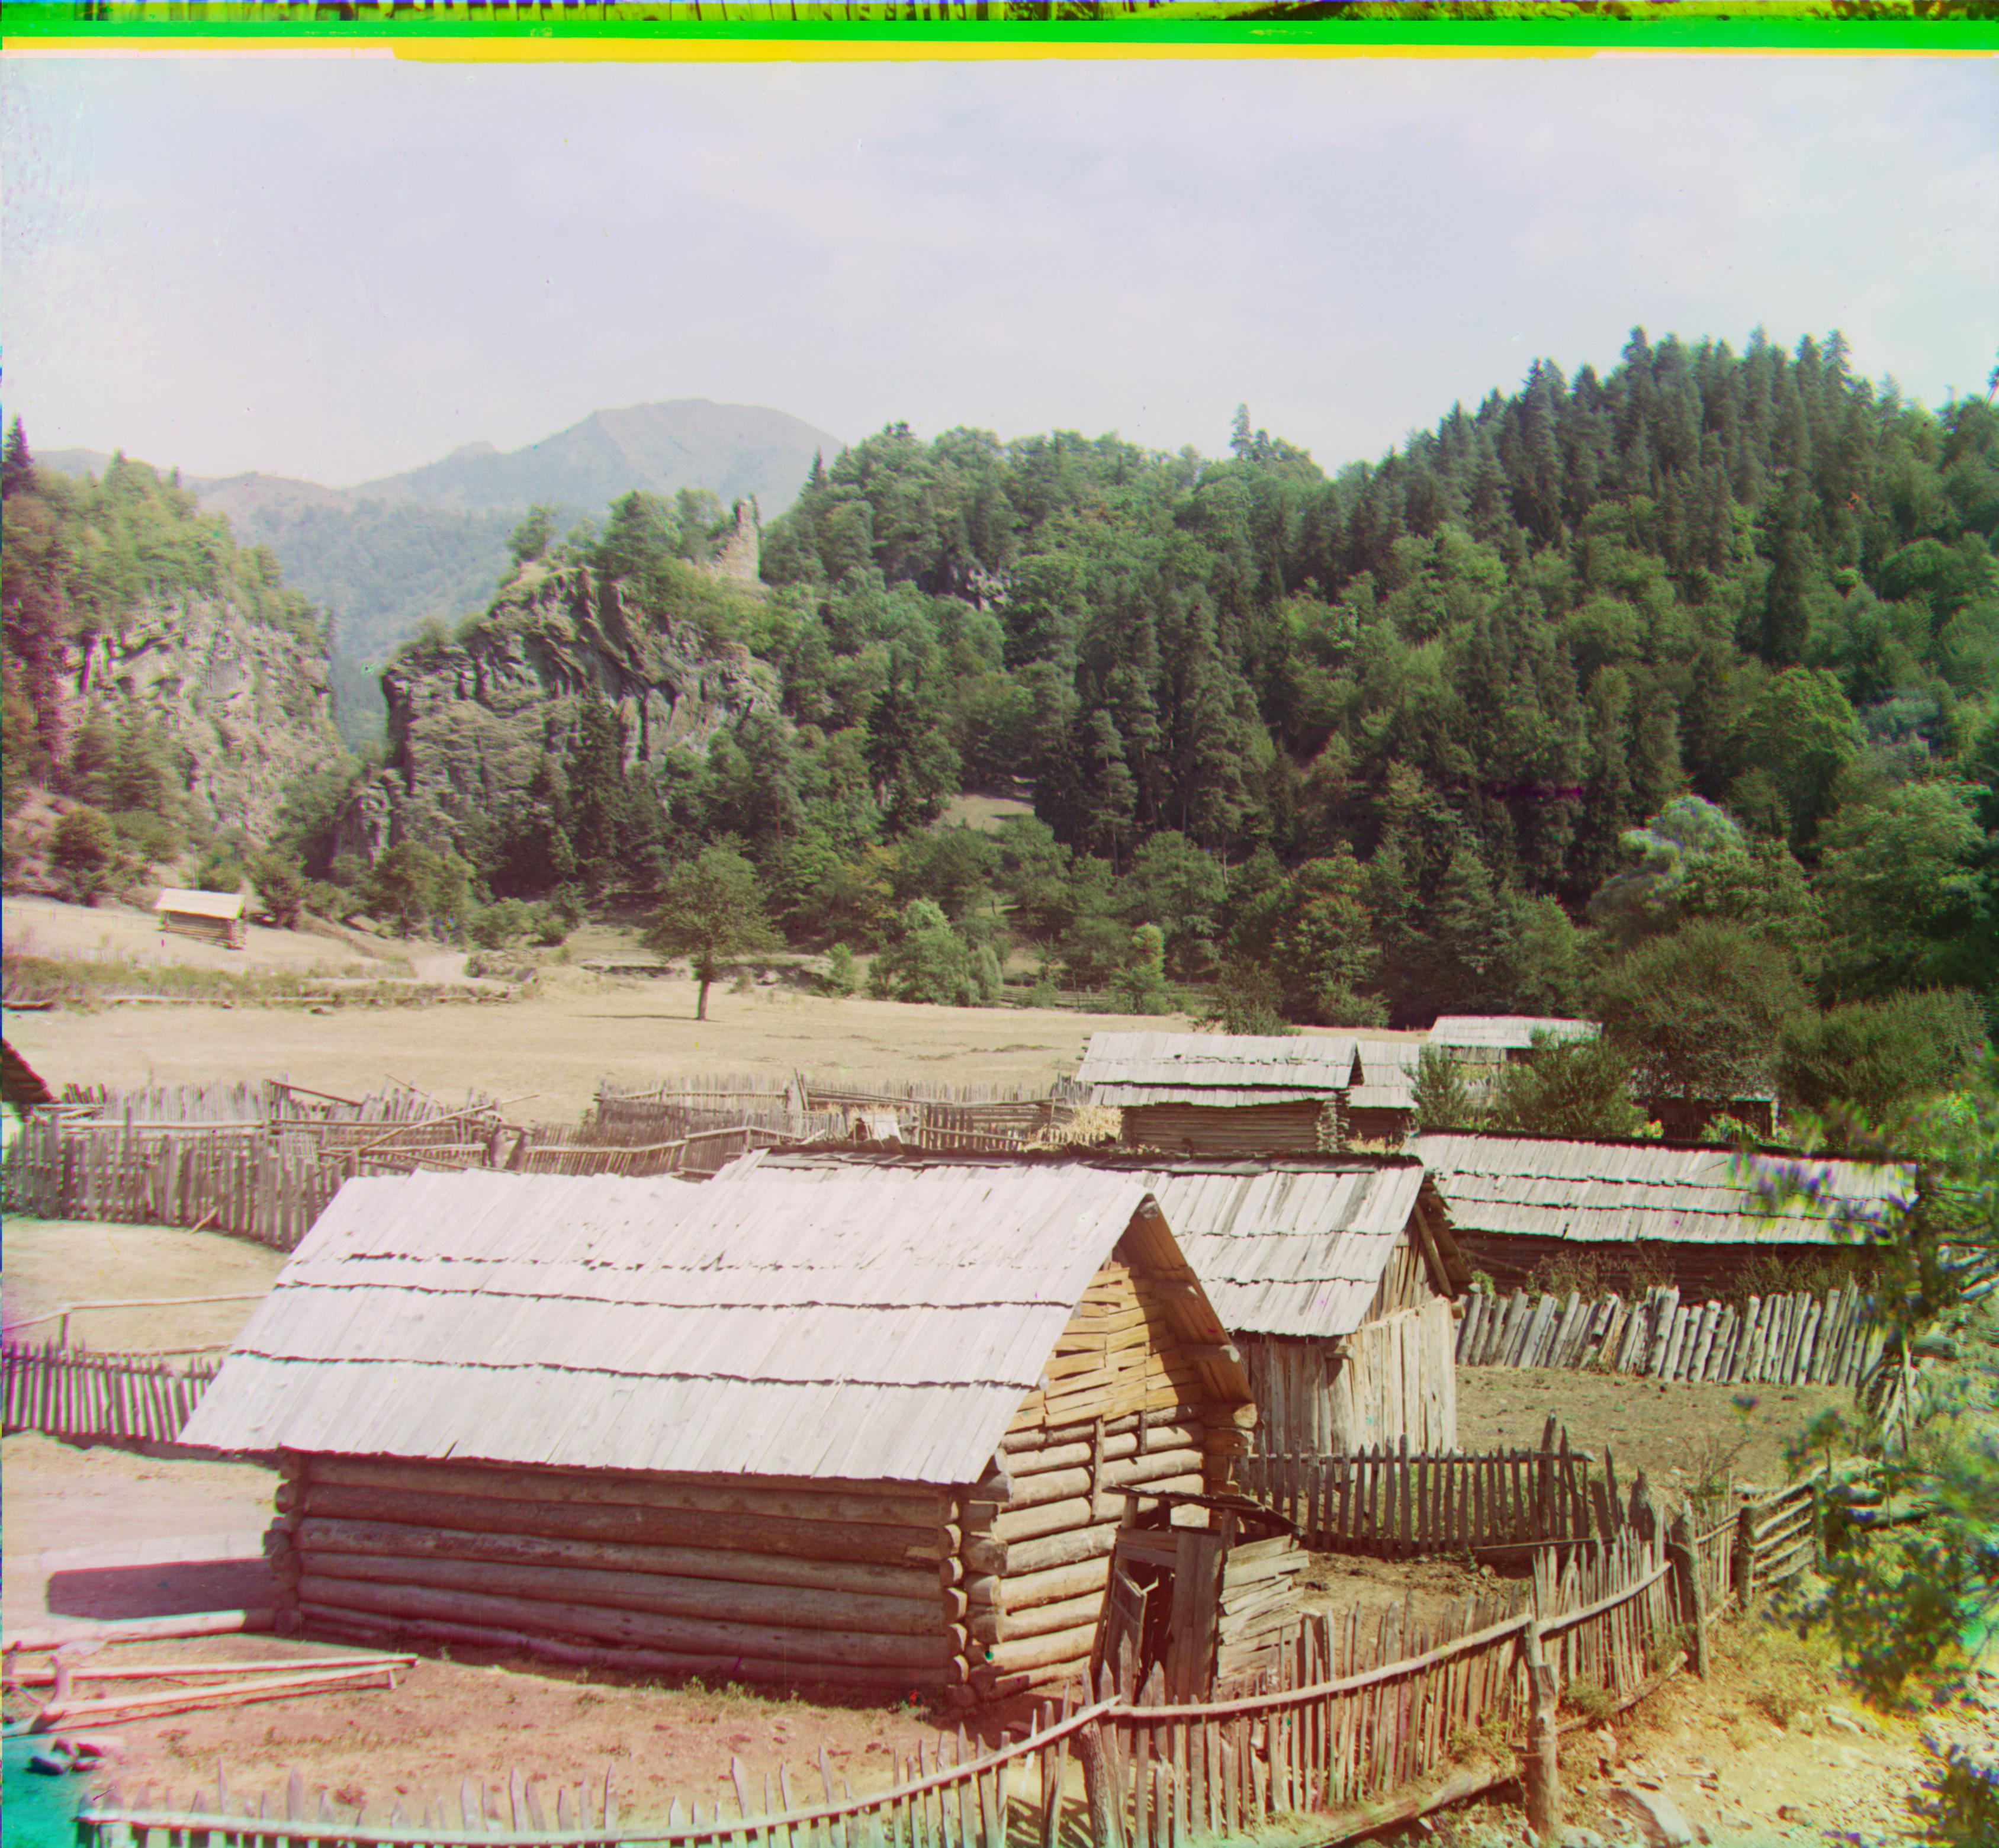
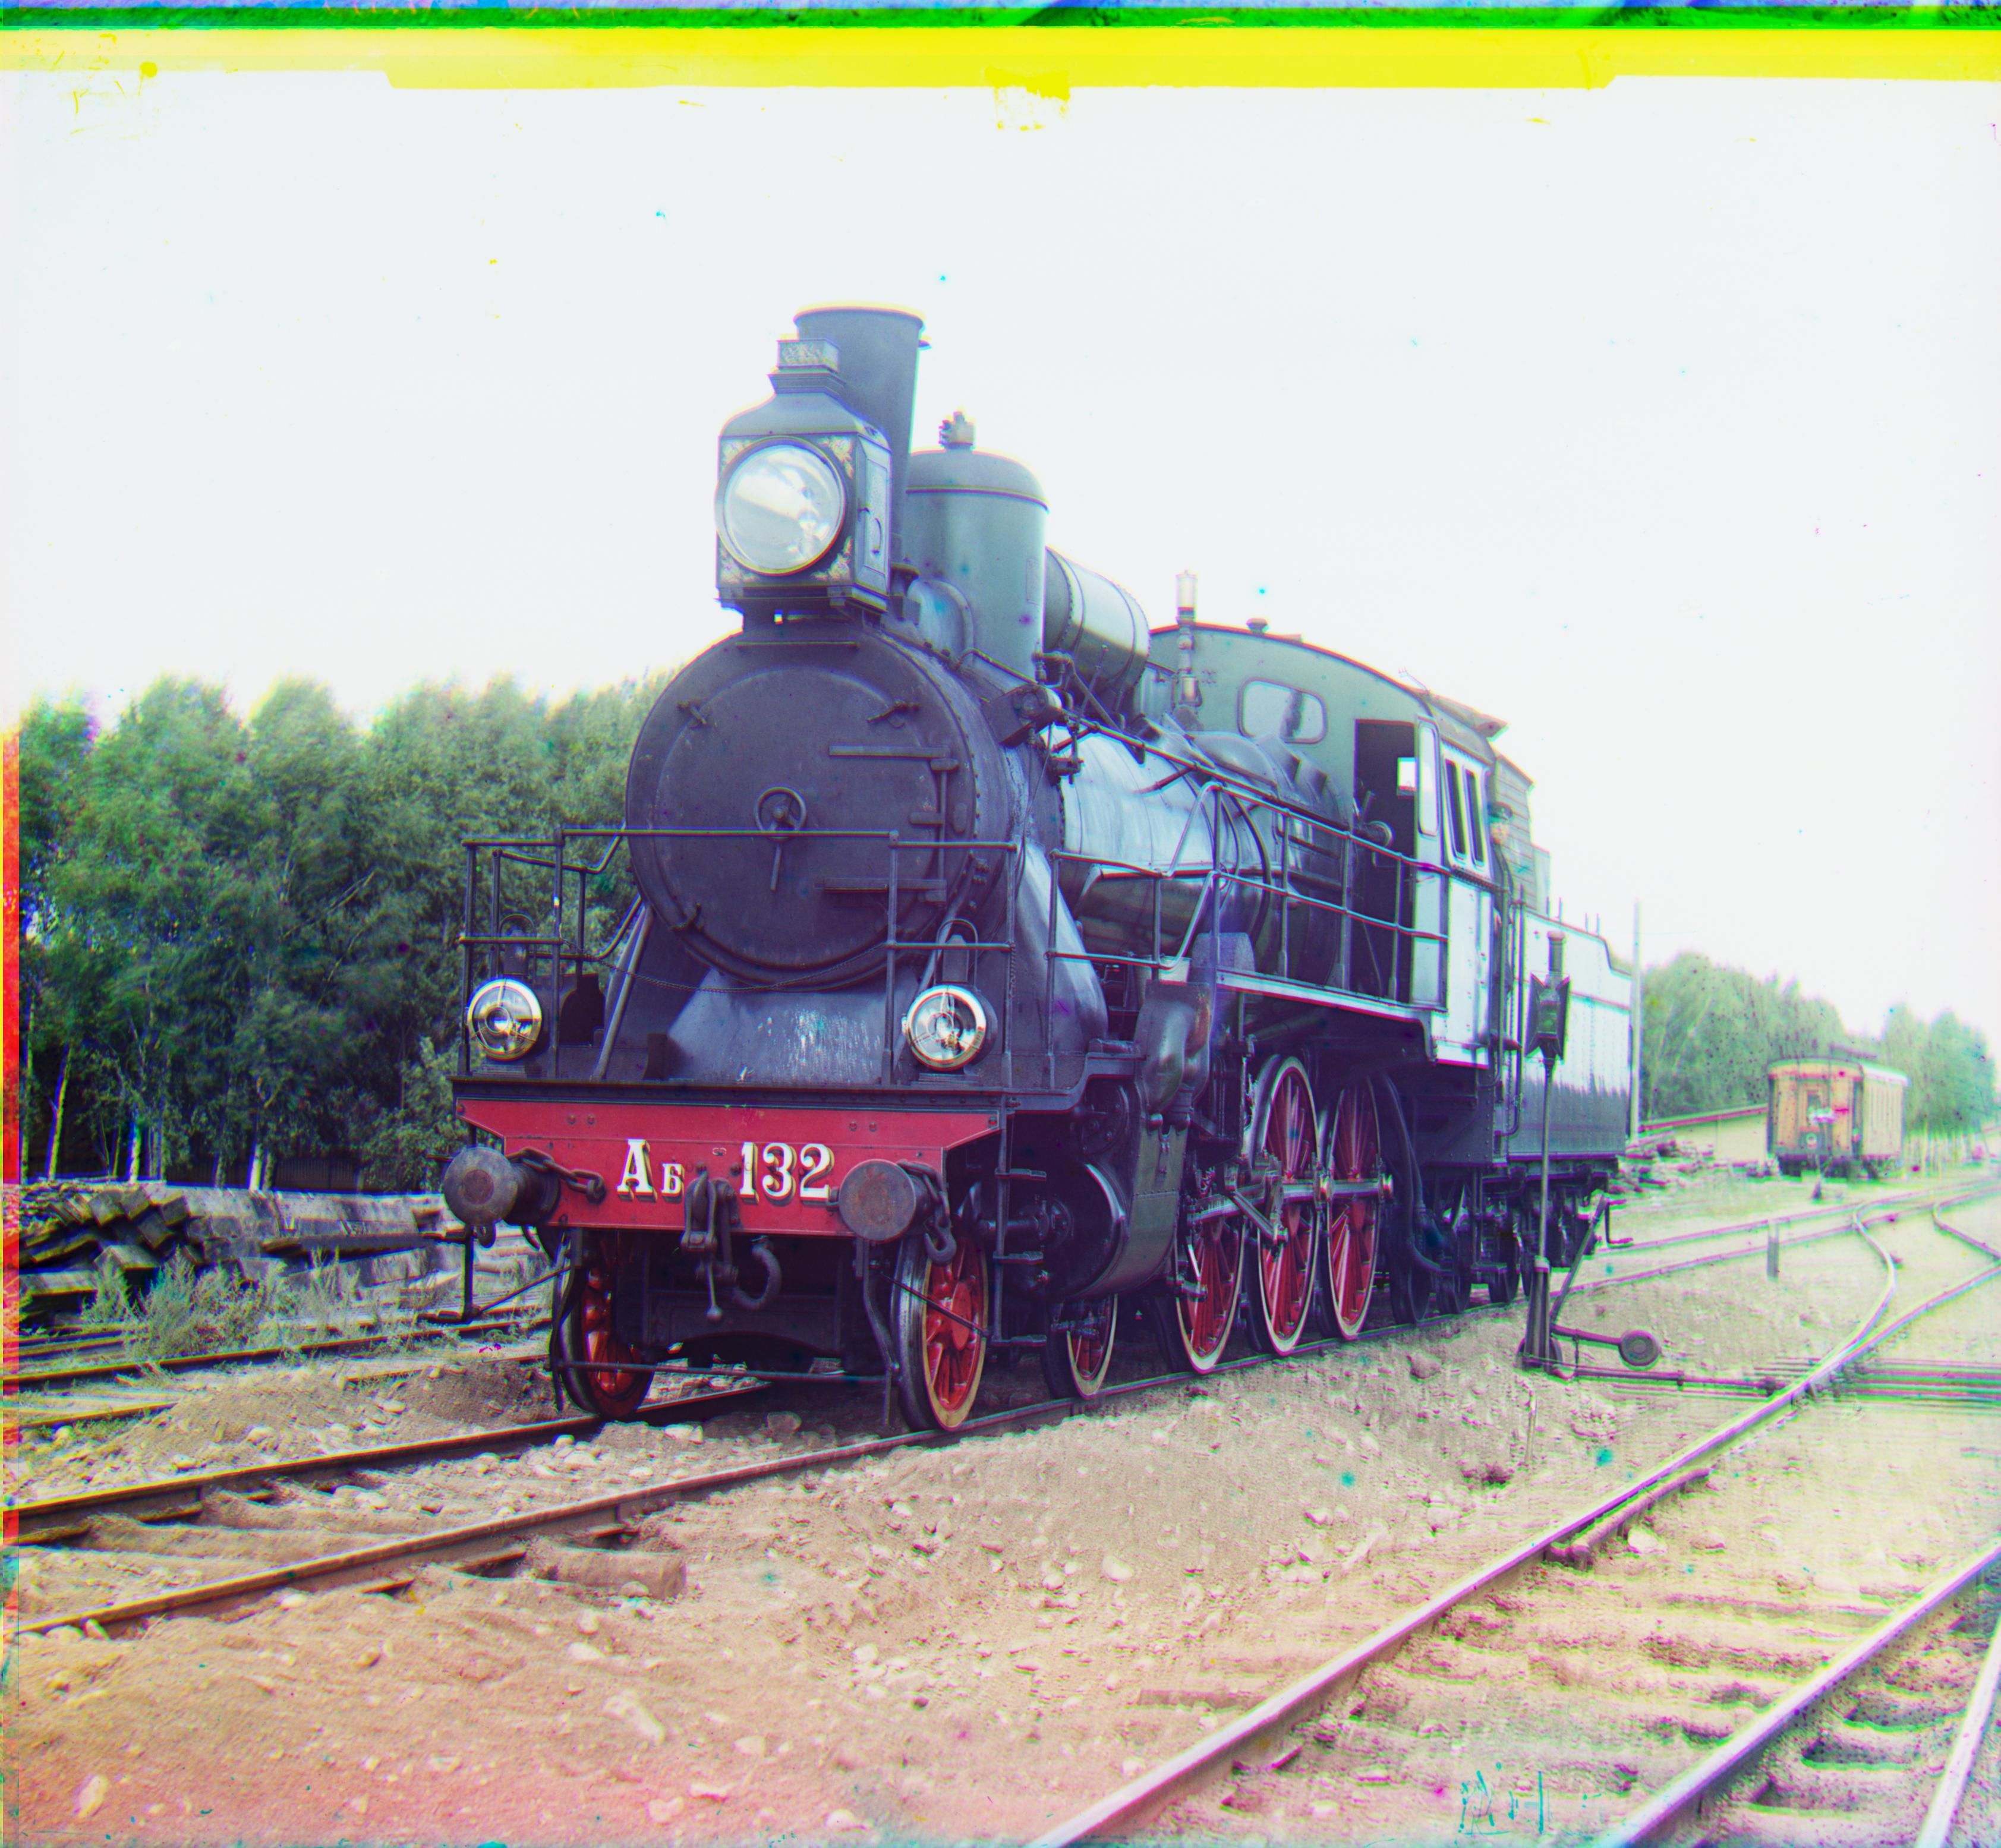
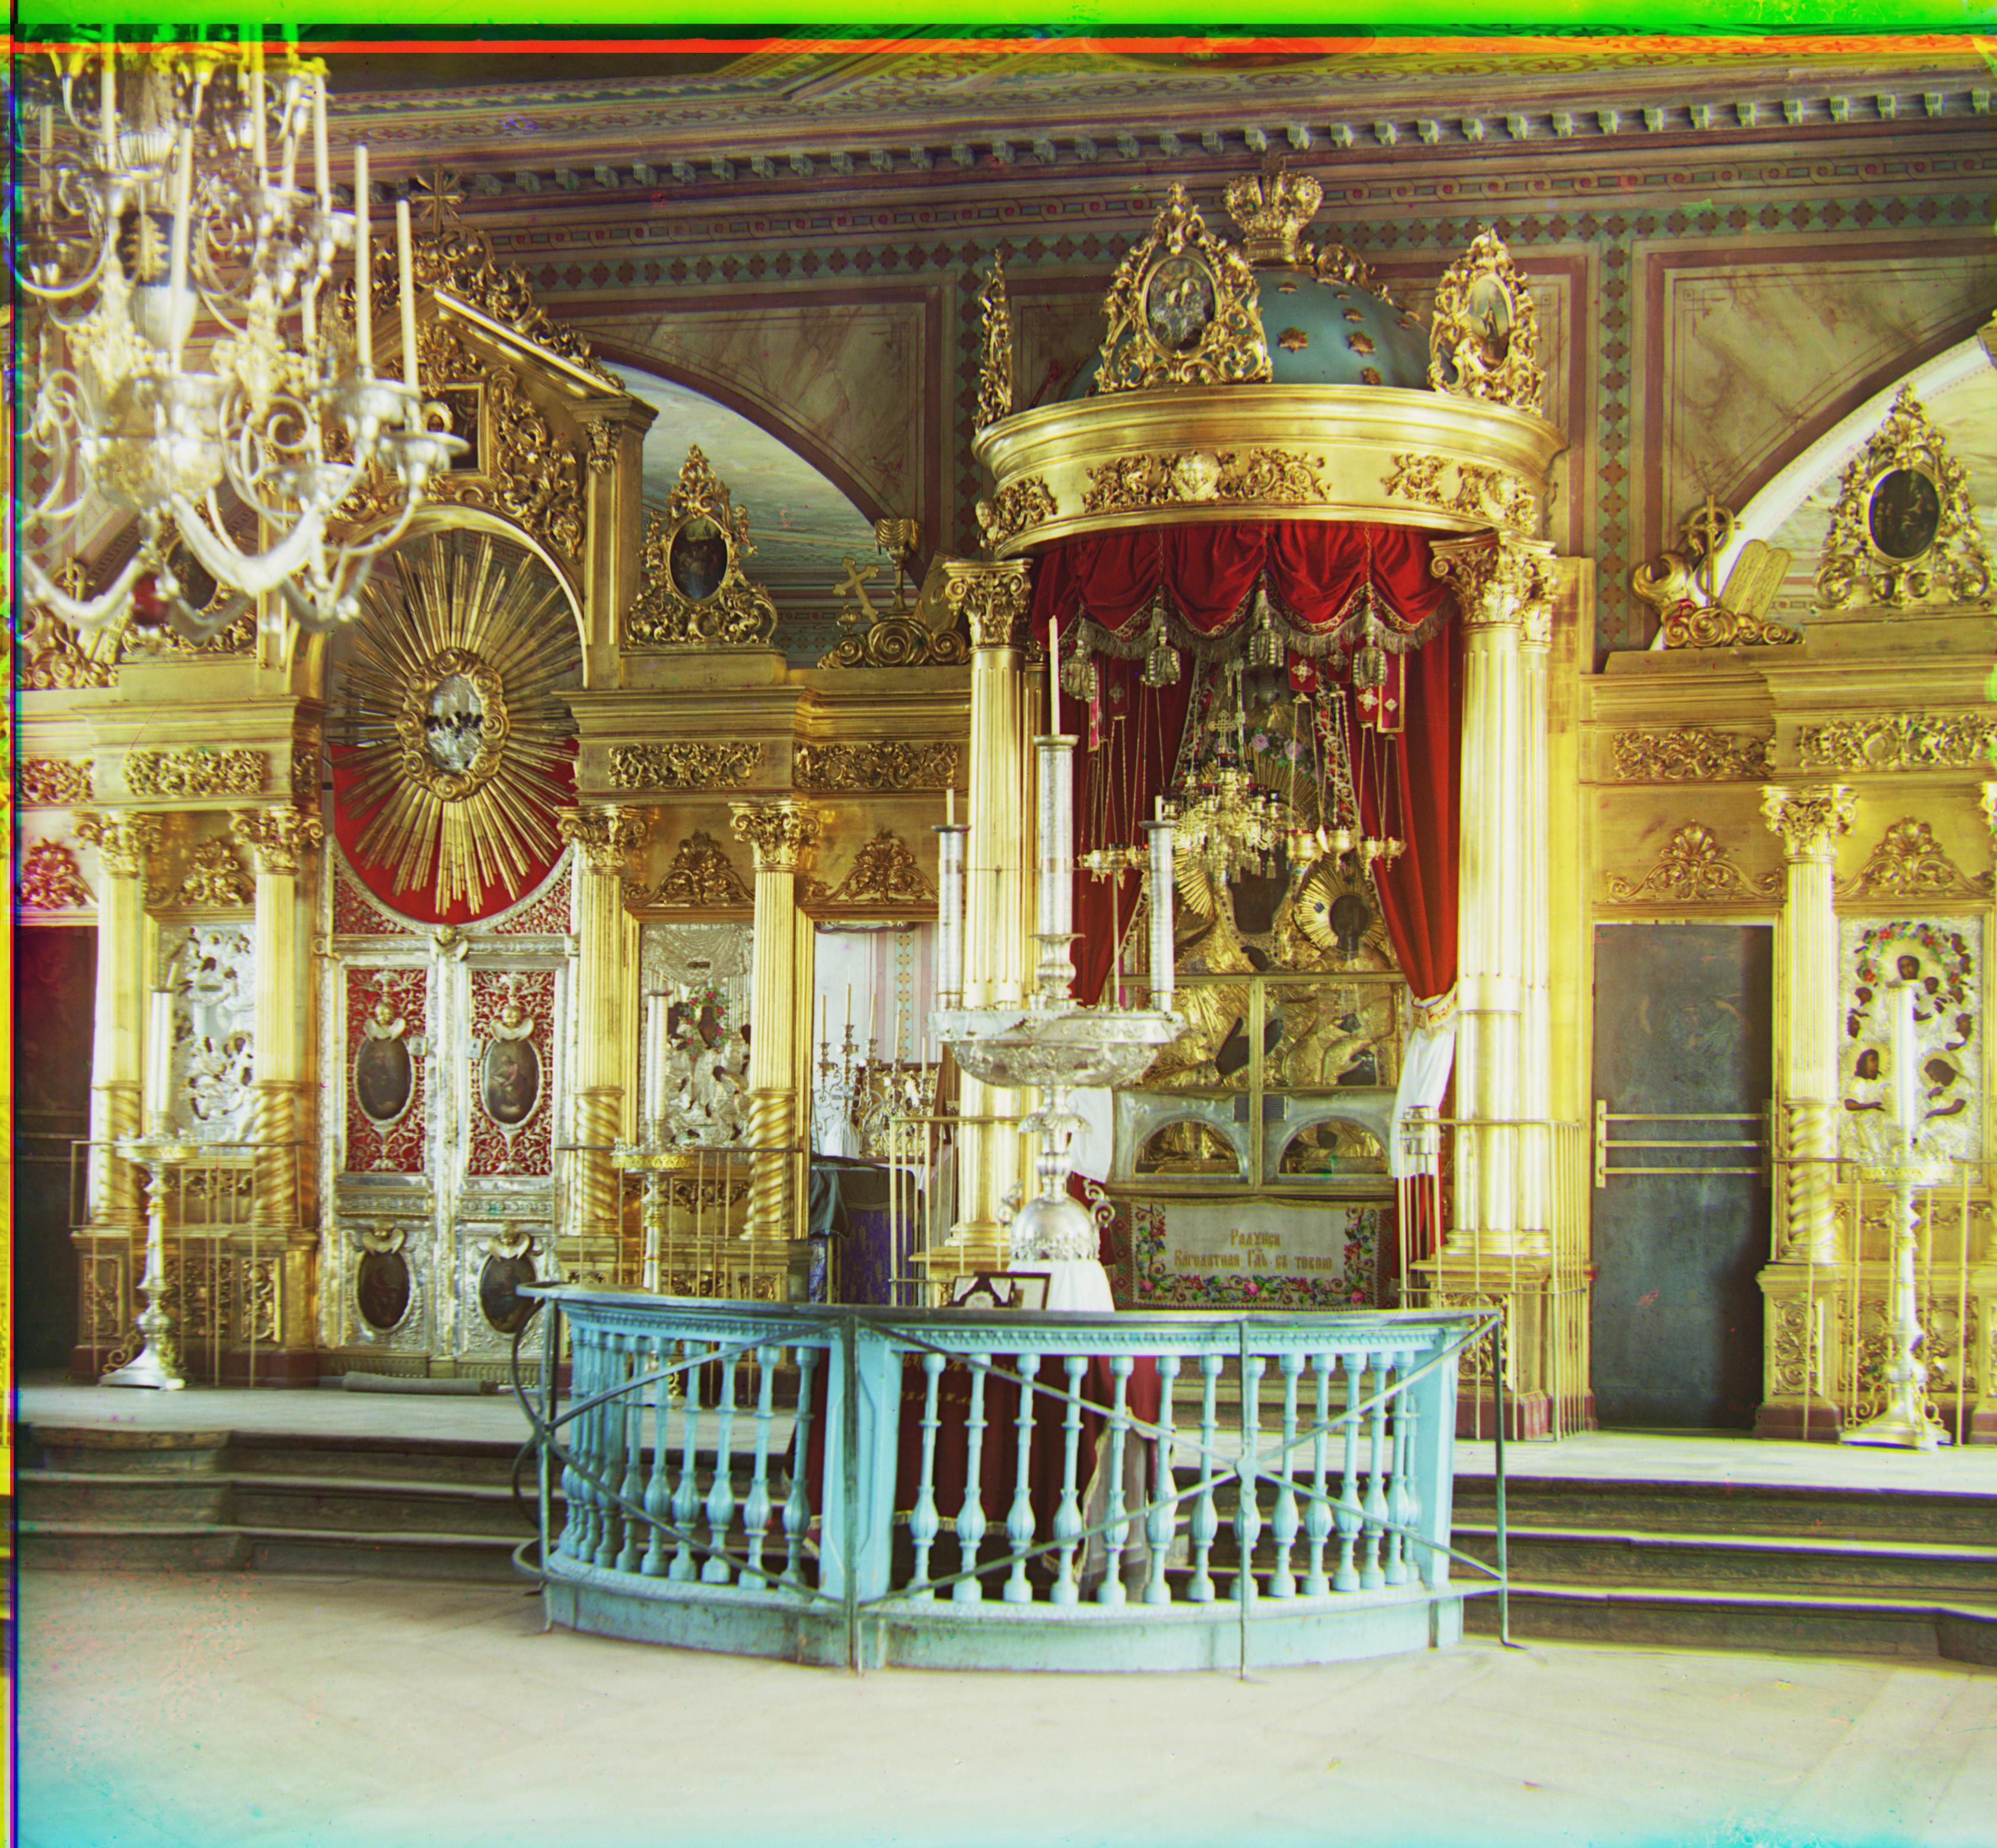
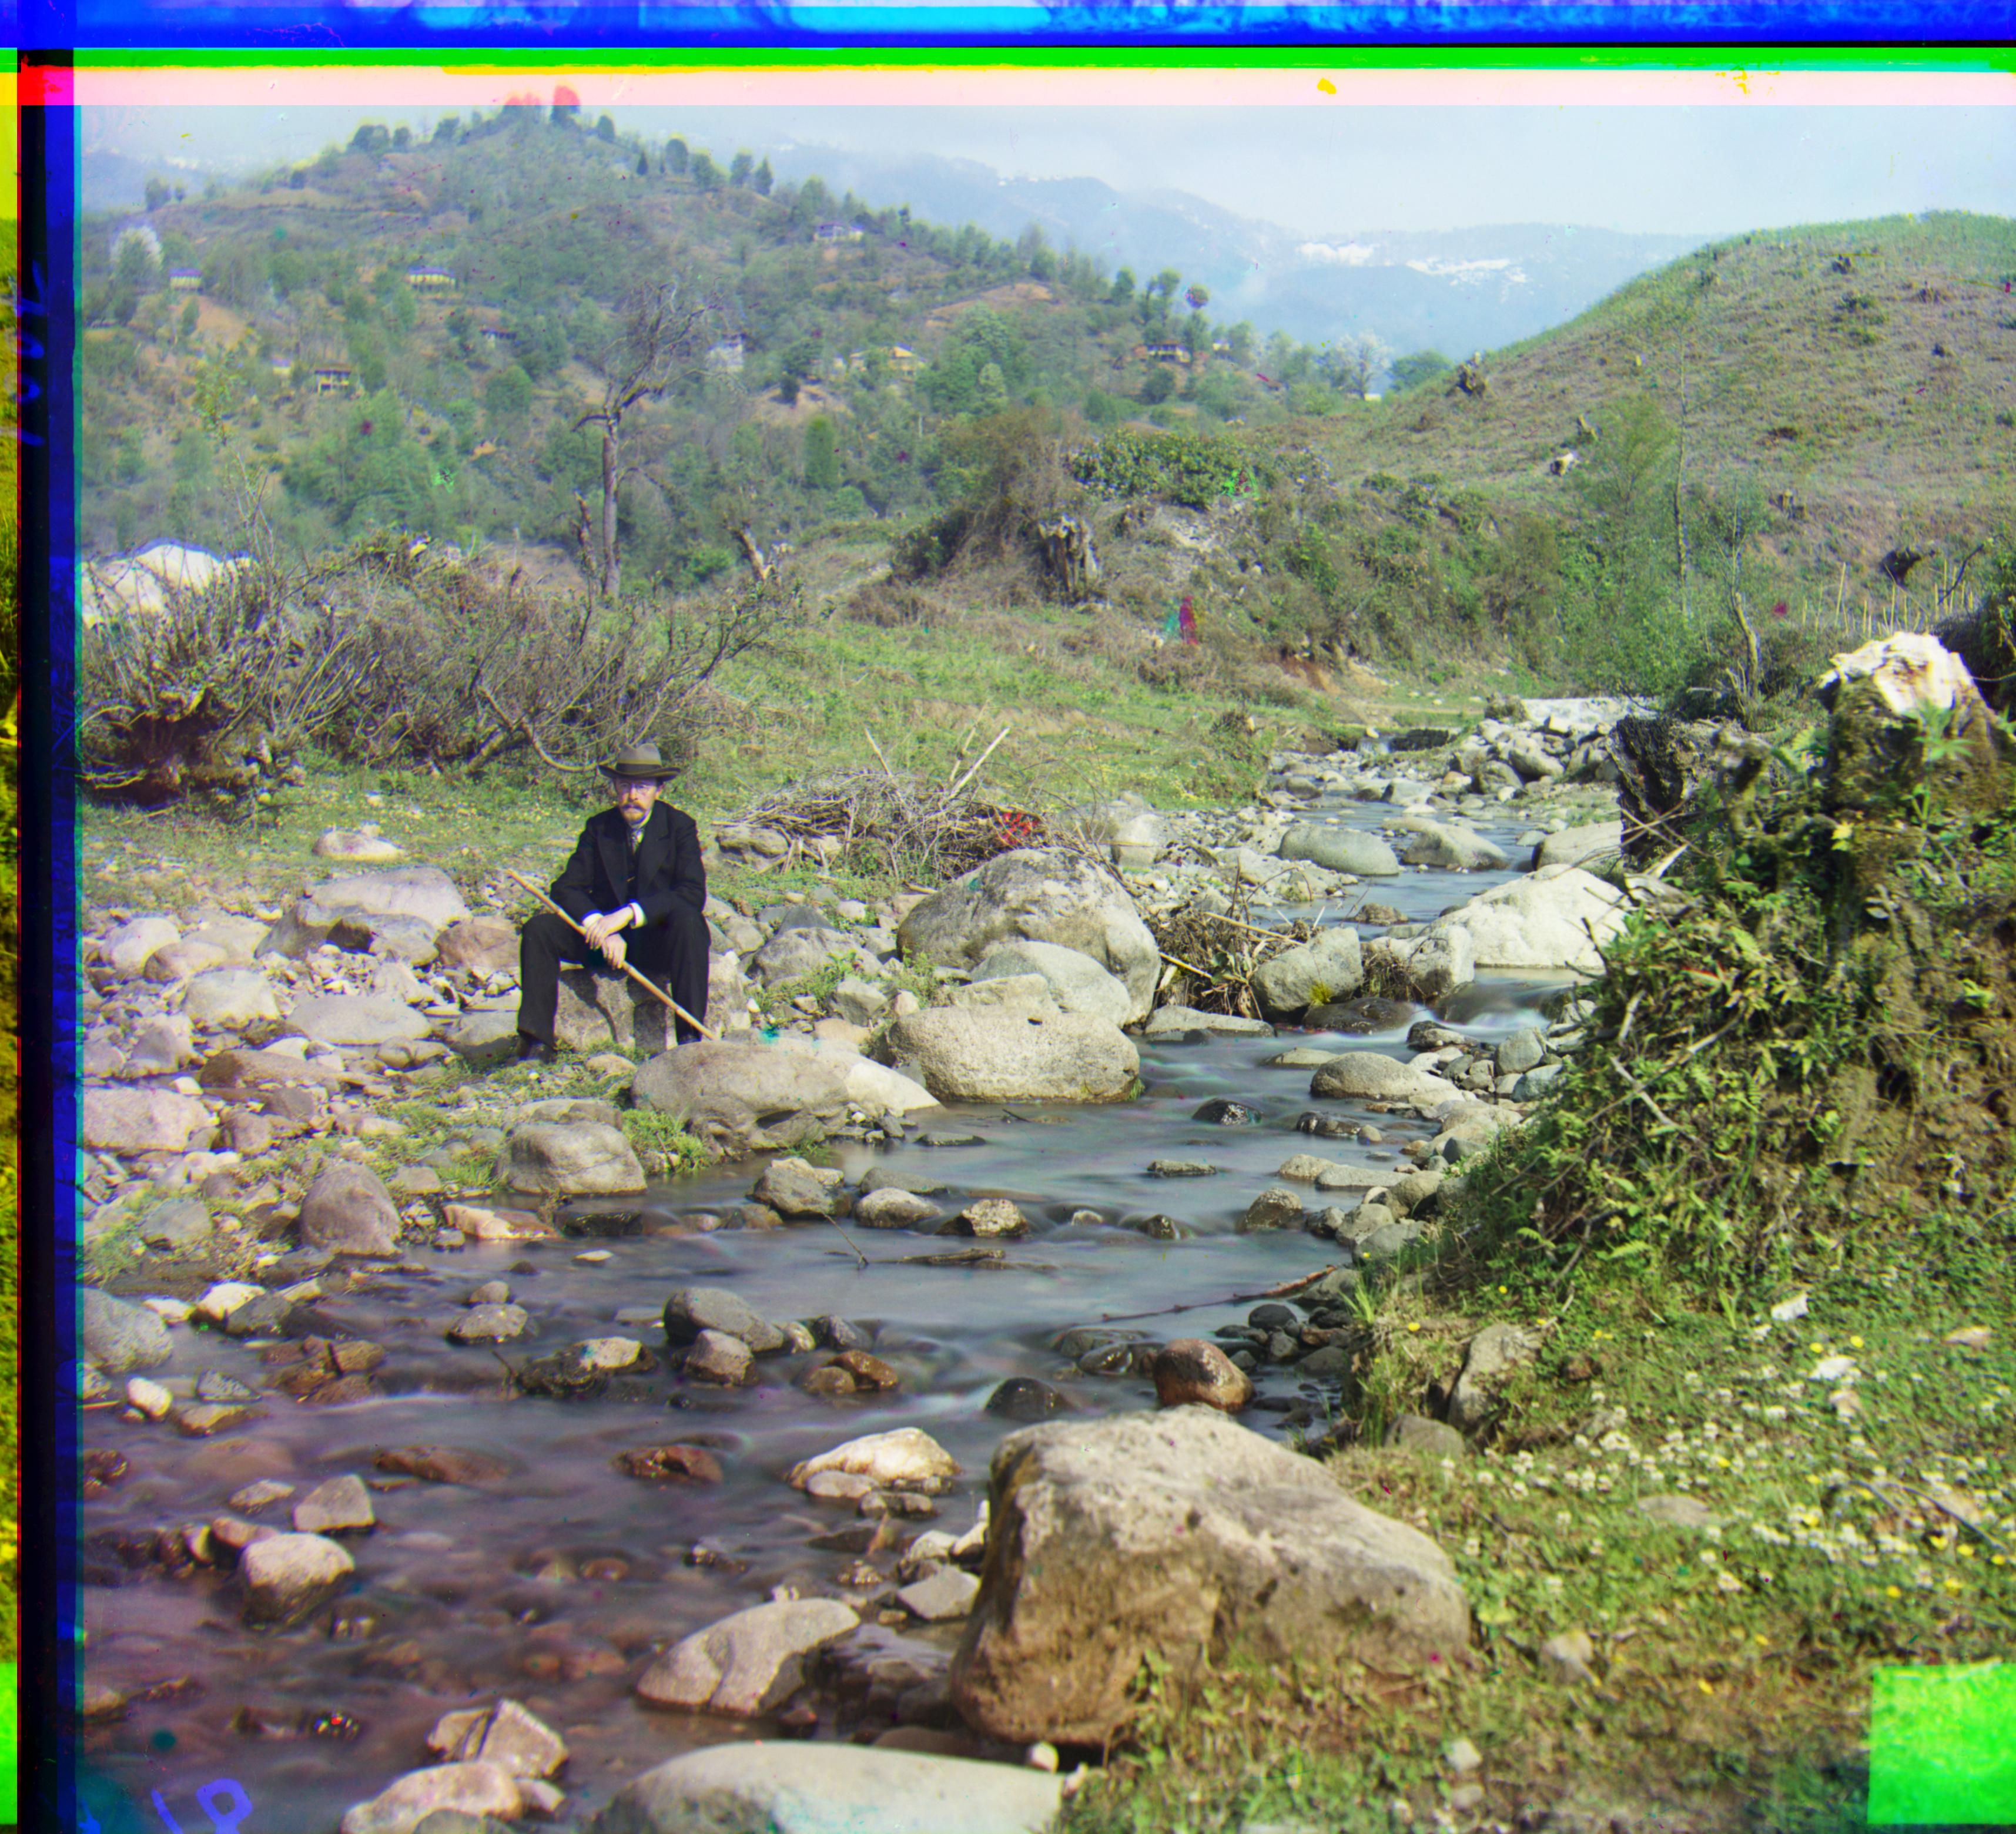
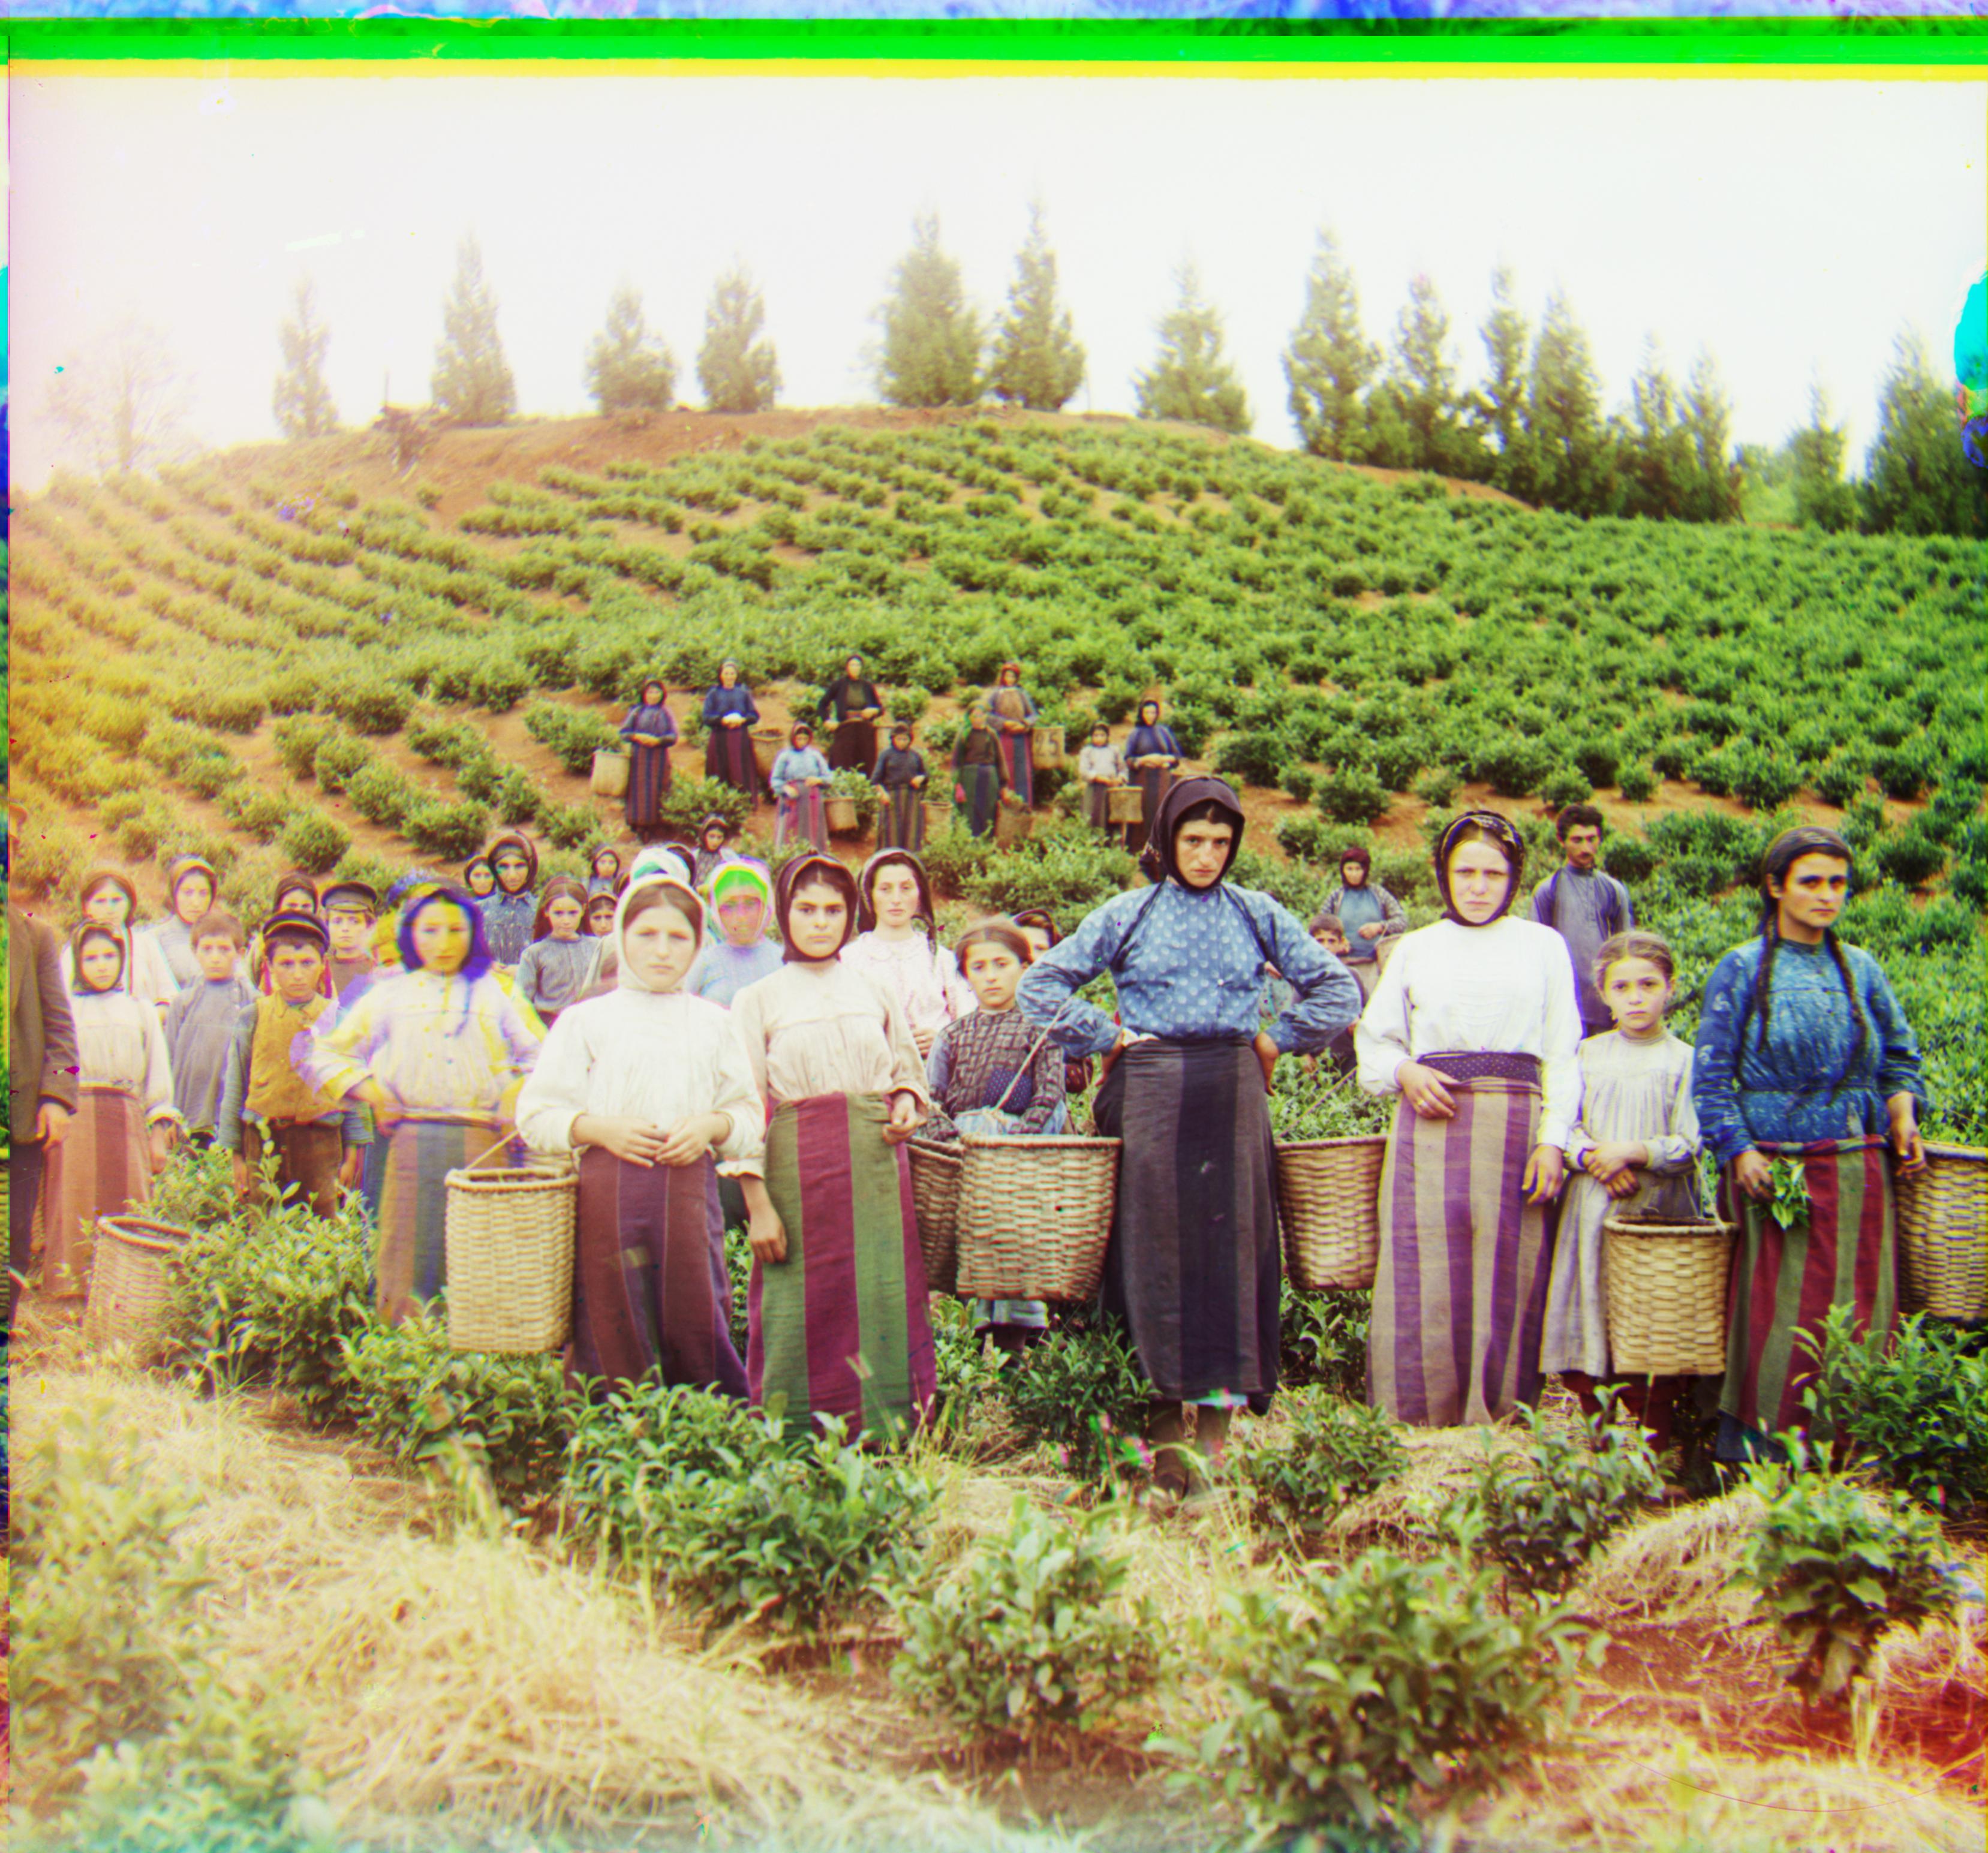
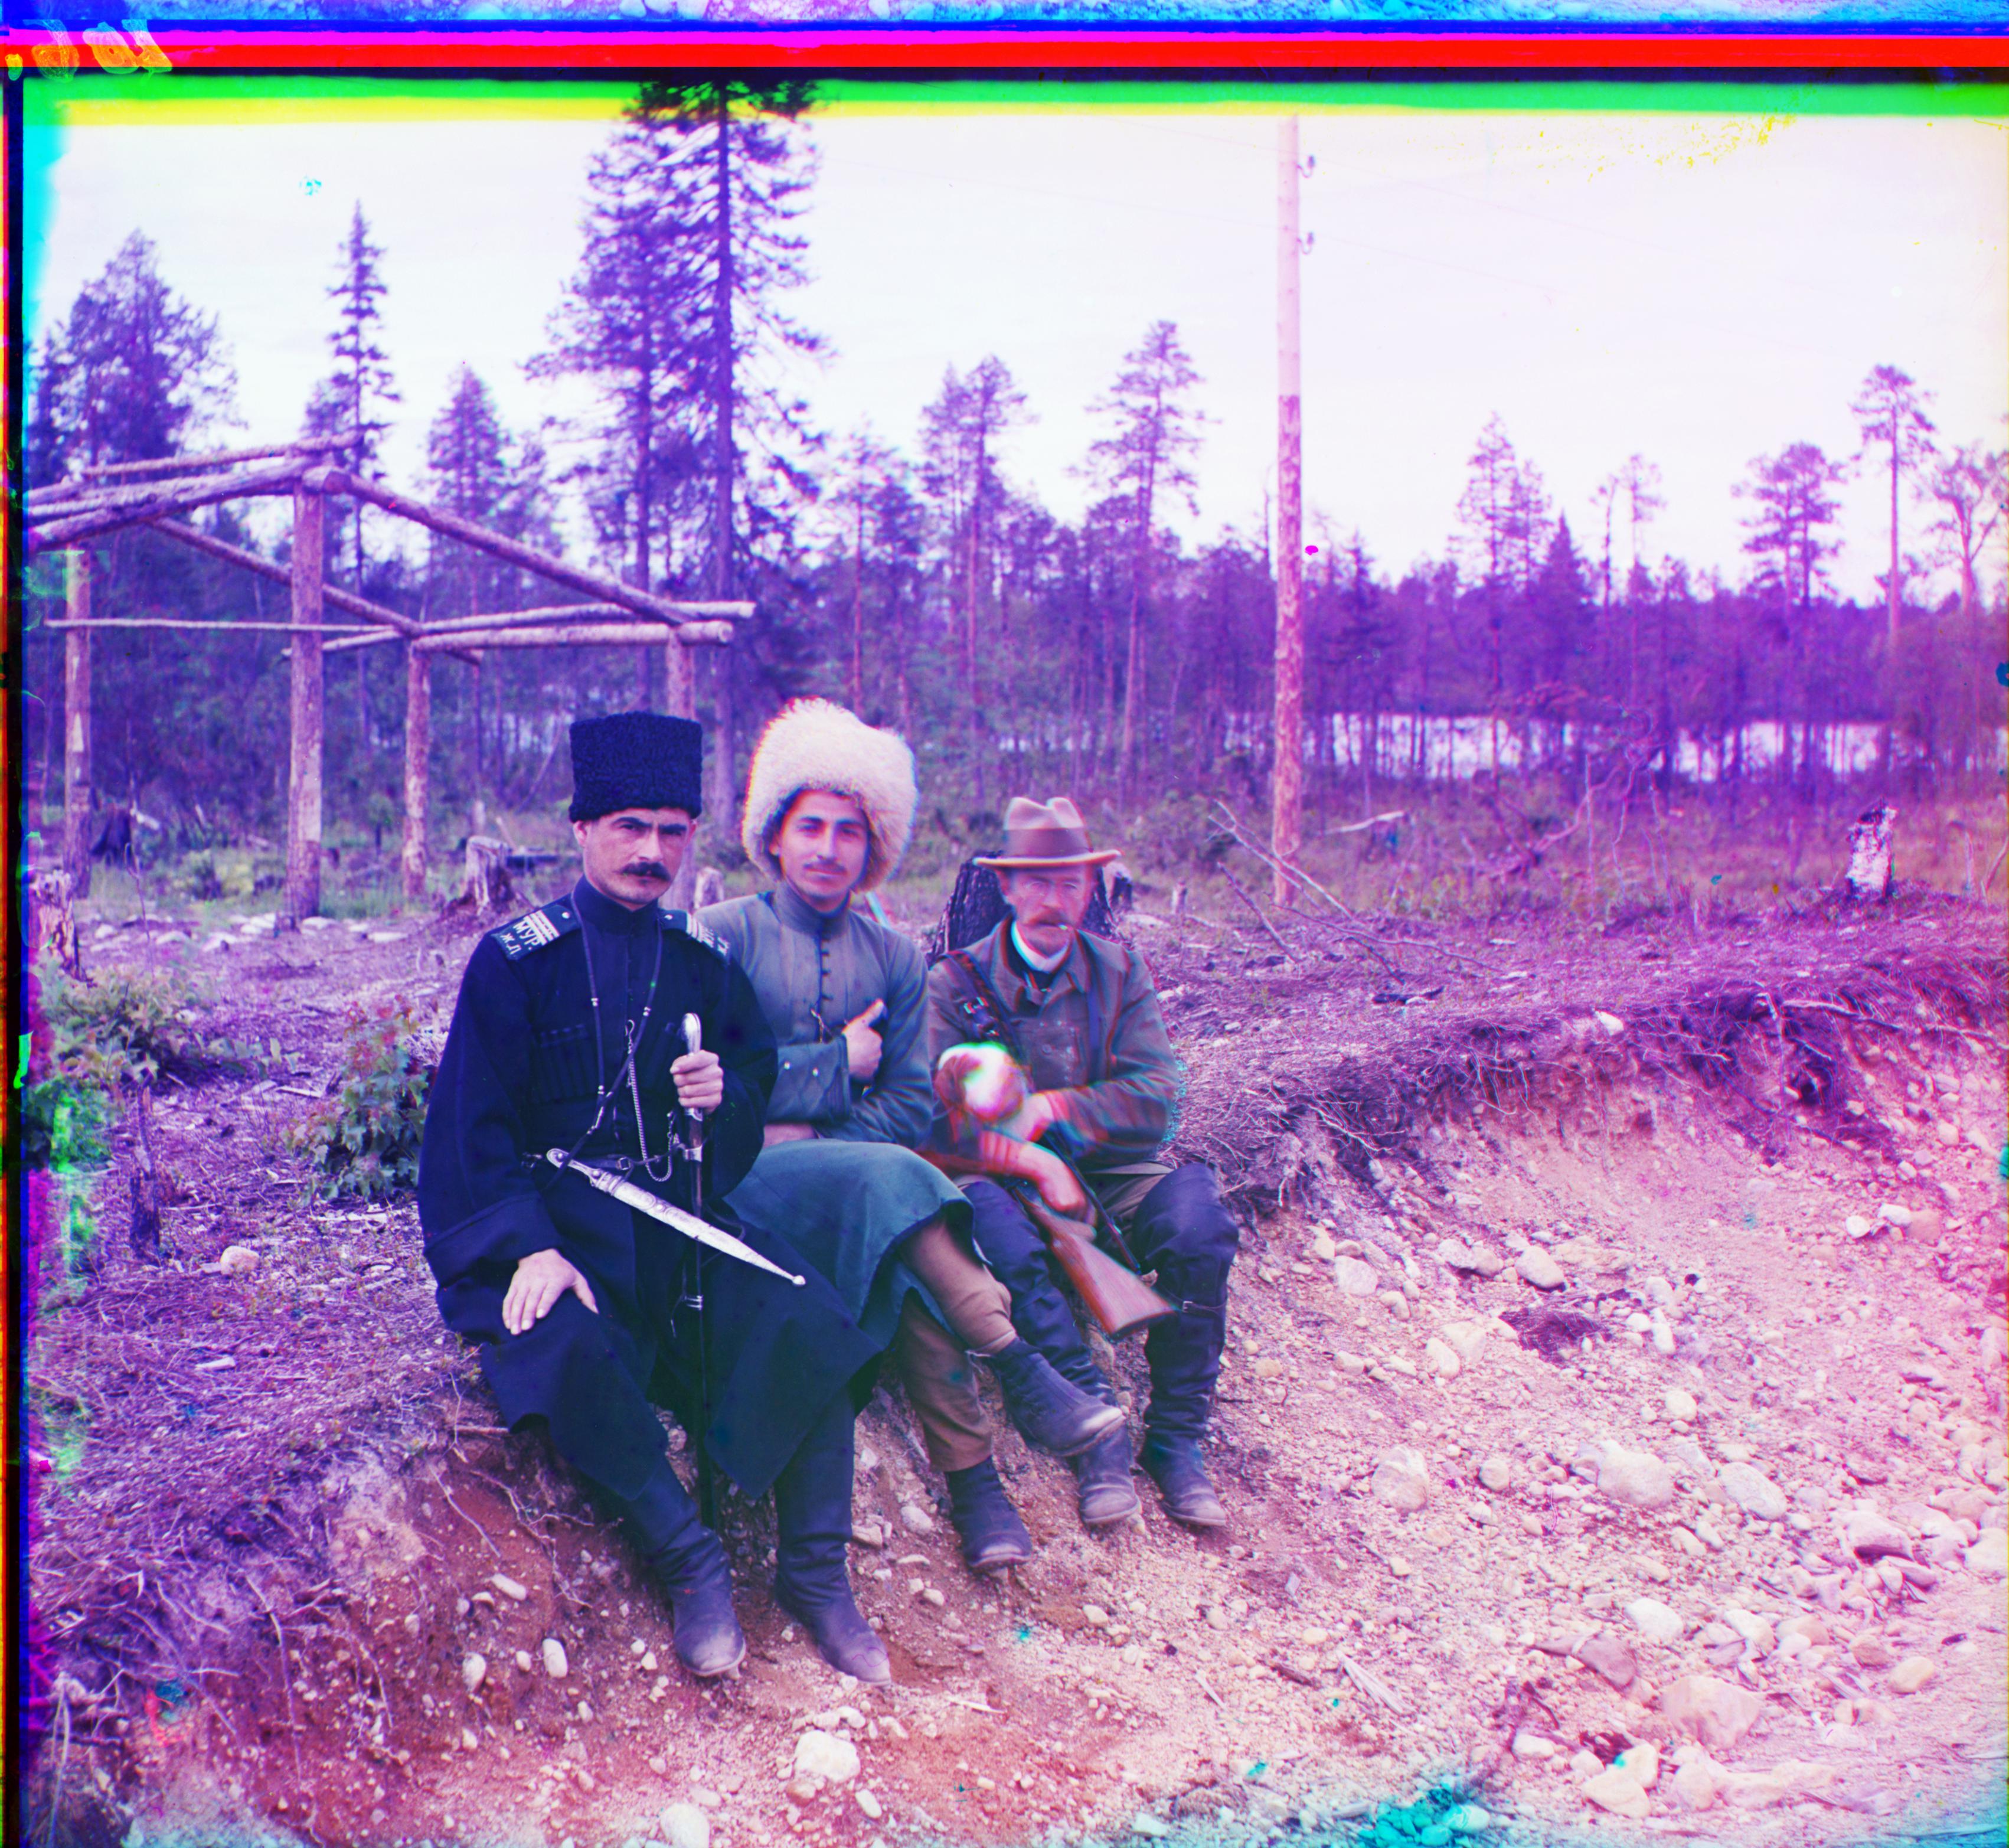
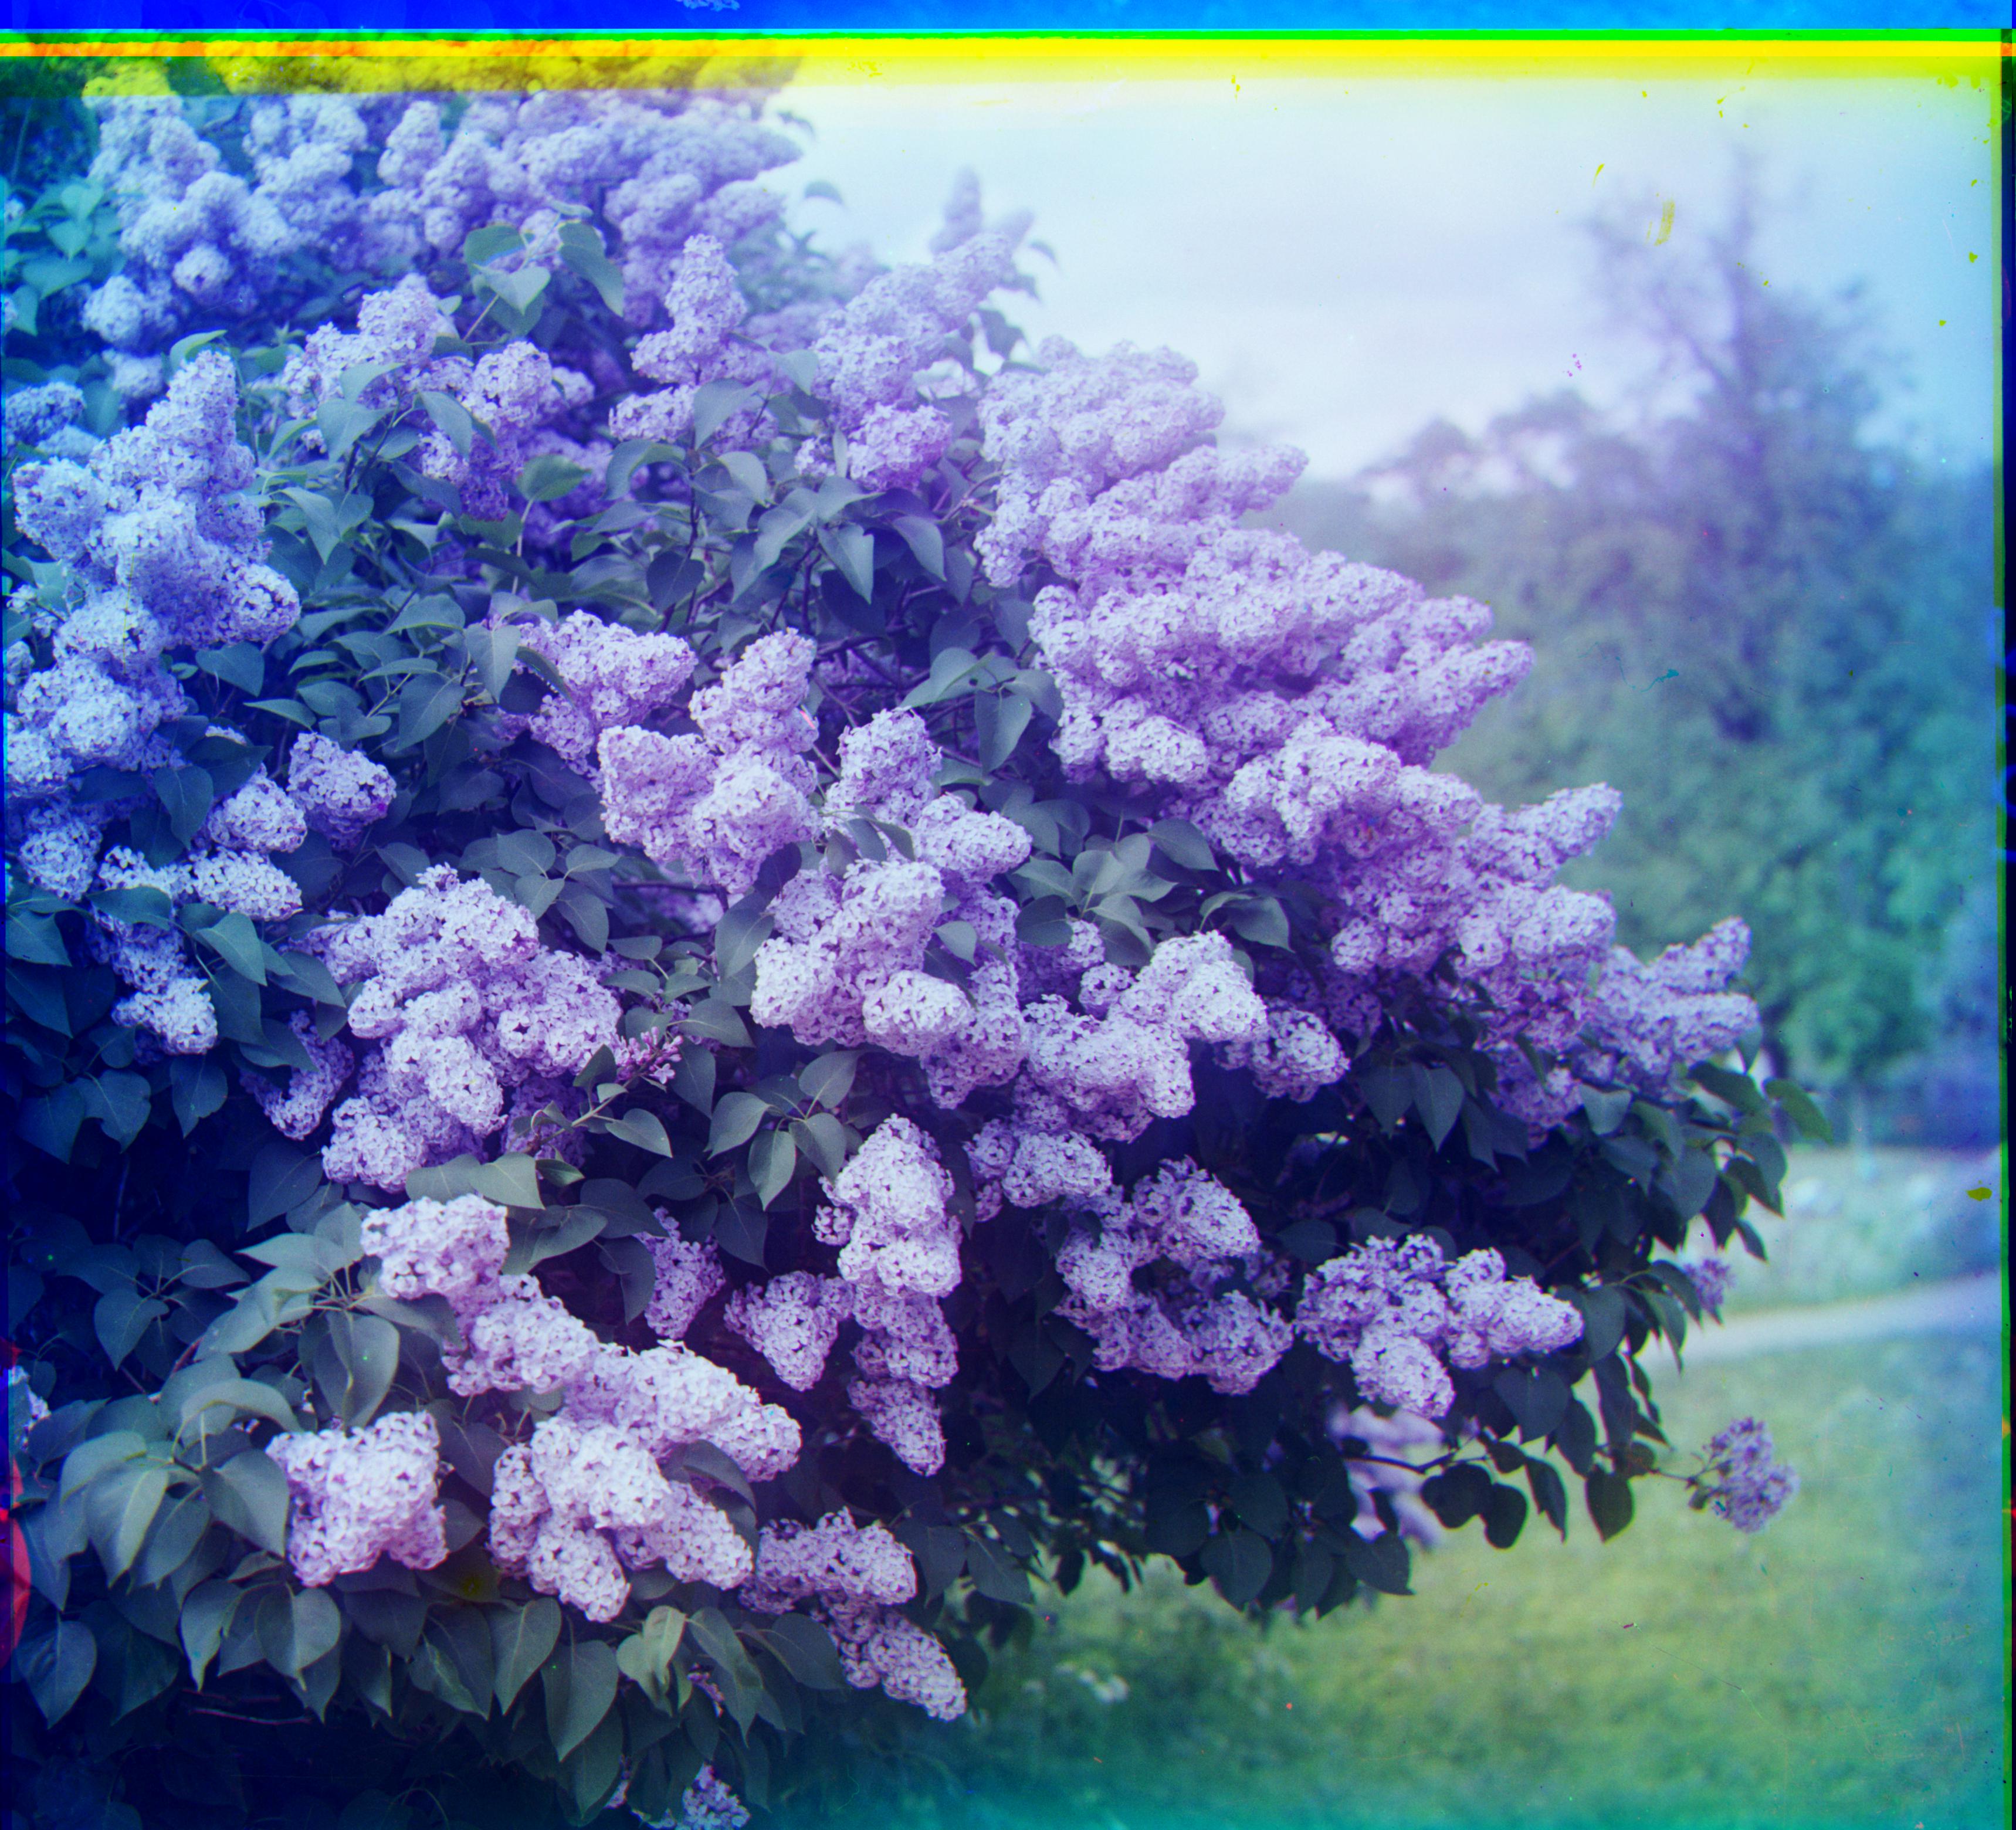
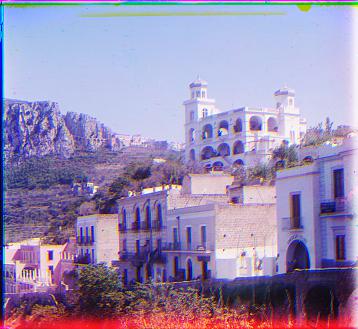
5. Aligning and processing data from other sources: I chose extra images randomly to process [5]. Becuase TIF image is more difficult to proecss, I choose two TIF images and one JPG images. It also has good pderformance on other images.
Gruppa.tif
Siren.tif
buildings.jpg
Reference
[1] https://en.wikipedia.org/wiki/Image_gradient
[2] https://docs.opencv.org/3.4/da/d85/tutorial_js_gradients.html
[3] https://www.programmersought.com/article/44561478628/
[4] https://www.geeksforgeeks.org/python-imageops-autocontrastmethod/
[5] https://www.loc.gov/collections/prokudin-gorskii/?sp=1