
Here are the images I chose to morph between and their anchor points.
We can compute the average of these points and use a Delaunay triangulation to get a reasonable mesh of triangles which we will warp to.

Computing the affine transformation which maps a triangle with points (a, b, c) to one with points (d, e, f) amounts to solving a matrix equation TA=B where each column of A and B are the points of the triangles with the extra spatial coordinate set to one. This T can be solved for by right multiplying B by A^-1. Here's an example of a warp: we want to map the left triangle onto the right triangle:

We first compute the affine transformation between them, and use biliniear interpolation, to compute the values within our target triangle. Here's the mapping we get of just the first color:

All we have left to do is take each triangle in our mesh and warp each triangle in the original images to the corresponding average triangle in the mean triangulation:

Here we can see that the warped faces end up matching very nicely to the meshpoints which we defined. The average of the faces is in the bottom middle. We can definitely tell that it's a nice mix between the two faces, but the relative sparsity of the mesh leaves a couple small artifacts. Bill Murray's ears are much more present in the original images, and as we didn't define the mesh to warp these exactly, we end up with a sort of ghosting where Bill's ears were warped to but Clint's weren't. For most of the explicit features like the mouth and eyes, it lines up reasonably. The top of the head, for example, has a texture very much in between both faces, as well as the hair.
We can just as easily warp a percentage between each face. Here's an animation of 45 frames of warping:

I also put it on youtube here
Here I'm using the FEI Face Dataset. It contains cropped images of faces with labeled keypoints like such:

We can also compute the mean face and triangulate it. Here is the triangulation laid over the sample:

We can use the same technique as in the last part and compute the average face keypoints and warp any face to them. Warping every face to the average face will give us a truly "average" face of our dataset. Below are 4 examples of faces on the top warped to the mean face shape below. The last column is the average face computed.

It's clearly a very low noise representation of the faces in our dataset which is expacted.

I took a selfie and did my best to match the same keypoints as those in the dataset. Here's my first shot at triangulation.

My keypoint selection is… ok… images from here on out are pretty weird looking (fair warning). Here's me warped to the average face:

I tried using a different piece of software to make a better set of points to warp on. Here's my second attempt:


Still pretty gross but not as bad as the first one :)
I also warped the mean face to match the geometry of my face. Here's what it looks like:

This dataset also contains a set of smiling faces (separate from those I used previously). Here's the same mean computed instead on the population of smiling faces:

We can look at the difference between our average smiling face and our average not smiling face in order to get a sort of "vector" in which the direction of smiling increases.

Spooky!
We can see the differences correspond mostly to changes on the lighting of the face, brightness from the teeth, lifting of the eyebrows, and squinting of the eyes. Pretty neat!
We can also use this to distort any face in our population.. like mine! Warping my face to the mean, adding this gradient vector, and warping it back yields a more "smiley" me. The oddities in the warping do make this image a little gross looking, though. Here it is before warping:

Here it is warping my face back to it's original geometry:

Instead we can also look at what we'd get if we apply the transformation to my mean-warped face which takes the average non-smiling face geometry to the average smiling face geometry. This should make the actual structure of my face more "smiley". It ends up doing that but looking pretty awful in the process of doing so.

We could also take this image and apply the inverse of the warp from me to the average non-smiling face to try to fix some of the geometry (for example around the bottom of my chin).

At this point I'm just terrified of what I've made. I think I'd rather just smile instead.
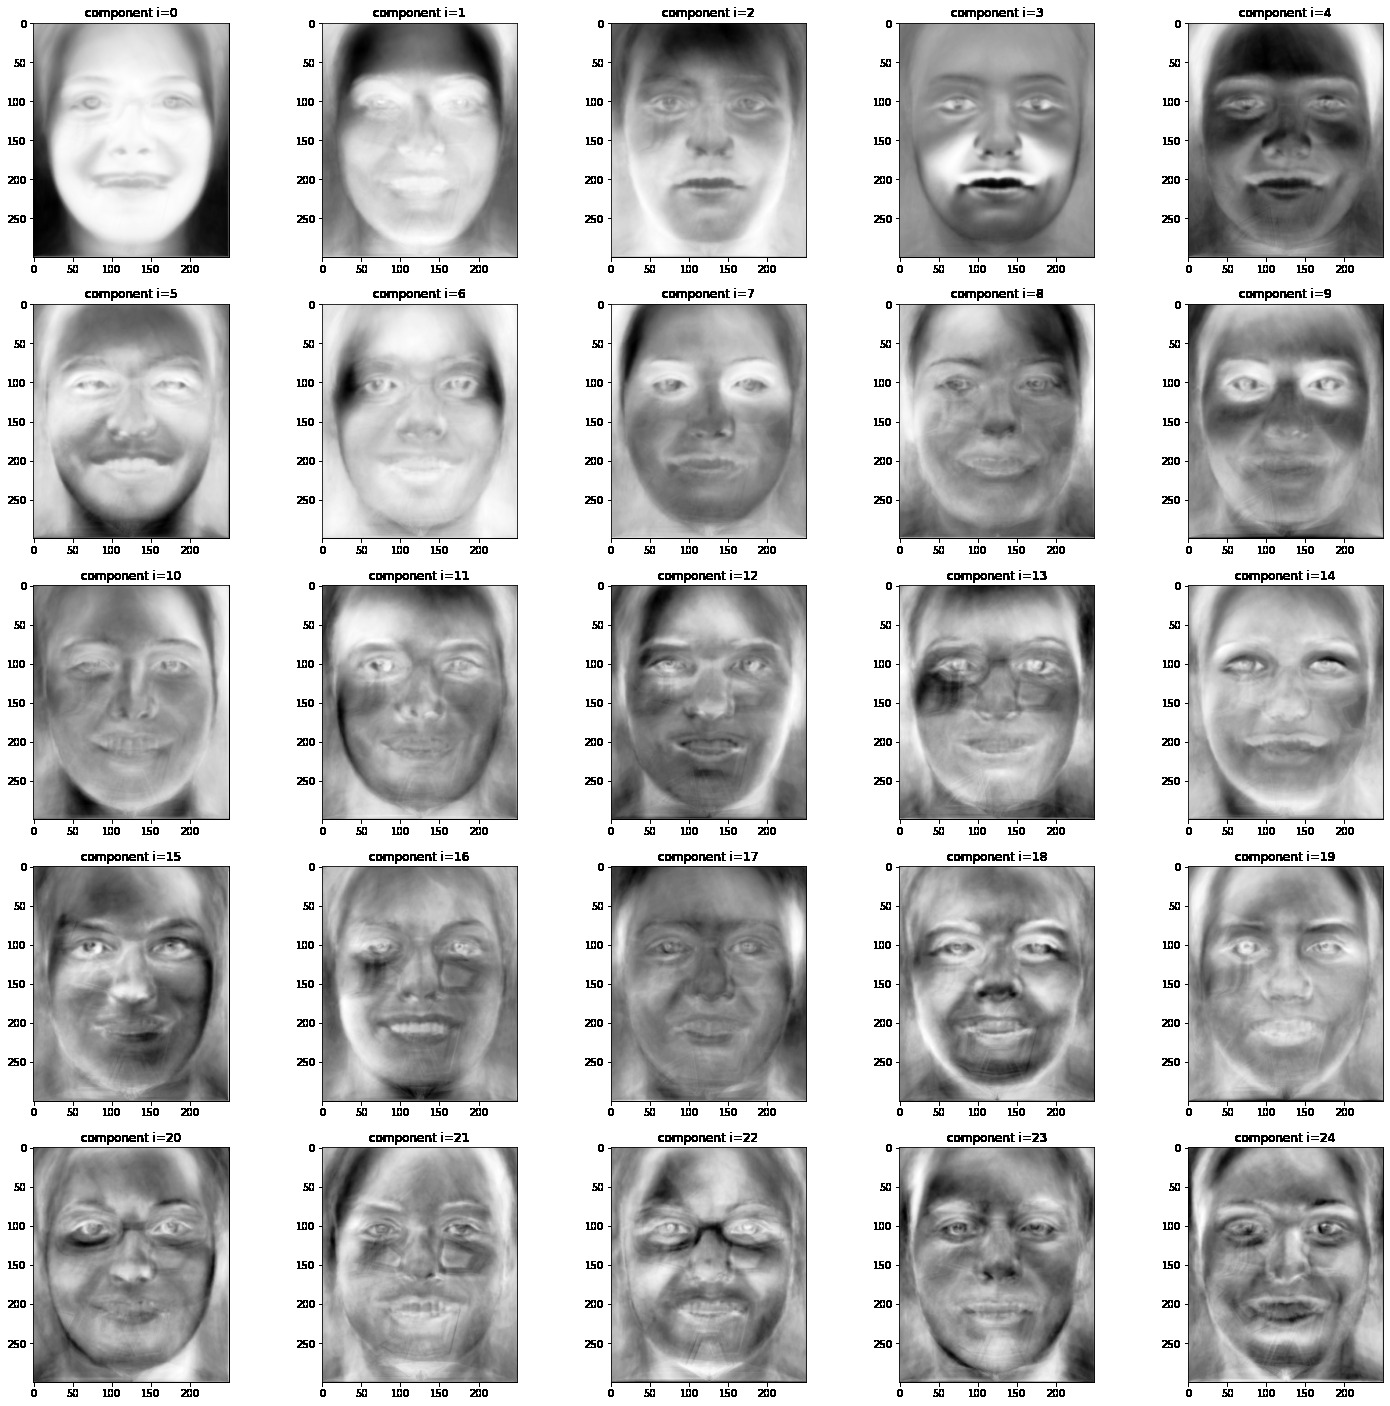
We can also analyze our faces using PCA. First, we look at only the non-smiling images, warping each to the mean face so the features line up, turning each image into a vector, normalizing our dataset, and running it through an iterative PCA algorithm. Our principal components yield some super interesting information


Here, the first principal component corresponds to some hair, even lighting of the face, and a sort of generally homogenous looking face. The second principle component corresponds to lighting around the top of the eyes as well as some highlighting around the chin and the nose. The third is also lighting from below. Some interesting ones are the i=6 case which seems to correspond to a slightly open mouth, the i=7 one which seems to correspond to having some dark hair in the top right of the frame.
Here is each component with a small perturbation applied to my face.

The i=7th component seems to make me more female, as well as the i=13th. The i=3rd component also gives me darker hair.
We can also do the same on the entire dataset with the intent of letting PCA distinguish between the smiling and non-smiling faces. We take the non-smiling images, warp them to their mean, and warp the smiling faces to their mean, then normalize, PCA:

And it looks like it works! We see the i=2 and i=3 components clearly correlate to lighting around the face when smiling, as well as the i=5 component. We still see the "hair in the top right" component in i=8, and a couple others. For example, the i=14 seems to have a more female aspect to it.
Here's what it looks like when I add small perturbations of each of these to my face. Sometimes, the correct amount to add may be negative (for example, i=3 and i=4).

To make me smile now, we can add some amount of a given component to my warped face and then apply the inverse transform. Here's me adding some of component i=3. We see it messes up the lighting a bit.

Here, adding some of the lighting components, we make the image a little better balanced but still just as creepy looking. It's the eyes.. they don't look smiley…

I also used some of the components to make a female duck-face me! This one is significantly less weird looking than the previous one.
