Project 04: Facial Keypoint Detection with Neural Networks
Vanessa Lin
Overview
In this project, I built convolutional neural networks to help me detect keypoints on a face, from just the nose to the whole face structure (eyes, eyebrows, nose, lips, face outline). To detect these facial keypoints, I first built two toy CNN models to train on the Danish computer scientists dataset. Afterwards, I moved onto a larger dataset, the ibug face dataset, to train and detect facial keypoints.Nose Tip Detection
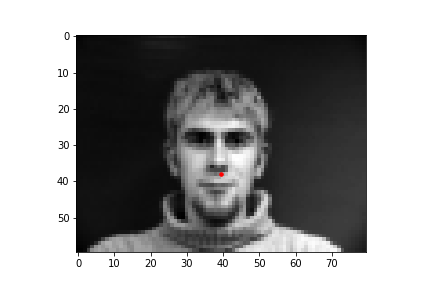
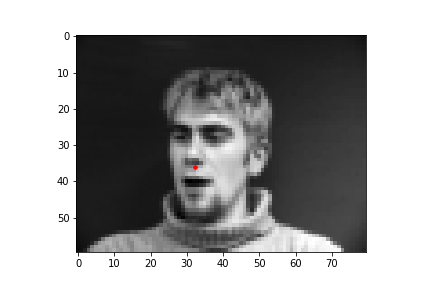
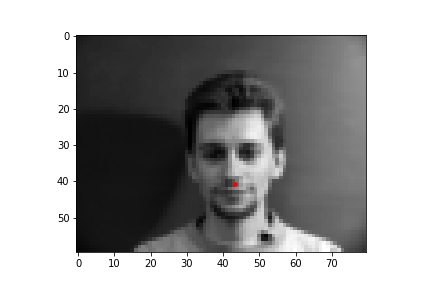
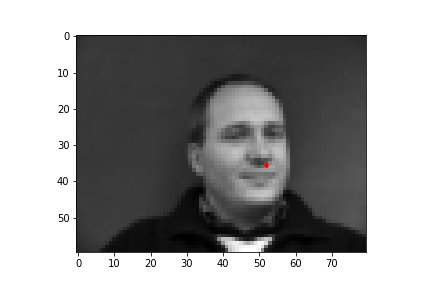
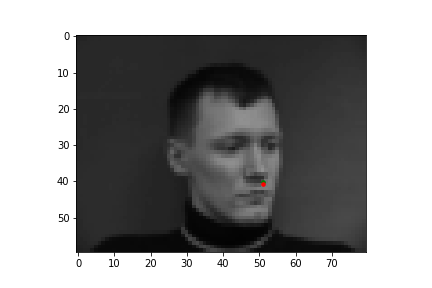
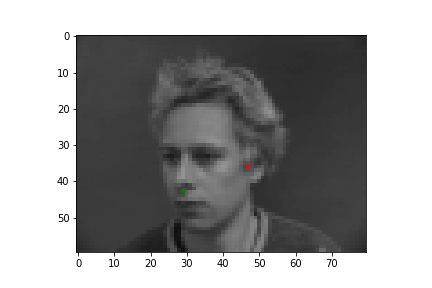
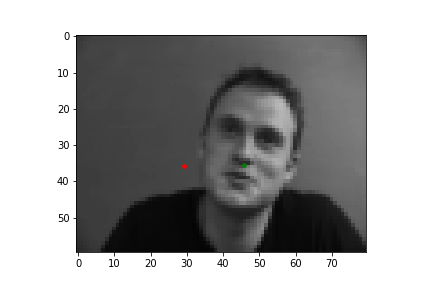
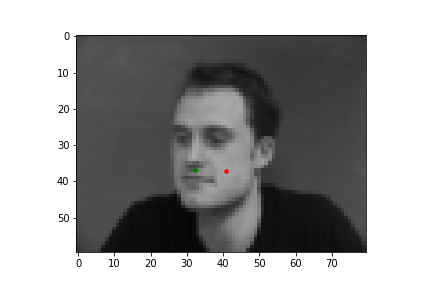
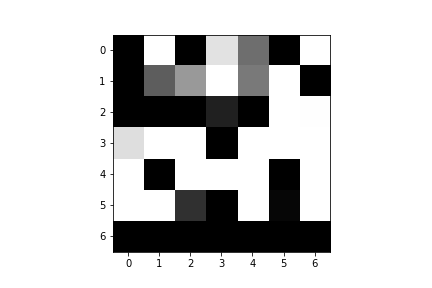
In this part of the project, I built a simple convolutional neural network that takes in an image as input and outputs the coordinates of a nose tip. Before training, I created a Dataset that creates a sample of{'image': image, 'landmarks': landmarks}, where the image was resized to a smaller size of 80 by 60 and the landmarks would just be one point for the nose. Next, I created a DataLoader to iterate through the data during training and validation. Below are some images from the training set with the ground truth labels in red.
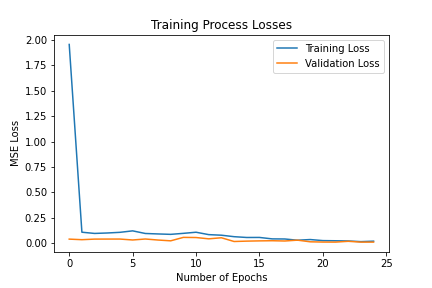
I trained the neural network for 25 epochs and used the MSE loss function with an Adam optimizer, using a learning rate of 0.001 and a batch size of 8. Below are the results of the training and validation losses across the 25 epochs.

Full Facial Keypoints Detection
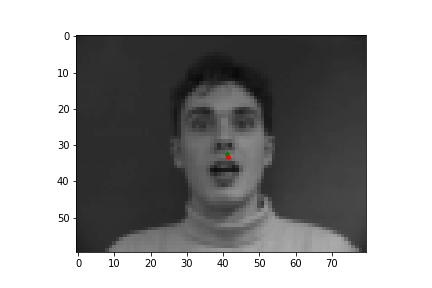
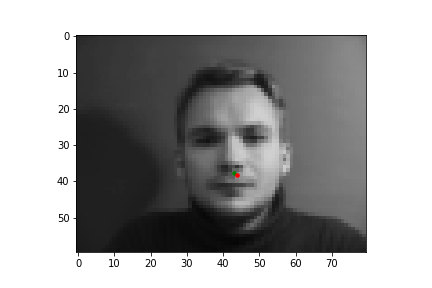
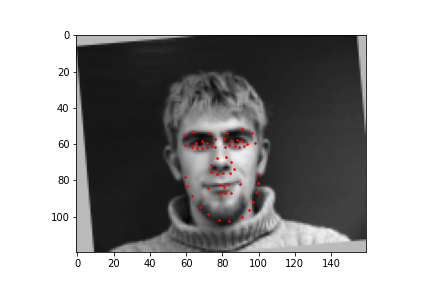
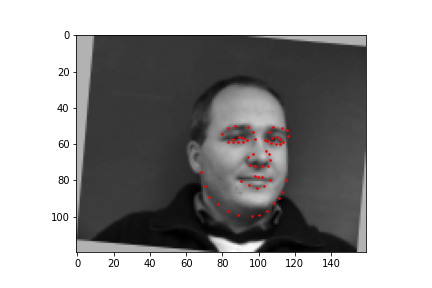
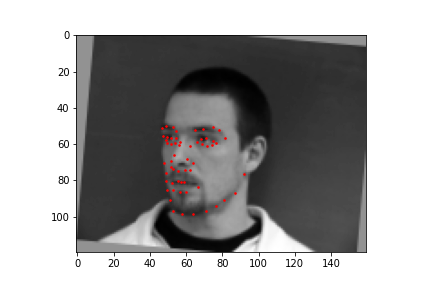
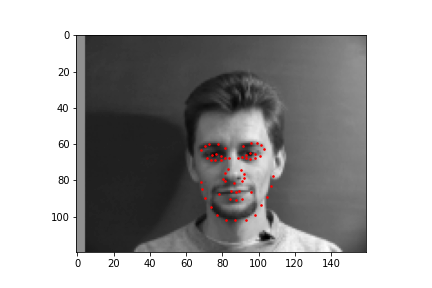
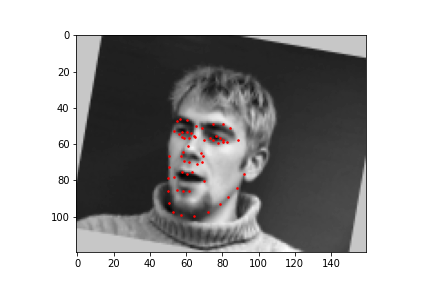
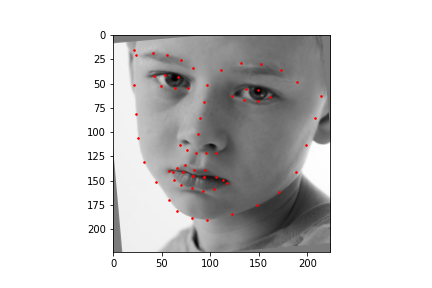
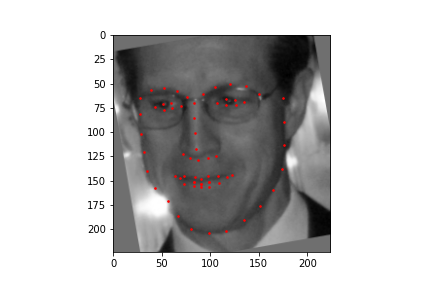
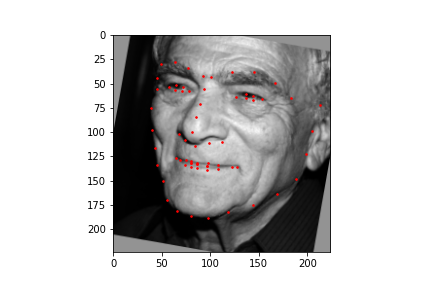
For the full facial keypoints detection, I built a similar convolutional neural network like the nose point detection neural network, but with two more convolutional layers. Also, since we have a small dataset, I added data augmentation, like rotating the image randomly with either[-10, -5, 0, 5, 10] degrees and shifting the image horizontally with either [-10, -5, 0, 5, 10] pixels, and updated the keypoints respectively to each transformation. The images were also resized to 160 by 120. Below are some of the sampled images created with the data augmentation and the ground truth labels in red.
I trained the neural network for 20 epochs and used the MSE loss function with an Adam optimizer, using a learning rate of 0.001 and batch size of 4. Below are the results of the training and validation losses across the 20 epochs.
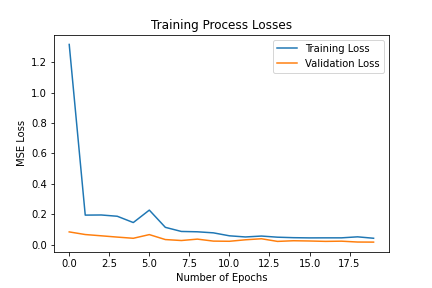

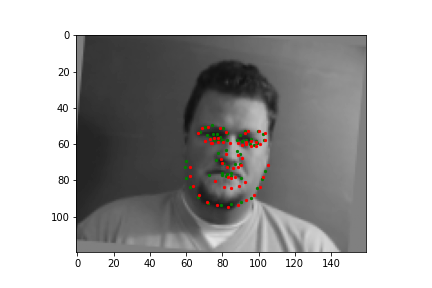
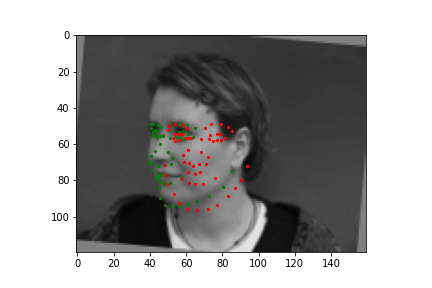
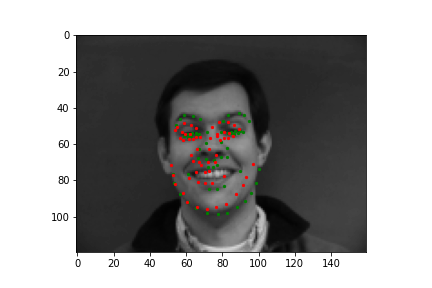
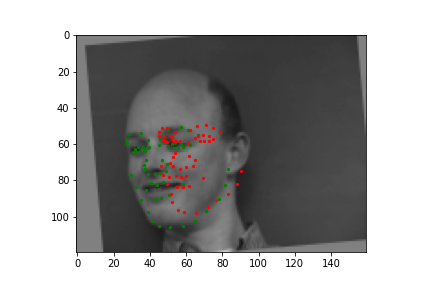

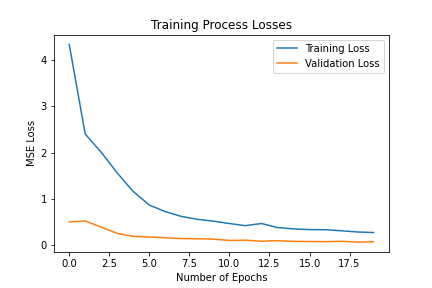
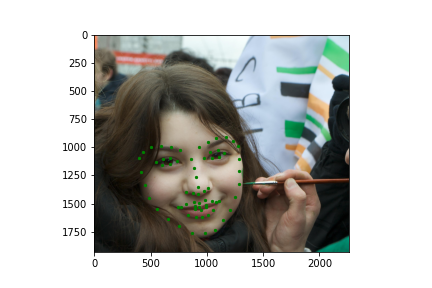
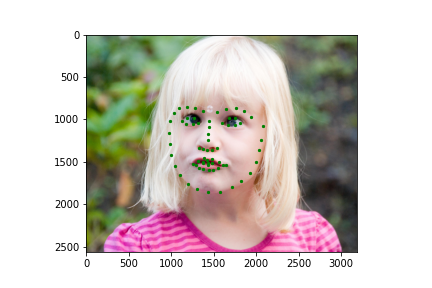
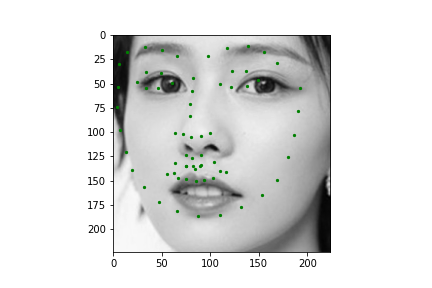
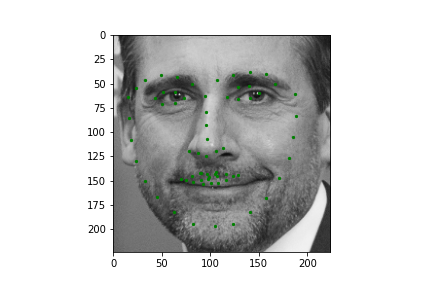
Train With Larger Dataset
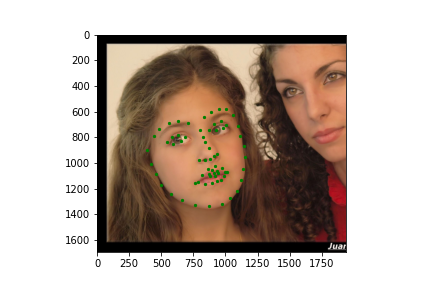
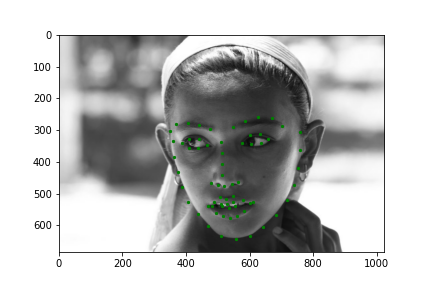
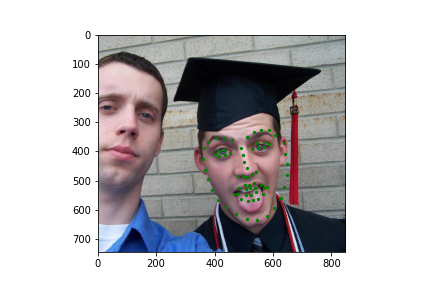
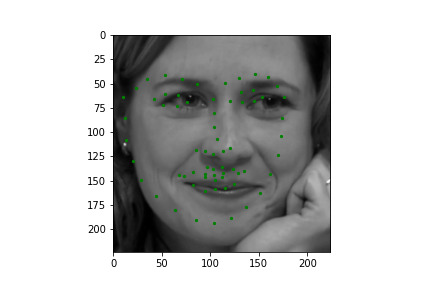
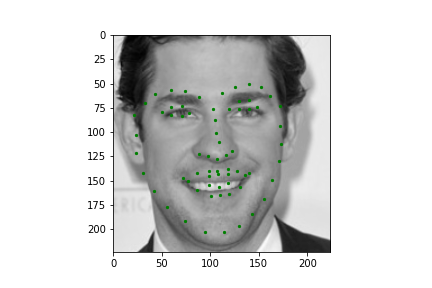
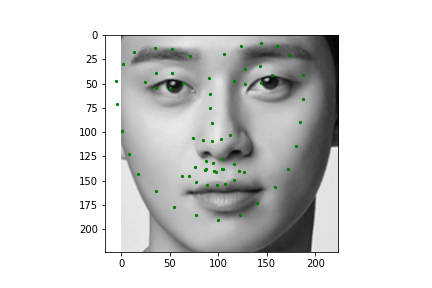
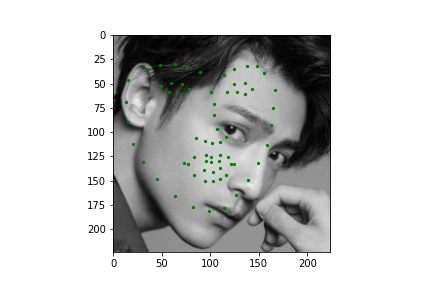
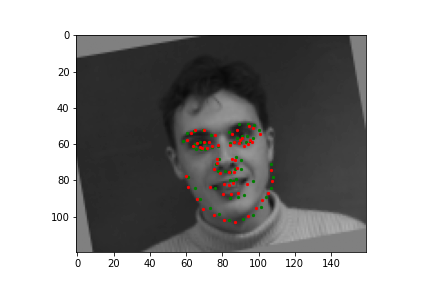
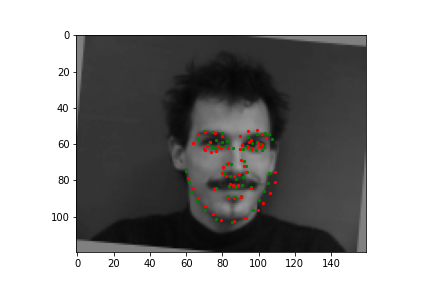
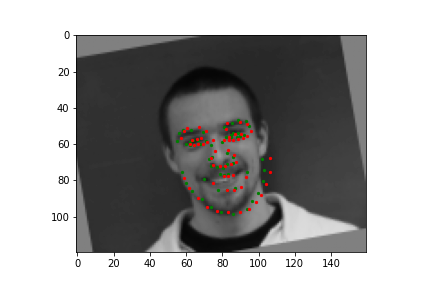
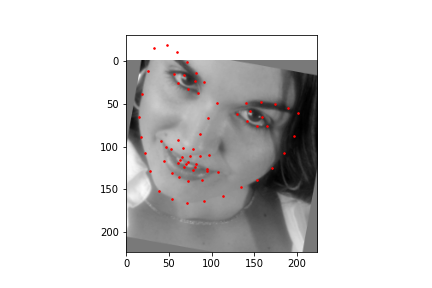
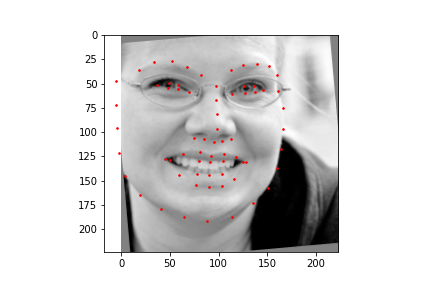
Now for training on a larger dataset, like the ibug face in the wild dataset (6666 images and 68 facial points per image), I used the same data augmentation techniques from part (2) for this part during training, and I added another transform that randomly changed the brightness of the photo, which would rescale the intensity throughskimage.exposure.rescale_intensity if the rescaling brightness boolean was chosen. As the dataset came with bounding boxes for each image, I increased the bounding box by a factor of 1.25x, cropped each image to the bounding box, and resized the image to 224 by 224 for training. While resizing the images, I also updated the keypoint labels accordingly. For the convolutional neural network, I used ResNet 18 from torchvision.models.resnet18(pretrained=False). I modified the first convolutional layer to take in 1 channel for the input as the image input's shape was (1, 224, 224), and I modified the last fully connected layer to an output size of 136, for the 68 facial points.
ResNet(

  (conv1): Conv2d(1, 64, kernel_size=(3, 3), stride=(1, 1), padding=(1, 1), bias=False)

  (bn1): BatchNorm2d(64, eps=1e-05, momentum=0.1, affine=True, track_running_stats=True)

  (relu): ReLU(inplace=True)

  (maxpool): MaxPool2d(kernel_size=3, stride=2, padding=1, dilation=1, ceil_mode=False)

  (layer1): Sequential(

    (0): BasicBlock(

      (conv1): Conv2d(64, 64, kernel_size=(3, 3), stride=(1, 1), padding=(1, 1), bias=False)

      (bn1): BatchNorm2d(64, eps=1e-05, momentum=0.1, affine=True, track_running_stats=True)

      (relu): ReLU(inplace=True)

      (conv2): Conv2d(64, 64, kernel_size=(3, 3), stride=(1, 1), padding=(1, 1), bias=False)

      (bn2): BatchNorm2d(64, eps=1e-05, momentum=0.1, affine=True, track_running_stats=True)

    )

    (1): BasicBlock(

      (conv1): Conv2d(64, 64, kernel_size=(3, 3), stride=(1, 1), padding=(1, 1), bias=False)

      (bn1): BatchNorm2d(64, eps=1e-05, momentum=0.1, affine=True, track_running_stats=True)

      (relu): ReLU(inplace=True)

      (conv2): Conv2d(64, 64, kernel_size=(3, 3), stride=(1, 1), padding=(1, 1), bias=False)

      (bn2): BatchNorm2d(64, eps=1e-05, momentum=0.1, affine=True, track_running_stats=True)

    )

  )

  (layer2): Sequential(

    (0): BasicBlock(

      (conv1): Conv2d(64, 128, kernel_size=(3, 3), stride=(2, 2), padding=(1, 1), bias=False)

      (bn1): BatchNorm2d(128, eps=1e-05, momentum=0.1, affine=True, track_running_stats=True)

      (relu): ReLU(inplace=True)

      (conv2): Conv2d(128, 128, kernel_size=(3, 3), stride=(1, 1), padding=(1, 1), bias=False)

      (bn2): BatchNorm2d(128, eps=1e-05, momentum=0.1, affine=True, track_running_stats=True)

      (downsample): Sequential(

        (0): Conv2d(64, 128, kernel_size=(1, 1), stride=(2, 2), bias=False)

        (1): BatchNorm2d(128, eps=1e-05, momentum=0.1, affine=True, track_running_stats=True)

      )

    )

    (1): BasicBlock(

      (conv1): Conv2d(128, 128, kernel_size=(3, 3), stride=(1, 1), padding=(1, 1), bias=False)

      (bn1): BatchNorm2d(128, eps=1e-05, momentum=0.1, affine=True, track_running_stats=True)

      (relu): ReLU(inplace=True)

      (conv2): Conv2d(128, 128, kernel_size=(3, 3), stride=(1, 1), padding=(1, 1), bias=False)

      (bn2): BatchNorm2d(128, eps=1e-05, momentum=0.1, affine=True, track_running_stats=True)

    )

  )

  (layer3): Sequential(

    (0): BasicBlock(

      (conv1): Conv2d(128, 256, kernel_size=(3, 3), stride=(2, 2), padding=(1, 1), bias=False)

      (bn1): BatchNorm2d(256, eps=1e-05, momentum=0.1, affine=True, track_running_stats=True)

      (relu): ReLU(inplace=True)

      (conv2): Conv2d(256, 256, kernel_size=(3, 3), stride=(1, 1), padding=(1, 1), bias=False)

      (bn2): BatchNorm2d(256, eps=1e-05, momentum=0.1, affine=True, track_running_stats=True)

      (downsample): Sequential(

        (0): Conv2d(128, 256, kernel_size=(1, 1), stride=(2, 2), bias=False)

        (1): BatchNorm2d(256, eps=1e-05, momentum=0.1, affine=True, track_running_stats=True)

      )

    )

    (1): BasicBlock(

      (conv1): Conv2d(256, 256, kernel_size=(3, 3), stride=(1, 1), padding=(1, 1), bias=False)

      (bn1): BatchNorm2d(256, eps=1e-05, momentum=0.1, affine=True, track_running_stats=True)

      (relu): ReLU(inplace=True)

      (conv2): Conv2d(256, 256, kernel_size=(3, 3), stride=(1, 1), padding=(1, 1), bias=False)

      (bn2): BatchNorm2d(256, eps=1e-05, momentum=0.1, affine=True, track_running_stats=True)

    )

  )

  (layer4): Sequential(

    (0): BasicBlock(

      (conv1): Conv2d(256, 512, kernel_size=(3, 3), stride=(2, 2), padding=(1, 1), bias=False)

      (bn1): BatchNorm2d(512, eps=1e-05, momentum=0.1, affine=True, track_running_stats=True)

      (relu): ReLU(inplace=True)

      (conv2): Conv2d(512, 512, kernel_size=(3, 3), stride=(1, 1), padding=(1, 1), bias=False)

      (bn2): BatchNorm2d(512, eps=1e-05, momentum=0.1, affine=True, track_running_stats=True)

      (downsample): Sequential(

        (0): Conv2d(256, 512, kernel_size=(1, 1), stride=(2, 2), bias=False)

        (1): BatchNorm2d(512, eps=1e-05, momentum=0.1, affine=True, track_running_stats=True)

      )

    )

    (1): BasicBlock(

      (conv1): Conv2d(512, 512, kernel_size=(3, 3), stride=(1, 1), padding=(1, 1), bias=False)

      (bn1): BatchNorm2d(512, eps=1e-05, momentum=0.1, affine=True, track_running_stats=True)

      (relu): ReLU(inplace=True)

      (conv2): Conv2d(512, 512, kernel_size=(3, 3), stride=(1, 1), padding=(1, 1), bias=False)

      (bn2): BatchNorm2d(512, eps=1e-05, momentum=0.1, affine=True, track_running_stats=True)

    )

  )

  (avgpool): AdaptiveAvgPool2d(output_size=(1, 1))

  (fc): Linear(in_features=512, out_features=136, bias=True)

)
Again, I trained the model with an MSE loss function and an Adam optimizer, using a learning rate of 0.001 and a batch size of 12. Below are the results of the training and validation losses across the 20 epochs.
On Kaggle, the mean absolute error (MAE) of my model is
9.73940.