Zhenkai Han
In this project, I learned how to do auto face detection with neural networks. With large amount of data, I can build a model to do decent face detection.
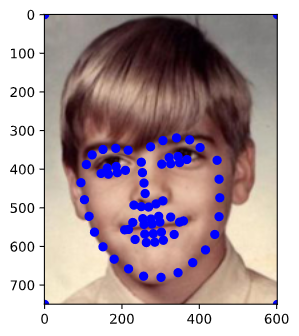
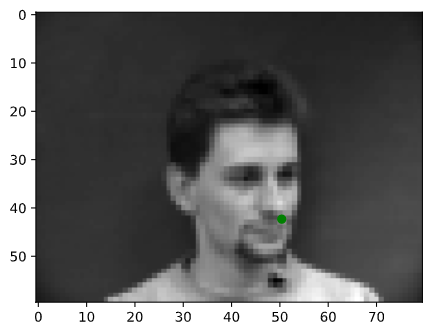
I wrote my own little tool to parse all landmarks from IMM Face Database. Though I only need landmarks of nose tip in part 1, but it is useful in next part. I converted all face photos into grayscale (one channel only) and convert image pixel values in range -0.5 to 0.5. After that, I resized the photos into width 80 and height 60. Each pixel had only one channel. For neural network's convenience, I added one dummy dimension so that the photo shape was 1*60*80. The following images was from my dataloader.
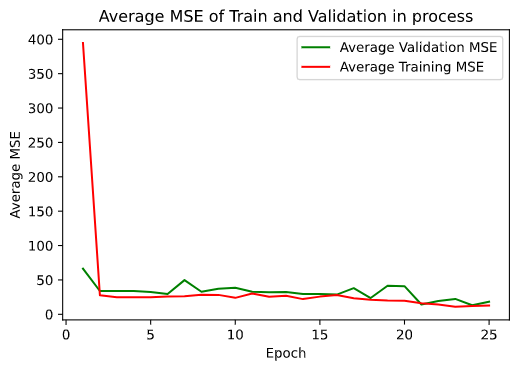
Then I followed the instructions and built a neural network with Pytorch. I split dataset into train set and validation set. I measured the accuracy of the neural network with mean squared error loss (lower is better) and optimized it with Adam. After a quick training (thanks to my GPU GTX 970), the model could tell me where is the nose tip of a face.
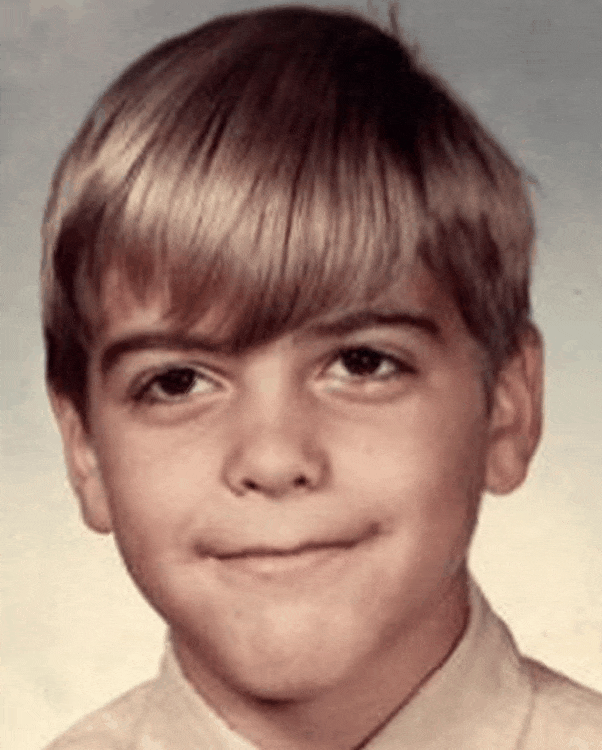
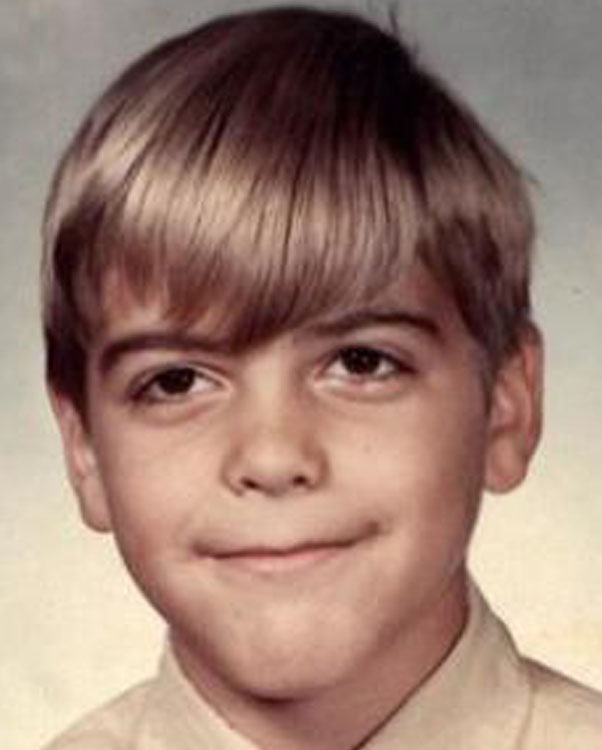
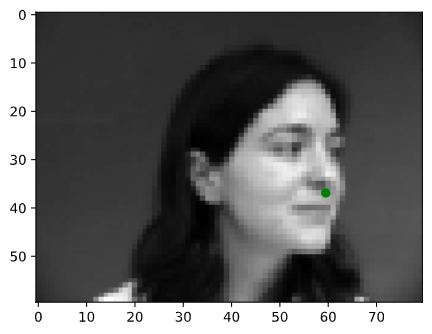
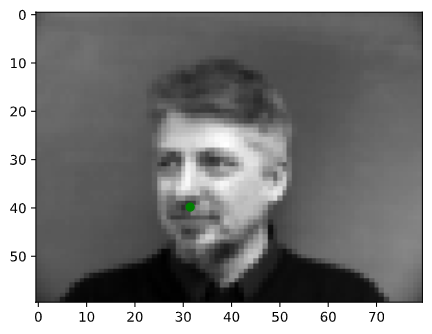
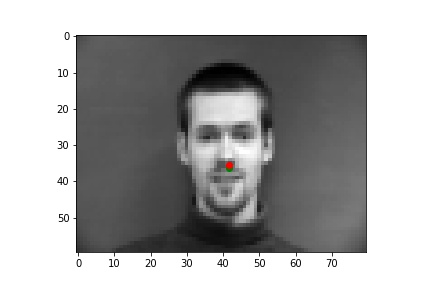
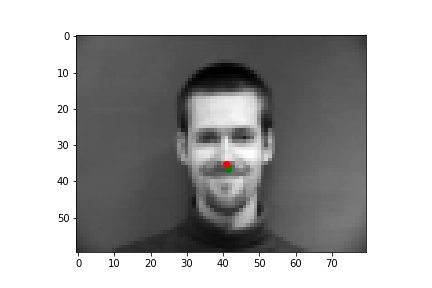
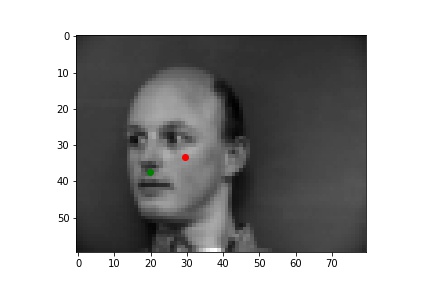
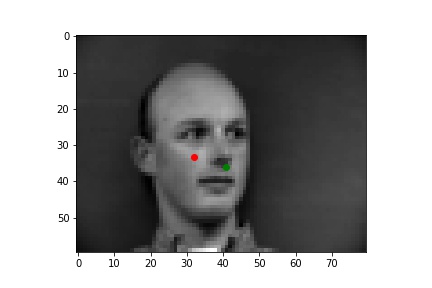
I picked some images from validation dataset. These two are good:
These following two are bad. Obviously, these two face were rotated and my neural network didn't realize it. Since this IMM face Database is too small and most of faces are full frontal, my neural network failed in those cases. Need more images with larger size!
I still used IMM face Database. This time I tried to get more images with larger size. The photo shape was 1*120*160. To get more similar images, I did data augmentation. I randomly rotated face and landmarks; I randomly changed brightness of images. The following images was from my dataloader.
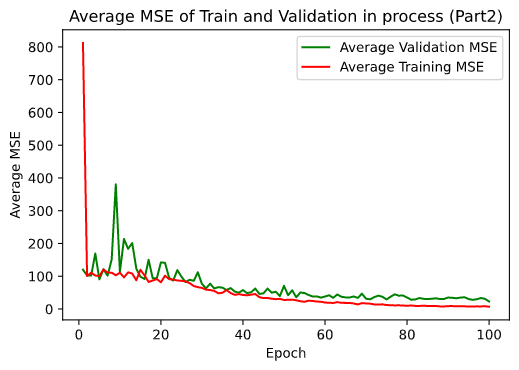
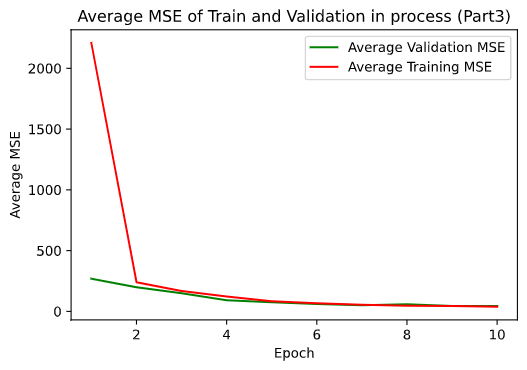
Then I followed the instructions and built another neural network with Pytorch. I split dataset into train set and validation set. I used mean squared error loss as loss function and optimized it with Adam. After training (thanks to my GPU GTX 970), the model could tell me where is the face.
Here is the detail architecture of my model.
Net(
(conv1): Conv2d(1, 32, kernel_size=(3, 3), stride=(1, 1))
(conv2): Conv2d(32, 16, kernel_size=(3, 3), stride=(1, 1))
(conv3): Conv2d(16, 16, kernel_size=(3, 3), stride=(1, 1))
(conv4): Conv2d(16, 16, kernel_size=(3, 3), stride=(1, 1))
(conv5): Conv2d(16, 16, kernel_size=(3, 3), stride=(1, 1))
(pool): MaxPool2d(kernel_size=2, stride=2, padding=0, dilation=1, ceil_mode=False)
(pool2): MaxPool2d(kernel_size=2, stride=2, padding=0, dilation=1, ceil_mode=False)
(pool3): MaxPool2d(kernel_size=2, stride=2, padding=0, dilation=1, ceil_mode=False)
(pool4): MaxPool2d(kernel_size=2, stride=2, padding=0, dilation=1, ceil_mode=False)
(pool5): MaxPool2d(kernel_size=2, stride=2, padding=0, dilation=1, ceil_mode=False)
(fc1): Linear(in_features=640, out_features=320, bias=True)
(fc2): Linear(in_features=320, out_features=116, bias=True)
)
Information on hyperparameters chosen for training:
Batch size: 1
Learning rate:0.001
Epochs: 100
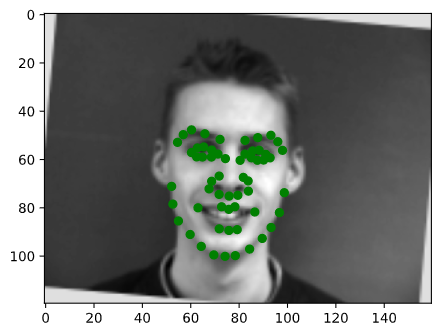
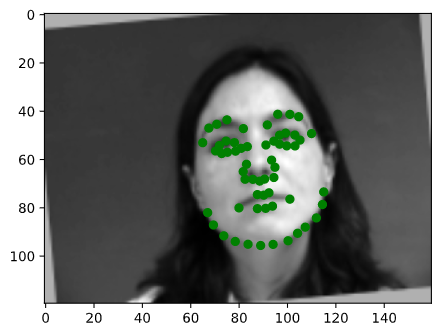
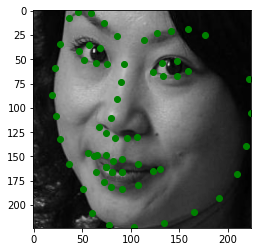
I picked some images from validation dataset. These two are good:
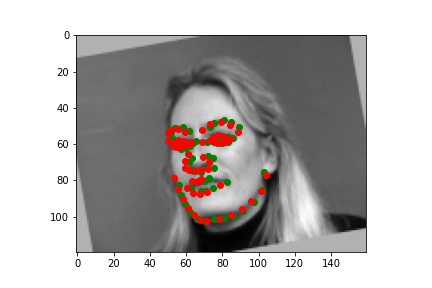
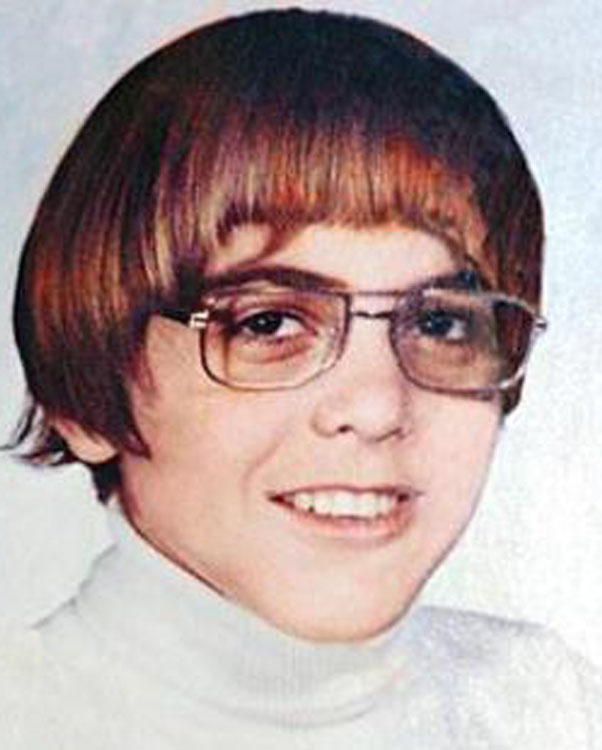
These following two are bad. The face in the first image is full frontal but the face is on left side of the image. Obviously, my neural network thought the face was rotated and it was wrong. That is why almost all keypoints tended to left except the keypoints of chin.
The face in the second image is full frontal and the image was rotated. Obviously, my neural network realized that the image was rotated (it was on correct path!) but the prediction keypoints were not rotated enough. My neural network needed more practice.
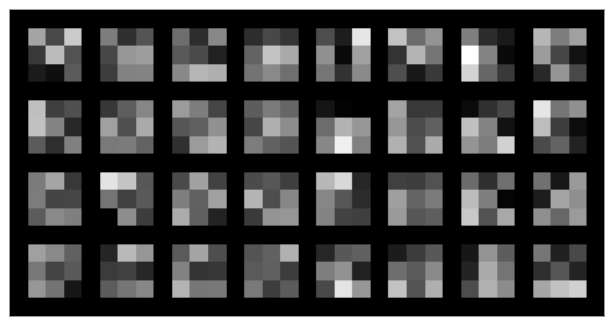
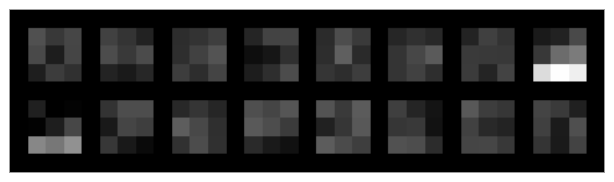
Here is visualization of first two convolution layers
I used ibug face Database. This time I got many images with different size. I cropped face area in images with bounding boxes (some bounding boxes are wrong) and resize face area to 1*224*224. The following images was from my dataloader.

Then I followed the instructions and built my neural network started from resnet18. I only changed the first layer's input channel number to 1 and changed the last layer's output channel number to 136 i.e., the (x, y) coordinates of the 68 landmarks for each face. I split dataset into train set (size 5555) and validation set(size 1111). I used mean squared error loss as loss function and optimized it with Adam. After a slow training (Many thanks to my GPU GTX 970, I slept and didn't need to worry about Colab disconnecting), the model could tell me where is the face in resized image.
Then I converted predicted keypoints in resized images to keypoints in origin images
Here is the detail architecture of my model.
ResNet(
(conv1): Conv2d(1, 64, kernel_size=(7, 7), stride=(2, 2), padding=(3, 3), bias=False)
(bn1): BatchNorm2d(64, eps=1e-05, momentum=0.1, affine=True, track_running_stats=True)
(relu): ReLU(inplace=True)
(maxpool): MaxPool2d(kernel_size=3, stride=2, padding=1, dilation=1, ceil_mode=False)
(layer1): Sequential(
(0): BasicBlock(
(conv1): Conv2d(64, 64, kernel_size=(3, 3), stride=(1, 1), padding=(1, 1), bias=False)
(bn1): BatchNorm2d(64, eps=1e-05, momentum=0.1, affine=True, track_running_stats=True)
(relu): ReLU(inplace=True)
(conv2): Conv2d(64, 64, kernel_size=(3, 3), stride=(1, 1), padding=(1, 1), bias=False)
(bn2): BatchNorm2d(64, eps=1e-05, momentum=0.1, affine=True, track_running_stats=True)
)
(1): BasicBlock(
(conv1): Conv2d(64, 64, kernel_size=(3, 3), stride=(1, 1), padding=(1, 1), bias=False)
(bn1): BatchNorm2d(64, eps=1e-05, momentum=0.1, affine=True, track_running_stats=True)
(relu): ReLU(inplace=True)
(conv2): Conv2d(64, 64, kernel_size=(3, 3), stride=(1, 1), padding=(1, 1), bias=False)
(bn2): BatchNorm2d(64, eps=1e-05, momentum=0.1, affine=True, track_running_stats=True)
)
)
(layer2): Sequential(
(0): BasicBlock(
(conv1): Conv2d(64, 128, kernel_size=(3, 3), stride=(2, 2), padding=(1, 1), bias=False)
(bn1): BatchNorm2d(128, eps=1e-05, momentum=0.1, affine=True, track_running_stats=True)
(relu): ReLU(inplace=True)
(conv2): Conv2d(128, 128, kernel_size=(3, 3), stride=(1, 1), padding=(1, 1), bias=False)
(bn2): BatchNorm2d(128, eps=1e-05, momentum=0.1, affine=True, track_running_stats=True)
(downsample): Sequential(
(0): Conv2d(64, 128, kernel_size=(1, 1), stride=(2, 2), bias=False)
(1): BatchNorm2d(128, eps=1e-05, momentum=0.1, affine=True, track_running_stats=True)
)
)
(1): BasicBlock(
(conv1): Conv2d(128, 128, kernel_size=(3, 3), stride=(1, 1), padding=(1, 1), bias=False)
(bn1): BatchNorm2d(128, eps=1e-05, momentum=0.1, affine=True, track_running_stats=True)
(relu): ReLU(inplace=True)
(conv2): Conv2d(128, 128, kernel_size=(3, 3), stride=(1, 1), padding=(1, 1), bias=False)
(bn2): BatchNorm2d(128, eps=1e-05, momentum=0.1, affine=True, track_running_stats=True)
)
)
(layer3): Sequential(
(0): BasicBlock(
(conv1): Conv2d(128, 256, kernel_size=(3, 3), stride=(2, 2), padding=(1, 1), bias=False)
(bn1): BatchNorm2d(256, eps=1e-05, momentum=0.1, affine=True, track_running_stats=True)
(relu): ReLU(inplace=True)
(conv2): Conv2d(256, 256, kernel_size=(3, 3), stride=(1, 1), padding=(1, 1), bias=False)
(bn2): BatchNorm2d(256, eps=1e-05, momentum=0.1, affine=True, track_running_stats=True)
(downsample): Sequential(
(0): Conv2d(128, 256, kernel_size=(1, 1), stride=(2, 2), bias=False)
(1): BatchNorm2d(256, eps=1e-05, momentum=0.1, affine=True, track_running_stats=True)
)
)
(1): BasicBlock(
(conv1): Conv2d(256, 256, kernel_size=(3, 3), stride=(1, 1), padding=(1, 1), bias=False)
(bn1): BatchNorm2d(256, eps=1e-05, momentum=0.1, affine=True, track_running_stats=True)
(relu): ReLU(inplace=True)
(conv2): Conv2d(256, 256, kernel_size=(3, 3), stride=(1, 1), padding=(1, 1), bias=False)
(bn2): BatchNorm2d(256, eps=1e-05, momentum=0.1, affine=True, track_running_stats=True)
)
)
(layer4): Sequential(
(0): BasicBlock(
(conv1): Conv2d(256, 512, kernel_size=(3, 3), stride=(2, 2), padding=(1, 1), bias=False)
(bn1): BatchNorm2d(512, eps=1e-05, momentum=0.1, affine=True, track_running_stats=True)
(relu): ReLU(inplace=True)
(conv2): Conv2d(512, 512, kernel_size=(3, 3), stride=(1, 1), padding=(1, 1), bias=False)
(bn2): BatchNorm2d(512, eps=1e-05, momentum=0.1, affine=True, track_running_stats=True)
(downsample): Sequential(
(0): Conv2d(256, 512, kernel_size=(1, 1), stride=(2, 2), bias=False)
(1): BatchNorm2d(512, eps=1e-05, momentum=0.1, affine=True, track_running_stats=True)
)
)
(1): BasicBlock(
(conv1): Conv2d(512, 512, kernel_size=(3, 3), stride=(1, 1), padding=(1, 1), bias=False)
(bn1): BatchNorm2d(512, eps=1e-05, momentum=0.1, affine=True, track_running_stats=True)
(relu): ReLU(inplace=True)
(conv2): Conv2d(512, 512, kernel_size=(3, 3), stride=(1, 1), padding=(1, 1), bias=False)
(bn2): BatchNorm2d(512, eps=1e-05, momentum=0.1, affine=True, track_running_stats=True)
)
)
(avgpool): AdaptiveAvgPool2d(output_size=(1, 1))
(fc): Linear(in_features=512, out_features=136, bias=True)
)
Information on hyperparameters chosen for training:
Batch size: 11
Learning rate:0.001
Epochs: 10
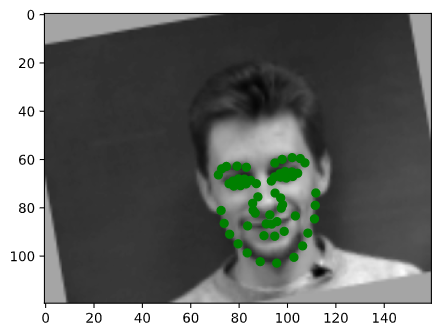
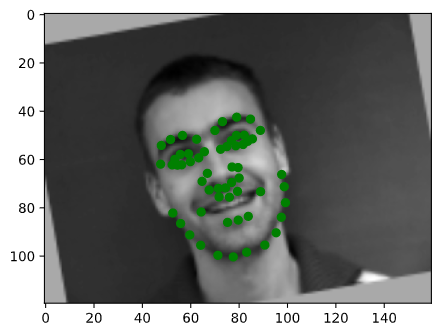
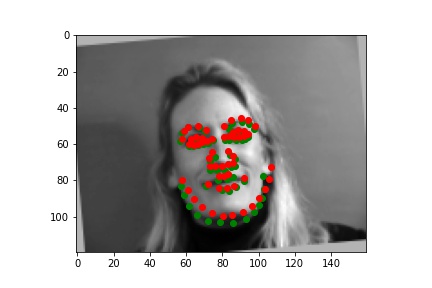
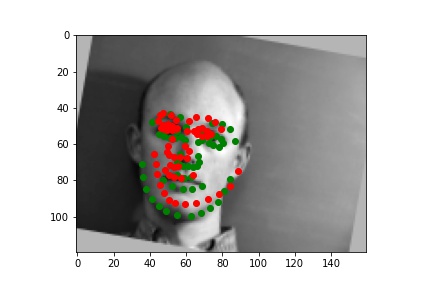
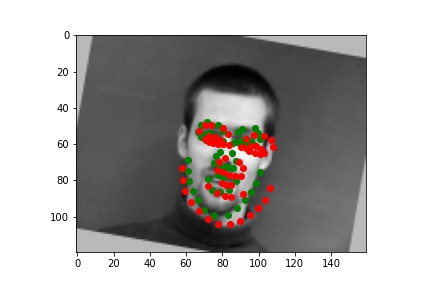
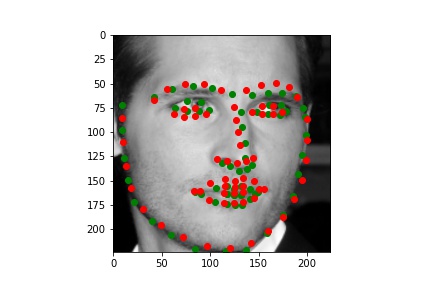
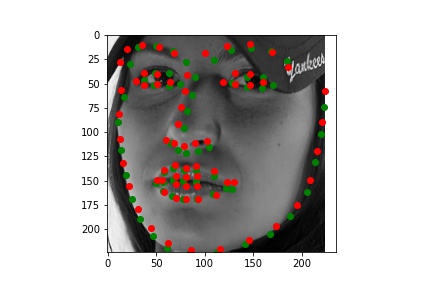
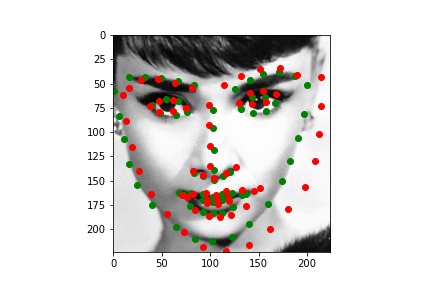
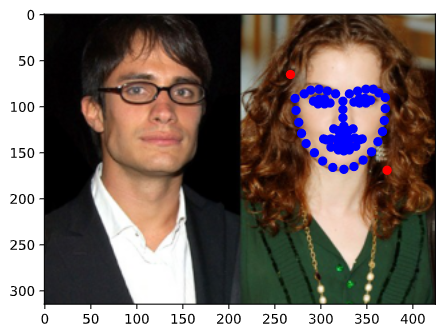
I picked some images from validation dataset. These three are good:
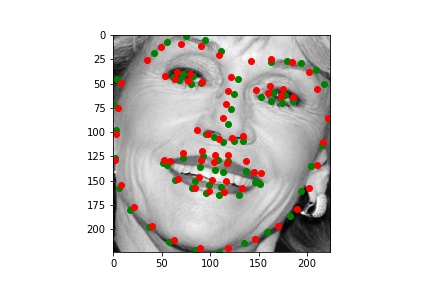
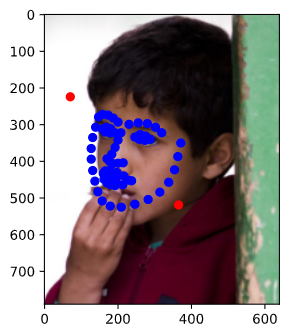
The following one is bad. Maybe my resnet18 thought the chin of face is always located on the border of image but it was wrong this time. Maybe Audrey Hepburn's face is smaller than normal face.
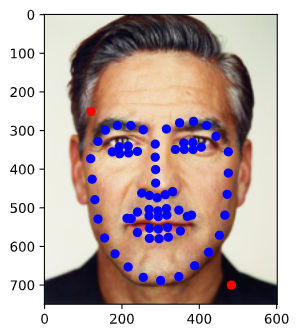
I also plot predicted keypoints on some original images from test set. My resnet18 works well in general.
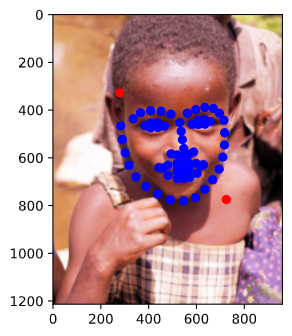
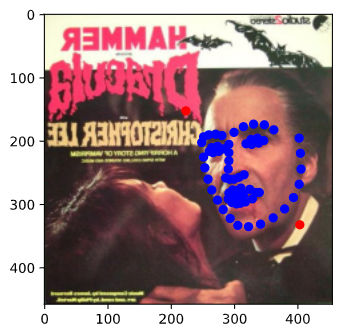
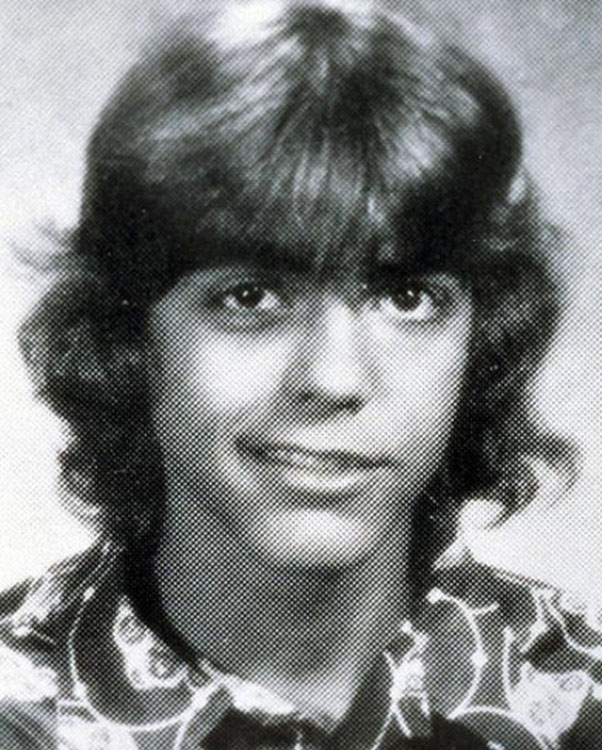
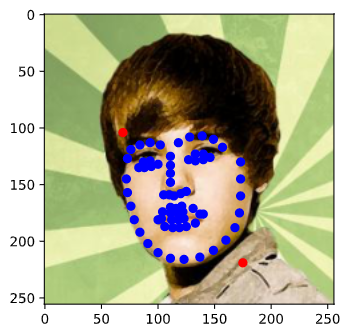
I also picked some face images from project3. My resnet18 works well in general.


The following one is bad. My resnet18 put eyebrow keypoints on Trump's eyes. Maybe Trump's eyebrow is a little hard to distinguish. Maybe Trump's pose is fresh for my resnet18 to learn so it didn't predict well.


I found some photos of George Clooney from here. I morph them in chronological order!