CS 194-26 Final - Neural Algorithm of Artistic Style - Andrew Loeza
Overview:
In this project, we utilized a pretrained VGG-19 neural network in order to manipulate (optimize) a white noise image based on several feature vectors of a style image in the form of a gram matrix and one feature vector of a content image. The ultimate desired result of this was to preserve the basic content of the image while also transforming it into a different style. The overall effect of how much the content vs the style is preferred is controlled by two weight hyperparameters for the image style and content.
Network Architecture:
Below is the feature architecture that was utilized to obtain the below results. The indicated layers with stars (*) are the layers that were used to create the gram matrix used for the stylized loss. Also, each of these 5 layers was a potential candidate to be the feature vector that would be used for content image's content loss. Similar to the paper, I replaced the max-pool layers with average pool layers which seemed to give better results. Oddly enough, the hyperparameters of the style and content loss had to be reversed compared to what the paper was suggesting, giving most of the weight to the content image rather than the stylized image. I'm unsure exactly why this is had to be done to get acceptable results, but my best guess is that it's a result of PyTorch's neural network implementation causing some unknown side effect.
VGG 19 Network:
(0): Conv2d(3, 64, kernel_size=(3, 3), stride=(1, 1), padding=(1, 1)) *
(1): ReLU(inplace=True)
(2): Conv2d(64, 64, kernel_size=(3, 3), stride=(1, 1), padding=(1, 1))
(3): ReLU(inplace=True)
(4): AvgPool2d(kernel_size=2, stride=2, padding=0)
(5): Conv2d(64, 128, kernel_size=(3, 3), stride=(1, 1), padding=(1, 1)) *
(6): ReLU(inplace=True)
(7): Conv2d(128, 128, kernel_size=(3, 3), stride=(1, 1), padding=(1, 1))
(8): ReLU(inplace=True)
(9): AvgPool2d(kernel_size=2, stride=2, padding=0)
(10): Conv2d(128, 256, kernel_size=(3, 3), stride=(1, 1), padding=(1, 1)) *
(11): ReLU(inplace=True)
(12): Conv2d(256, 256, kernel_size=(3, 3), stride=(1, 1), padding=(1, 1))
(13): ReLU(inplace=True)
(14): Conv2d(256, 256, kernel_size=(3, 3), stride=(1, 1), padding=(1, 1))
(15): ReLU(inplace=True)
(16): Conv2d(256, 256, kernel_size=(3, 3), stride=(1, 1), padding=(1, 1))
(17): ReLU(inplace=True)
(18): AvgPool2d(kernel_size=2, stride=2, padding=0)
(19): Conv2d(256, 512, kernel_size=(3, 3), stride=(1, 1), padding=(1, 1)) *
(20): ReLU(inplace=True)
(21): Conv2d(512, 512, kernel_size=(3, 3), stride=(1, 1), padding=(1, 1))
(22): ReLU(inplace=True)
(23): Conv2d(512, 512, kernel_size=(3, 3), stride=(1, 1), padding=(1, 1))
(24): ReLU(inplace=True)
(25): Conv2d(512, 512, kernel_size=(3, 3), stride=(1, 1), padding=(1, 1))
(26): ReLU(inplace=True)
(27): AvgPool2d(kernel_size=2, stride=2, padding=0)
(28): Conv2d(512, 512, kernel_size=(3, 3), stride=(1, 1), padding=(1, 1)) *
(29): ReLU(inplace=True)
(30): Conv2d(512, 512, kernel_size=(3, 3), stride=(1, 1), padding=(1, 1))
(31): ReLU(inplace=True)
(32): Conv2d(512, 512, kernel_size=(3, 3), stride=(1, 1), padding=(1, 1))
(33): ReLU(inplace=True)
(34): Conv2d(512, 512, kernel_size=(3, 3), stride=(1, 1), padding=(1, 1))
(35): ReLU(inplace=True)
(36): AvgPool2d(kernel_size=2, stride=2, padding=0) Results:
Below are the results that I obtained on four of the content and style image combinatiosn that were presented in the paper along with 3 other pairs of images of my own choosing. The specific hyperparameters used to get the results are shown with the content, style, and output images along with the corresponding image from the paper. My one bad result is Forest Path. Regardless of how I tuned the hyperparameters, I couldn't get the style to transfer in a way that didn't completely overwrite the content of the image. My best guess for why this happens is because the content image lacks objects that have substantial enough structure that the filters of the neural network can identify and preserve. This is why geometric objects like buildings seem to be fairly well preserved in these transformations, whereas organic objects tend to replaced by stylized content.
Composition VII:
Hyperparameters:
Epochs = 800
Learning Rate = 0.9
Content Layer = 4
Content Weight = 3000000000
Style Weight = 2.2
The Shipwreck of the Minotaur:
Hyperparameters:
Epochs = 800
Learning Rate = 0.9
Content Layer = 4
Content Weight = 3000000000
Style Weight = 2.5
Starry Night:
Hyperparameters:
Epochs = 2000
Learning Rate = 0.9
Content Layer = 2
Content Weight = 17000000
Style Weight = 5.1
Femme nue assise:
Hyperparameters:
Epochs = 1500
Learning Rate = 0.9
Content Layer = 4
Content Weight = 3000000000
Style Weight = 10
New York:
Hyperparameters:
Epochs = 800
Learning Rate = 0.9
Content Layer = 4
Content Weight = 3000000000
Style Weight = 2.5

Eiffel Tower:
Hyperparameters:
Epochs = 800
Learning Rate = 0.9
Content Layer = 4
Content Weight = 3000000000
Style Weight = 2.5

Forest Path:
Hyperparameters:
Epochs = 800
Learning Rate = 0.9
Content Layer = 4
Content Weight = 30000000000
Style Weight = 8

CS 194-26 Final - Augmented Reality - Andrew Loeza
Overview:
In this project we recorded a video of a box with a grid drawn on it so that we could track the points on the grid throughout the video. We then created a 3D world coordinate system for our box and assigned one corresponding point to each tracked point. This then allowed us to create a camera callibration matrix for every frame of the video so that we could finally insert a cube into every frame of the video that would move according to the camera motion as a result of the callibration matrix.
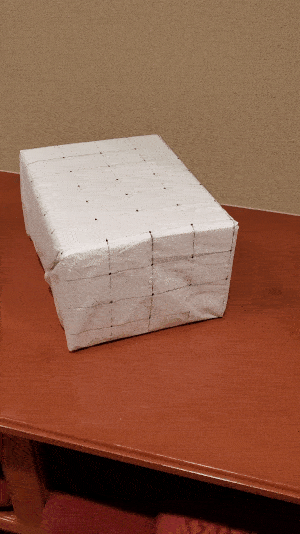
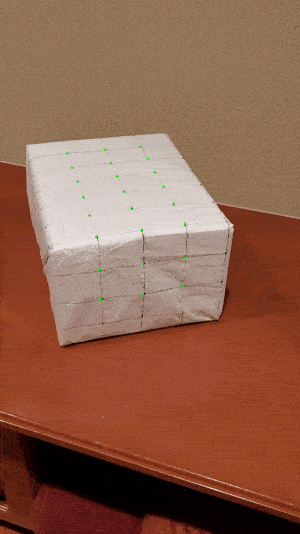
Tracking the Points:
Below are the 24 points on my box that I tracked. Ultimately, I decided to use cv2.TrackerCSRT to track the points since it gave better accuracy than the suggested cv2.TrackerMedianFlow tracker, but I used the suggested box size of 8x8.
Camera Callibration:
For the camera callibration, I was unable to get np.linalg.lstsq to work properly by using the formula shown to us in lecture for the callibration matrix. So, I decided to create an estimate for the matrix by fixing the bottom right variable of the callibration matrix to 1 and then I used a similar method to solve for this matrix as we used to solve for the homography matrices in project 5. Besides that, though, the matrices are filled up by the tracked points for each frame and the corresponding 3D world coordinates. This is then done for all frames, giving us a camera callibration matrix for each.
Inserting the Cube:
Below you can see the results of inserting the cube into every frame after projecting its 3D coordinate corner points onto the image with the callibration matrix for every frame. The results aren't too amazing. I imagine this is mainly due to two reasons. The first is that my hands are not the steadiest, and so when I was creating my box grid, it's very likely that the lines aren't entirely straight and that the measurements aren't the most accurate either. And the second is from the fact that I used an estimate for the callibration matrix. Regardless, though, I'm still quite happy with the results. Below you can see the original video along with the