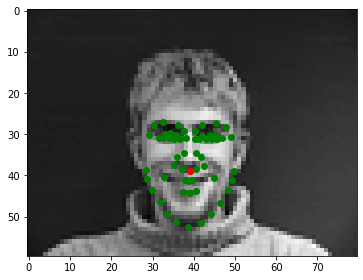
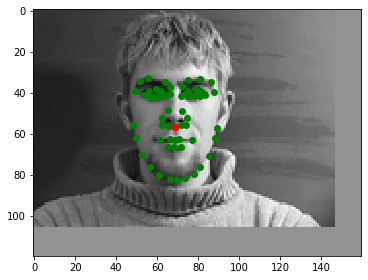
All facial keypoints, nose in red
by: Gavin Fure
We'll be using our GPUs to automatically detect facial keypoints with big modern neural network technology.
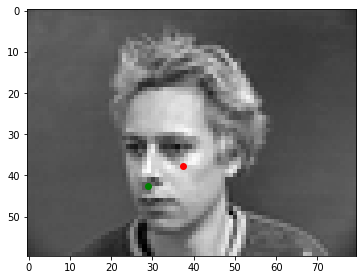
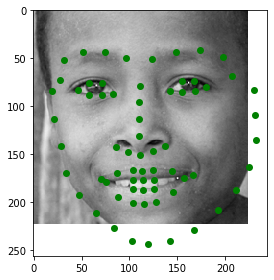
In this section, we will be training on only one facial keypoint, sort of as a warm-up. In my dataset, I changed the images to be grayscale and resized them to be pretty small, 80x60. I used PiL to load the grayscale images and the output pixdl values happened to be in the range of (0, 1), so I only needed to subtract .5 to reach our desired range. Here is a visualization of all the keypoints, with the 'nose-tip' keypoint in red.
All facial keypoints, nose in red
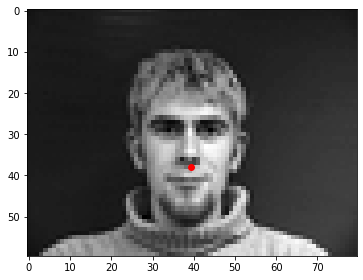
Nose keypoint
My network used 3 convolution layers, each with 32 filters (channels), and 3x3 kernels. I performed a maxpool after the final conv layer, then had two fully connected layers. The hidden layer between them was of size 256. I used a stride of 1 for convolutions and added padding to ensure that my output was the same size as my input (padding = (kernel_size - 1) // 2). I performed a ReLU nonlinearity after each layer. I used MSE Loss and the Adam optimizer, as specified in the spec, and a batch size of 32 with a learning rate of 1e-3.
The network starts off predicting all 0 values. I wonder if there is an easy way to get the network to have its initial predictions be closer to the ground truth mean values? Oh well, it's not too important, it ends up learning the right answer anyways, but this could speed up training on more difficult problems.
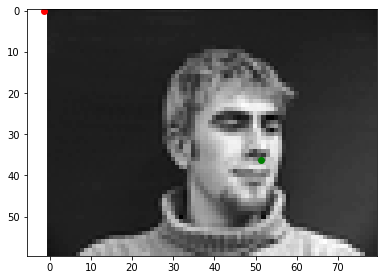
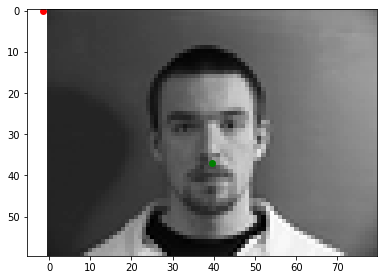
Predictions are in red, ground truth is green. These predictions are taken from the 0th epoch, and both are (0, 0)
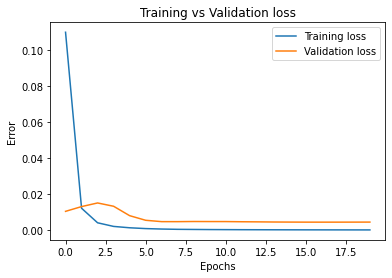
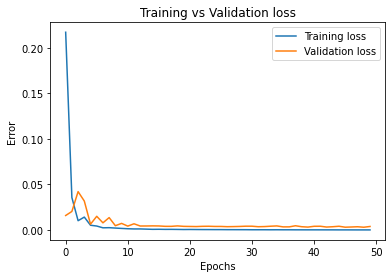
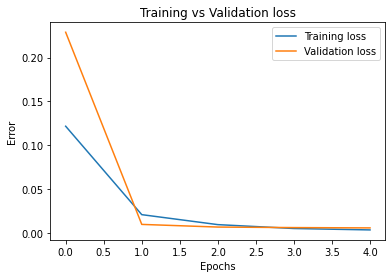
I trained for 20 epochs in total, ending up with a training loss of 5.69e-5 and a test error of 2.08e-3. Here is the plot of the training and validation loss:
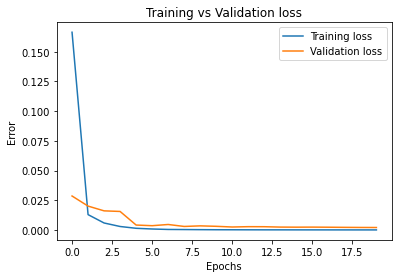
Notice that the validation loss appears to be converging towards the training loss. It continues to decrease as the epochs go on, so we probably would have gotten even more gains from more epochs. However, the scale is a little large, so it is difficult to see just how much the validation loss was improving.
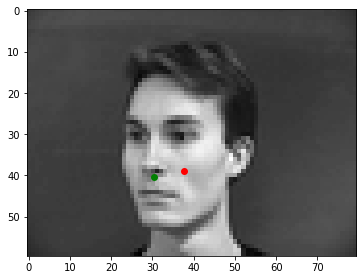
Here are some predictions the model made on the training set. Again, predictions are in red and ground truths are in greenn
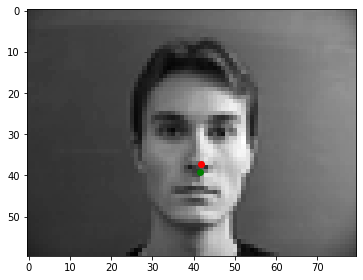
These are both good predictions! The one on the left is off to the side, so we know the model isn't just outputting the mean location for each prediction.
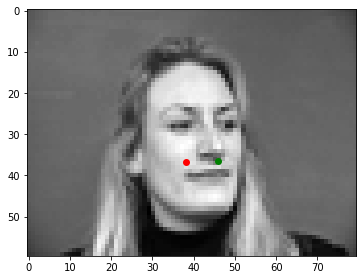
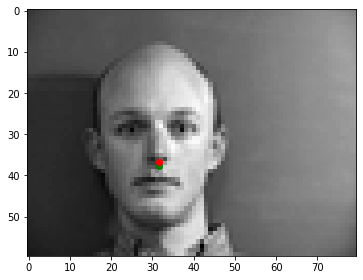
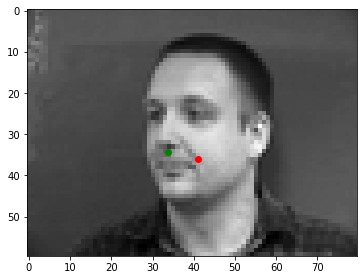
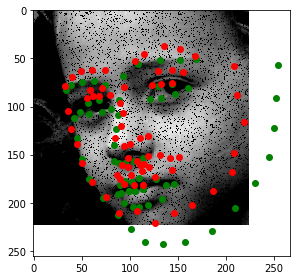
The network has some trouble with faces that are turned to the side. I assume this is because the shape of the nose is not the same here as it is when people are facing forwards. Since most of the images are of people facing forwards, it was most beneficial for the network to learn this representation of the nose first, a view perpindicular to the plane of the subject's face. The nose looks pretty different when people turn their heads, so it will take more training and maybe a bigger network to also learn this representation of the nose.
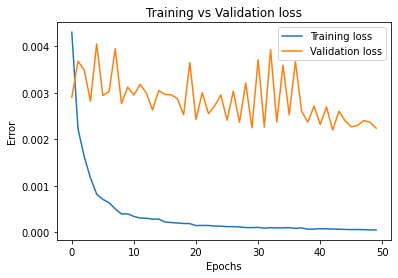
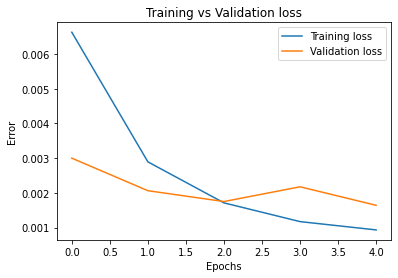
Next, I modified the network's parameters a little bit: I increased the number of convolutional layers from 3 to 4, and decreased the number of filters (channels) at each layer from 32 to 16. Since this is a pretty drastic decrease in filter size, I expect the network to perform somewhat worse, but the extra layer might help it learn more representations a bit easier. This could help with the issue we were having earlier of the network failing to recognize the nose of somebody facing sideways. After 20 epochs, this v2 model ended up with a training loss of 3.23e-4, which is substantially higher than v1. The test error was 4.53e-3, which is also unfortunately larger than v1. Here is the training graph:
Validation loss seems to stop decreasing after about epoch 7.5. This network archiceture is not an improvement. Additionally, the v2 model has the same issues as v1. Here are some examples of that deficiency:
In this section, we will extend our previous setup to predict all of the facial keypoints instead of just the tip of the nose. Since we only have a small dataset to work with, we will also introduce some data augmentation to artifically expand the size of the dataset. I implemented a horizontal and vertical shift, brightness jittering, and added some dropout on a portion of the inputs (randomly set some pixels to 0). Here are some examples of my data augmentation, along with the ground truth labels:

My network had 5 convolutional layers, each separated by a ReLU and a maxpool. Each time a maxpool was performed, I doubled the number of channels in the next convolutional layer. This way, we preserve the amount of information the network is processing, but allow it to deepen its representations. Maxpools halve their outputs, and we double the number of channels, so it evens out. I again used padding that preserved input size, 3x3 kernels, and a stride of 1. I also used 2 fully connected layers at the end of the network, this time with a hidden size of 3000, and a batch size of 32. I determined this value experimentally, it's just what seemed to work best. I experimented a little with skip connections and having maxpools happen every 2 layers instead of every layer, but it didn't seem to have an improvement.
I trained for 100 epochs with a learning rate of 1e-3 in two 50-epoch cycles:
The first training set ended up with a final training loss of 9.63e-5 and a validation loss of 3.87e-3. The difference between these two values is larger than in previous problems, indicating that this is more difficult problem, and that more data augmentation may have helped. The second set had a final training loss of 5.13e-5 and a validation loss of 2.24e-3, which is a clear improvement over the first. The validation training line is a bit irregular, but it trends downwards, so even more training would help out our network even more.
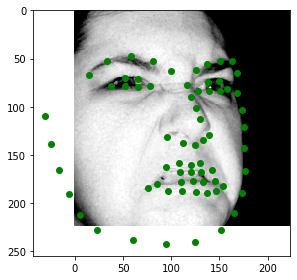
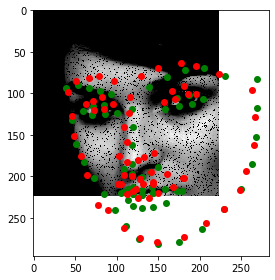
Next, I will show some examples of how my network performed on inputs. It was able to track faces as they were shifted horizontally and vertically, so we know that it has some mechanism for recognizing the location of a face. I took this as evidence that the network was learning useful information. However, it still definitely struggled with face orientations, and was consistently unable to properly outline faces that were not looking directly at the camera. Using rotations as data augmentation would likely have helped this, as well as having a larger dataset. Even when it fails to detect the change in orientation, it still places the points over the face, which is a positive at least. Here are some successes:
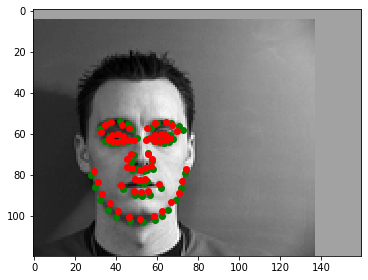
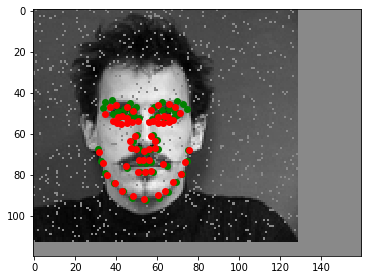
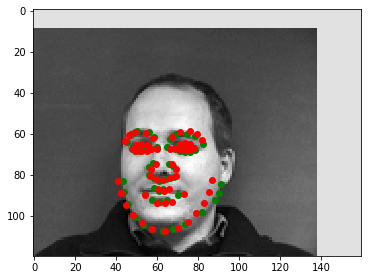
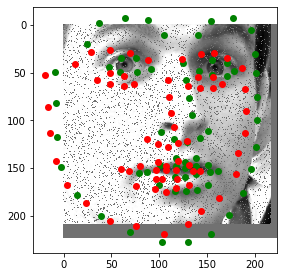
These are all pretty close to the correct labels, often overlapping with them. Additionally, the network displays its ability to effectively adjust to data augmentations. It succeeds through both dropout and position shifting, even applied together. Next, we have some failures:
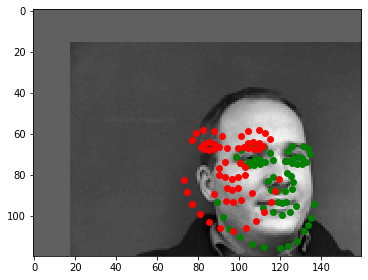
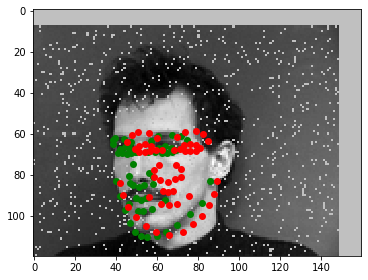

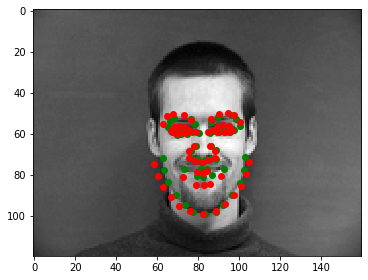
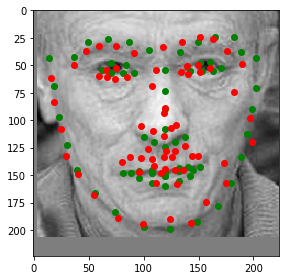
While these are not catastrophic failures, they demonstrate the network's failure to adjust to different face orientations. No matter what position the head is in, the network will always place the points in the outline of a face facing forwards. Additionally, while the network is often able to correctly determine the center of a face, it sometimes makes mistakes, like in the image in the top left (which also suffers from the facial orientation deficiency). This defiency seems somewhat difficult to correct, for two reasons. First, most images in the dataset are facing forwards, so it benefits the network to excel in this mode. Second, even when faces are presented in a different orientation, the network's prediction is not too far off from the locations of the real points. It's possible that this could be remedied through just training more, but it's also possible that we will need more representative power in our network, which would require more memory and longer training times.
Finally, we have a visualization of the first two layers of filters:
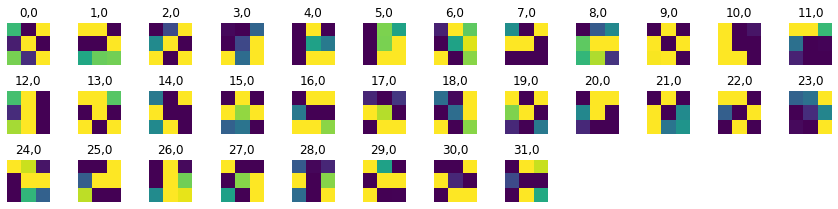
Layer 0
This layer is small, because the very first always has to have only 1 channel. It translates its output to have 32 layers, so the next layer, layer 1, is very large in comparison. Instead of being double the size of layer 0, it is 32 times larger:

Layer 1
After this, layers progressively double in size. Let's talk about the visualizations. Since we only have 3x3 kernels, it is hard to determine what structures each filter is designed to detect. However, we can clearly see that they are all very specialized and distinct from each other. When workiing together, they will definitely be able to recognize the distanct parts of the face that correspond to each label.
Now we will move on to training with a much larger dataset: 6666 images instead of only around 240. We're using th ibug dataset, which includes facial landmarks from several datasets, as well as mirrored version of most images. I used the provided bounding boxes to crop my images, then resized them all to be 224x224x3. I trained in color instead of grayscale. I used all of the data augmentations from the previous section, except I replaced the naive brightness jittering with Pytorch's ColorJitter module. Here are some images from the dataloader, with their ground truth labels. I ended up displaying these in grayscale due to a bug in my display function, but it is inconsequential to the training process. Some of these bounding boxes are quite poor, and the labels exist outside of the bounding box very often. I don't really see this as being too much of a problem, since this might help teach the model more about face shape. It's almost like an extraneous puzzle: how do we extrapolate the true face shape when we are missing data?
For my model, I used a pretrained ResNet18 from pytorch, replacing their final fully connected layer with one that outputs the shape I am looking for (68x2). Also, I added a dropout layer right before this final fc layer that will zero out half of the input data during training, forcing this layer to learn stronger and more diverse representations. I turned this dropout layer off when testing. ResNet18 is a convolutional network consisting of 18 total layers: several groups of convolutions, batch norms, relus, and downsamples, followed by an adaptive pooling layer and finally the single fully connected layer. ResNet is state of the art, and by training in 3-layer RGB instead of grayscale, I was able to utilize the excellent pretrained values for my training. I used a batch size of 32 and a learning rate of 1e-3, training for two rounds of 5 epochs, followed by a final round of 5 epochs at 5e-4 learning rate. Here are the graphs of my training:
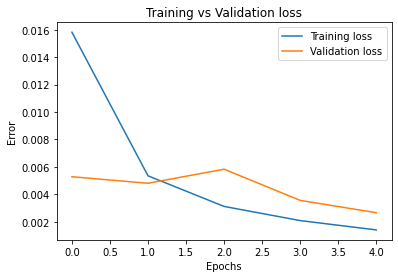
Learning rates for each graph are as follows: Top left: 1e-3. Top right: 1e-3. Bottom: 5e-4
At the end of training, we had 9.32e-4 training loss and 1.64e-3 validation loss. Training loss continually decreased throughout training, and validation loss trended downwards as well, though it had some bumps. This indicates that we could likely still improve our model through further training. We haven't overfit yet.
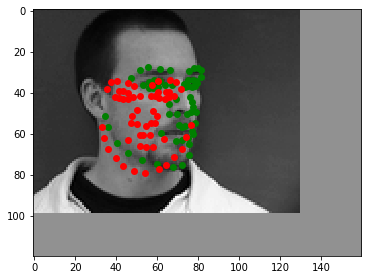
Let's look at some predictions made during training. Predictions are in red and the ground truth labels are green. Keep in mind that a dropout layer was active during training, so these predictions won't look as good as they will in testing.
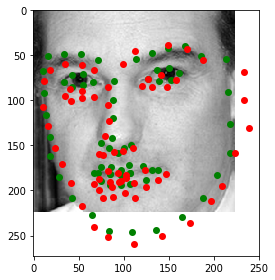
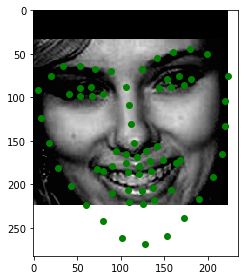
Notice how the model can guess the shape of somebody's face fairly accurately even when part of their face is offscreen. This model does not have the orientation deficiency that the previous model had, and seems to be performing very well, even with 50% dropout and somewhat heavy data augmentation.
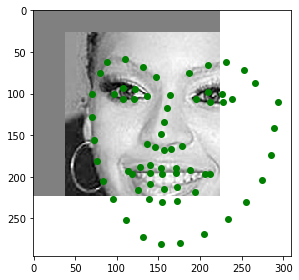
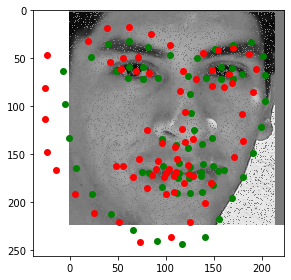
Next, let's look at some predictions the model made on the test set, without that dropout layer:
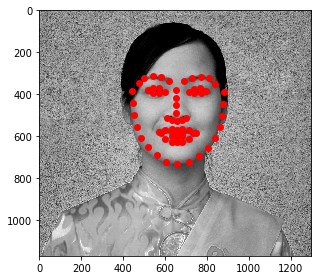
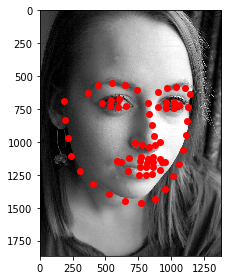
These look really good! Surprisingly coherent and consistent, especially compared to the training images, on which it often had some trouble correctly locating the mouth. Finally, let's see how the model performs on some brand new images:
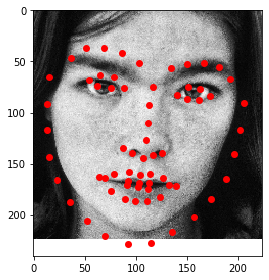
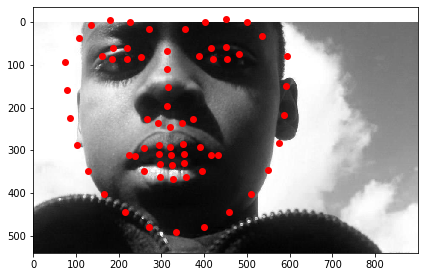
Bjork
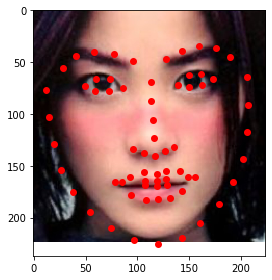
Faye Wong

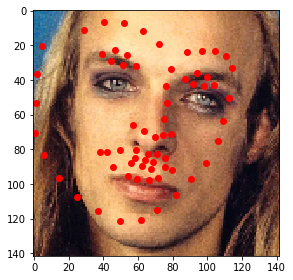
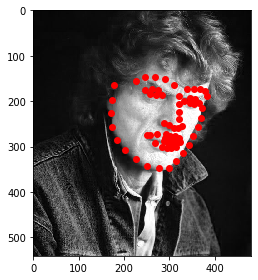
Brian Eno

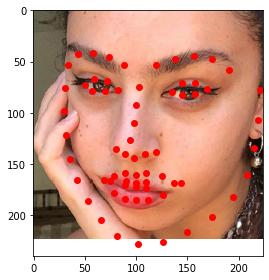
Charli XCX
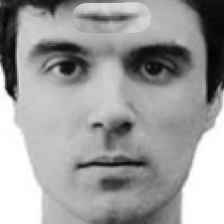
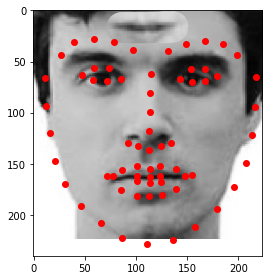
David Byrne (with a mouth on his forehead)
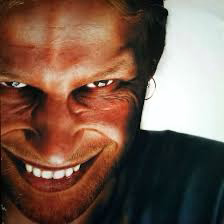
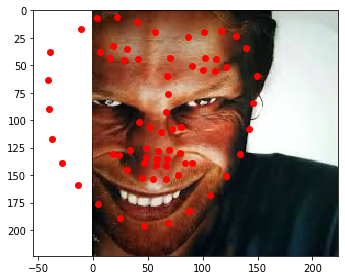
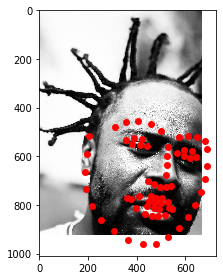
Aphex Twin
The model performs alright on these new images that are outside of its dataset. I had to crop them to fit only the face in the frame or the model got confused, and it didn't perform amazingly on Brian Eno or Aphex Twin. The Aphex one I can understand: that angle is probably not represented well in the training set, and the lighting is strange. However, it is a little bit disappointing that is missed the eyes and the smile so badly, since they are so much whiter than the surrounding area. The Eno prediction is also disappointing, and less explainable. It seems like a pretty normal photo, but it looks like the model identified his eyebrows as his eyes. Strange. Maybe it's the eyeshadow throwing it off? Anyways, the model performed decently on the other images, correctly identifying the locations of key areas like nose, eyes, and mouth. However, it seems to have a bit of trouble identifying the chin and the edges of the face: it tends to guess larger areas than the actual face. This is likely due to the way it was trained: on bounding boxes that only contained faces and were frequently cut off. The entire frame was a face, and I have cropped my images a bit less tightly than the dataset we trained on did.
This project was cool. It is good to be acquainted with the best technology of our time, and it is useful to see that it could be used to solve a problem we faced in an earlier project. However, there are so many cool things to be done with neural nets, and I wish we did something a bit more visually engaging and artistic, like GANs or something. Oh well, this is cool, even if it is a bit stressful to have to cover all of neural nets in like two weeks.