import numpy as np
import matplotlib.pyplot as plt
import skimage.io as io
import skimage as sk
import matplotlib.image as mpimg
from IPython.core.display import HTML
HTML("""
<style>

div.cell { /* Tunes the space between cells */
margin-top:1em;
margin-bottom:1em;
}

div.text_cell_render h1 { /* Main titles bigger, centered */
font-size: 2.2em;
line-height:0.9em;
}

div.text_cell_render h2 { /*  Parts names nearer from text */
margin-bottom: -0.4em;
}


div.text_cell_render { /* Customize text cells */
font-family: 'Georgia';
font-size:1.2em;
line-height:1.4em;
padding-left:3em;
padding-right:3em;
}

.output_png {
    display: table-cell;
    text-align: center;
    vertical-align: middle;
}

</style>

<script>
code_show=true;
function code_toggle() {
 if (code_show){
 $('div.input').hide();
 } else {
 $('div.input').show();
 }
 code_show = !code_show
}
$( document ).ready(code_toggle);
</script>
The raw code for this IPython notebook is by default hidden for easier reading.
To toggle on/off the raw code, click <a href="javascript:code_toggle()">here</a>.

""")

#Trebuchet MS
Project3: Face Morphing 
Overview:
In this project, we implemented an algorithm to produce an animation of morphing a face into another face. We can also compute the mean of a population of faces and extrapolate from a population mean to create a caricature of a face. Furthermore, by computing the difference between the female's face and male's face, we are able to change the gender of a face based on face morphing.
1. Compute the mid-way face:
In this part, for the given two faces, we compute the average of them based on face warping. It includes two steps:
- Warp both faces into the average shape.
- Cross-dissolve the color of the two warped faces
We illustrate the detailed algorithm here:
- We firstly define pairs of corresponding points on the two images by hand. We label faces A and B in a consistent manner using the same ordering of keypoints in the two faces.
- Then we compute the midway shape of face A and B by taking an average on the pairs of points we defined in last step.
- We compute the Delaunay triangulation on the midway shape.
- For each triangulation, compute the transformation from the segment on face A to the conterpart on the midway face. Implement an inverse warp based on this transformation. Loop over all triangulations to obtain the warping face A which should have the same shape of the midway face.
- Repeat step4 on face B.
- Cross-disolve warped A and warped B to get the midway face.
We firstly define pairs of corresponding points on the two images by hand:
im = io.imread("im1_point.png")
fig = plt.figure(figsize=(15,15))
ax = fig.add_subplot(1,1,1)
ax.imshow(im)
plt.axis("off")

plt.show()

The Delaunay triagulation is defined as:
im = io.imread("im1_triangulation.png")
fig = plt.figure(figsize=(15,15))
ax = fig.add_subplot(1,1,1)
ax.imshow(im)
plt.axis("off")

plt.show()

The mid_way face is:
im1 = io.imread("im1_1.png")
im2 = io.imread("im1_2.png")
im3 = io.imread("morphed_im1.png")

fig = plt.figure(figsize=(20,20))
ax1 = fig.add_subplot(1,3,1)
ax1.imshow(im1)
ax1.set_title("face A",fontsize=20)
plt.axis("off")

ax2 = fig.add_subplot(1,3,2)
ax2.imshow(im2)
ax2.set_title("face B",fontsize=20)
plt.axis("off")

ax3 = fig.add_subplot(1,3,3)
ax3.imshow(im3)
ax3.set_title("mid_way face",fontsize=20)
plt.axis("off")

plt.show()

2. The Morph Sequence:
In this part, we morph still face A into face B and produce 45 frames of animation numbered 0-45, where frame 0 must be identical to picture A and frame 45 must be identical to picture B. In the video, each frame will be displayed for 1/30 of a second. The algorithm is similar to the last part. We interpolate the pairs of points on A and B to generate a series of shapes. We morph A and B into those shapes one by one and then cross-disolve the warped images A and B with a user-defined weight.
The animation is show here:
#from IPython.display import HTML
HTML('<center><img src="im_sequence.gif" width="400" height="400"></center>')
3.The "Mean face" of a population
In this part, we use FEI face database to calculate the "mean face" of the database. The keypoints are already annotated on the data. We take an average on the keypoints as a common shape of the faces and morph all faces into that shape. Then cross-disolve the morphed faces together to get the "mean face".
The database is shown here:
HTML('<center><img src="face_sequence.gif" width="300" height="300"></center>')
The faces are warped into a common shape:
HTML('<center><img src="face_warp_sequence.gif" width="300" height="300"></center>')
The mean face is:
im = io.imread("average_face.png")
fig = plt.figure(figsize=(10,10))
ax = fig.add_subplot(1,1,1)
ax.imshow(im,cmap="gray")
plt.axis("off")

plt.show()

We can see the the region around the mouth is blur. That's because the faces in the database includes neutral and smiling facial expressions.
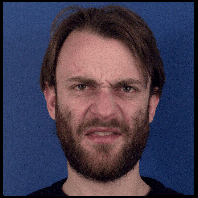
We can warp a face into the "mean face" and warp the "mean face" into that face:
im1 = io.imread("average_face.png")
im2 = io.imread("face.png")
im3 = io.imread("face_avg_warp.png")
im4 = io.imread("face_warp.png")

fig = plt.figure(figsize=(10,10))
ax1 = fig.add_subplot(1,2,1)
ax1.imshow(im2,cmap="gray")
ax1.set_title("face",fontsize=20)
plt.axis("off")

ax2 = fig.add_subplot(1,2,2)
ax2.imshow(im4,cmap="gray")
ax2.set_title("face warped into mean face",fontsize=20)
plt.axis("off")

plt.show()

fig = plt.figure(figsize=(10,10))
ax1 = fig.add_subplot(1,2,1)
ax1.imshow(im1,cmap="gray")
ax1.set_title("mean face",fontsize=20)
plt.axis("off")

ax2 = fig.add_subplot(1,2,2)
ax2.imshow(im3,cmap="gray")
ax2.set_title("mean face warped into a face",fontsize=20)
plt.axis("off")

plt.show()


Where we can see that the facial expression of the face changes after the morphing.
4. caricatures: Extrapolating from the mean
In this part, we produce a caricature of a face by extrapolating from the population mean we calculated in the last step. The basic idea is to calculate $face + \alpha\times (face - mean)$. Here the face and the "mean face" are pre-alined to a common shape using the above algorithm.
im = io.imread("caricature.png")
fig = plt.figure(figsize=(8,8))
ax = fig.add_subplot(1,1,1)
ax.imshow(im,cmap="gray")
plt.axis("off")

plt.show()

Bells and Whistles: change the gender of a face
We firstly got an averaged female face and an averaged male face:
im1 = io.imread("avg_female.png")
im2 = io.imread("avg_male.png")

fig = plt.figure(figsize=(8,8))
ax1 = fig.add_subplot(1,2,1)
ax1.imshow(im1)
plt.axis("off")

ax2 = fig.add_subplot(1,2,2)
ax2.imshow(im2)
plt.axis("off")

plt.show()

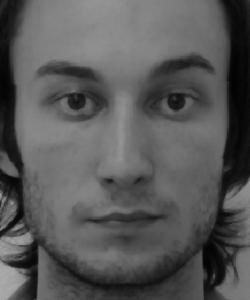
We then manully labeled the features on the two averaged faces and the face to be modulated in a consistend manner:
im1 = io.imread("avg_female_annotation.png")
im2 = io.imread("avg_male_annotation.png")
im3 = io.imread("face_annotation.png")

fig = plt.figure(figsize=(20,20))
ax1 = fig.add_subplot(1,3,1)
ax1.imshow(im1)
plt.axis("off")

ax2 = fig.add_subplot(1,3,2)
ax2.imshow(im2)
plt.axis("off")

ax3 = fig.add_subplot(1,3,3)
ax3.imshow(im3)
plt.axis("off")

plt.show()

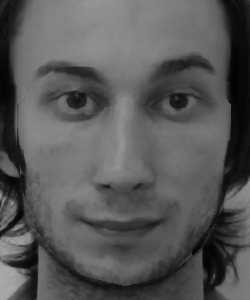
We then warped the three faces into a common shape(which is defined as the average shape of female and male). And then we add the difference between female and male to face to be modulated in order to make it more "female".
im1 = io.imread("face2.png")
im2 = io.imread("face_change_gender.png")

fig = plt.figure(figsize=(20,20))
ax1 = fig.add_subplot(1,2,1)
ax1.imshow(im1)
plt.axis("off")

ax2 = fig.add_subplot(1,2,2)
ax2.imshow(im2, cmap="gray")
plt.axis("off")

plt.show()

Since we can not remove the beard, it still looks like a man. But if we look at the eyes and eyebrows, it looks very "female".