I decided to stick with the recommended structure for the network (although there definitely are better architectures). At least when testing with a small number of epochs to check speed of convergence, my results were best using the default settings. I tried changing the learning rate, number of channels in the second conv layer (which seems to improve results considering case studies like VGG-16), activation function, and regularization, but the default results converged faster and proved sufficient.
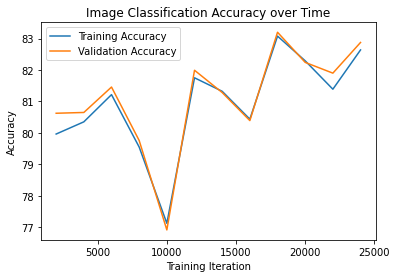
Here are our training and validation accuracies over time.
The accuracies, per class, output by my network are below:
| Class # | Label | Accuracy |
|---|---|---|
| 0 | T-shirt/top | 78.1 |
| 1 | Trouser | 95.8 |
| 2 | Pullover | 66.3 |
| 3 | Dress | 83.9 |
| 4 | Coat | 85.3 |
| 5 | Sandal | 92.7 |
| 6 | Shirt | 29.1 |
| 7 | Sneaker | 94.0 |
| 8 | Bag | 95.1 |
| 9 | Ankle boot | 93.8 |
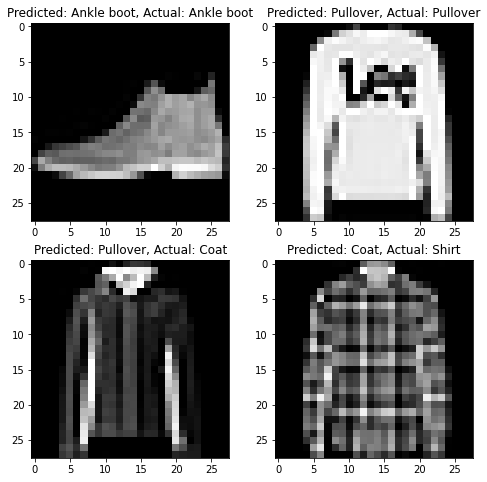
Below are two success and two failure cases for my model. It seems that the lowest accuracy is the shirt, which makes sense due to heavy visual similarity to Pullovers and Coats
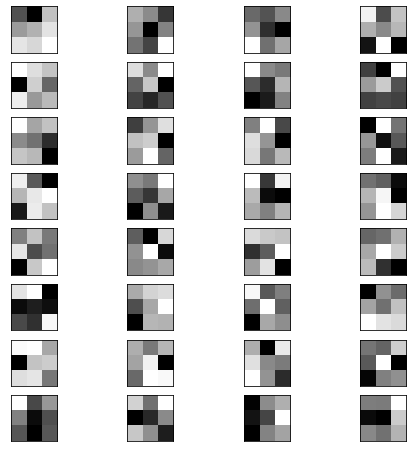
Below are each of the 32 3x3 filters used for the first convolutional layer.
My model is based off of a standard symmetric U-Net architecture. Ideally, we would add skip connections between each of the equivalent hidden convolution and deconvolution layers, but we can achieve satisfactory results without this. My final architecture is made up of three convolution and three deconvolution layers, followed by a final 1x1 convolution to yield our output labels. Each convolution layer consists of a 3x3 stride 1 convolution (with padding to maintain size), a ReLU activation, then a 2x2 max-pool that effectively downsamples our features by 2x. With each convolution layer we (basically) double the number of channels. Each deconvolution layer effectively does the opposite, but uses the same structure - a 3x3 deconvolution (with padding to maintain size), ReLU, 2x upsample, and halving of number of channels. The hyperparameters for each layer is detailed in the table below:
| Layer # | Layer Type | Kernel Size | Padding | Activation | Input Dims (WxHxC) | Output Dims (WxHxC) |
|---|---|---|---|---|---|---|
| 1 | Convolution | 3x3 | 1 | ReLU | 256x256x3 | 128x128x32 |
| 2 | Convolution | 3x3 | 1 | ReLU | 128x128x32 | 64x64x64 |
| 3 | Convolution | 3x3 | 1 | ReLU | 64x64x64 | 32x32x128 |
| 4 | Deconvolution | 3x3 | 1 | ReLU | 32x32x128 | 64x64x64 |
| 5 | Deconvolution | 3x3 | 1 | ReLU | 64x64x64 | 128x128x32 |
| 6 | Deconvolution | 3x3 | 1 | ReLU | 128x128x32 | 256x256x32 |
| 7 | Final "Convolution" | 1x1 | None | None | 256x256x32 | 256x256x5 |
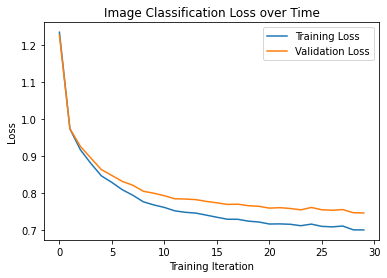
I experimented a bit with hyperparameters such as learning rate, regularization but since my model took a while to train it was difficult to compare results. Surprisingly, regularization did not seem to help in the final results with this case either. Regardless, the results are satisfactory. I did an experiment with 100 epochs, but the training and validation losses seemed to converge around 30, so I stopped there to prevent overfitting.
Here are our training and validation accuracies over time.
The APs, per class, output by my network are below:
| Class # | Label | AP |
|---|---|---|
| 0 | Others | 0.6745672042556656 |
| 1 | Facade | 0.7712309942334139 |
| 2 | Pillar | 0.21752339148767363 |
| 3 | Window | 0.8418040619619384 |
| 4 | Balcony | 0.617856161443973 |
This puts our average AP at around 62.4%.
Below is an example input image, our model output, and the corresponding ground truth:

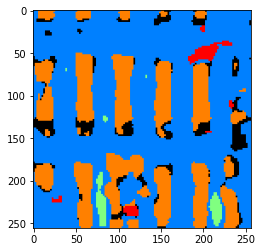

My model seems to most readily misclassify things as balconies, especially in occluded regions. The rest of the classes have reasonable accuracy.