Lab 0: Setting up a productive workflow
Due at 11:59pm on Friday, 01/27/2017.
Starter Files
Download lab00.zip. Inside the archive, you will find starter files for the questions in this lab, along with a copy of the OK autograder.
Submission
By the end of this lab, you should have submitted the lab with
python3 ok --submit. You may submit more than once before the
deadline; only the final submission will be graded.
Introduction
This lab explains how to use your own computer to complete assignments for CS 61A. If you are using a school computer, most of the instructions are the same, except you won't have to install anything.
Set up
Register for an account
Go to the EECS account site
to register for an instructional account. Login using your Berkeley CalNet Id
and click the Get a new account button in the row for CS 61A. Your username
will be of the form cs61a-xx. Write down or download your account form so you
don't forget it!
These accounts allow you to use instructional machines in the CS department, which can be useful if you do not have regular access to a computer. They are not required if you do not plan on using the lab computers.
Install a terminal
The terminal is a program that allows you to interact with your computer by entering commands. No matter what operating system you use (Windows, macOS, Linux), the terminal will be an essential tool for CS 61A.
If you're on a Mac or are using a form of Linux (such as Ubuntu), you already have a program called
Terminalor something similar on your computer. Open that up and you should be good to go.
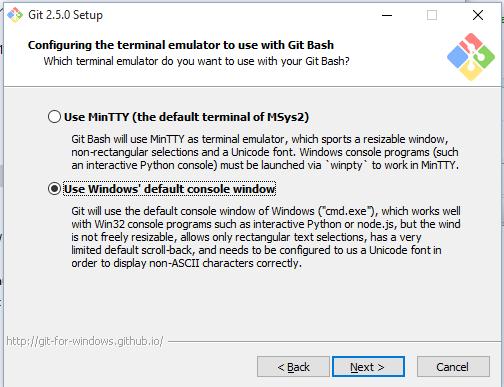
For Windows users, we recommend downloading a terminal called Git Bash.
You should be able to install Git Bash with most of the default configuration options, with one exception. In the Configuring the terminal emulator to use with Git Bash step, select the second option: Use Windows' default console window.
This is very important! If you do not select this option, your terminal will not work!
Install Python 3
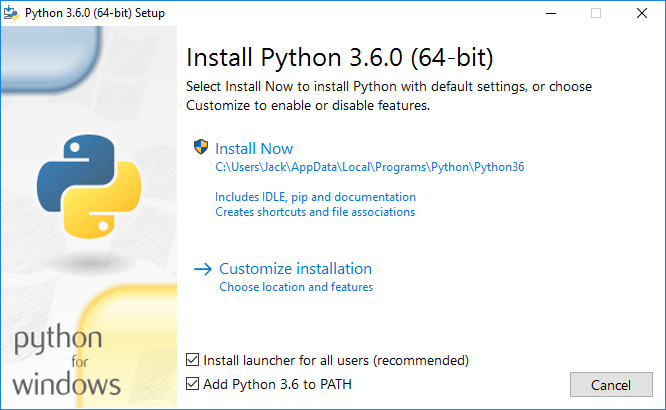
Python 3 is our primary programming language. Download Python using the links in the table below.
| OS | Download |
|---|---|
| Windows | Installer |
| macOS | Installer |
| Ubuntu | sudo apt-get install python3 |
| Other | Python3 Download |
macOS users can refer to this video for additional help on setting up Python.
If you're having trouble opening the installer, you can right-click the icon and select "Open".
Important: For Windows users, make sure to check the "Add Python 3.6 to PATH" box, which will allow you to execute thepythoncommand from your terminal.
Install a text editor
The Python interpreter that you installed earlier allows you to run Python code. You will also need a text editor, which will help you write Python code.
A text editor is a program that allows you to edit text files, and often comes with tools to help you customize your experience. You will be using a text editor to create, modify, and save files.
There are many editors out there, each with its own set of features. We find that Atom and Sublime Text 2 are popular choices among students, but you are free to use other text editors.
Note: Please, please, please do not use Microsoft Word to edit programs. Word is designed to edit natural languages like English -- trouble will ensue if you try to write Python with Word!
For your reference, we've also written some guides on using popular text editors. After you're done with lab, you can take a look if you're interested:
Open a terminal
First, open a terminal, if you haven't already.
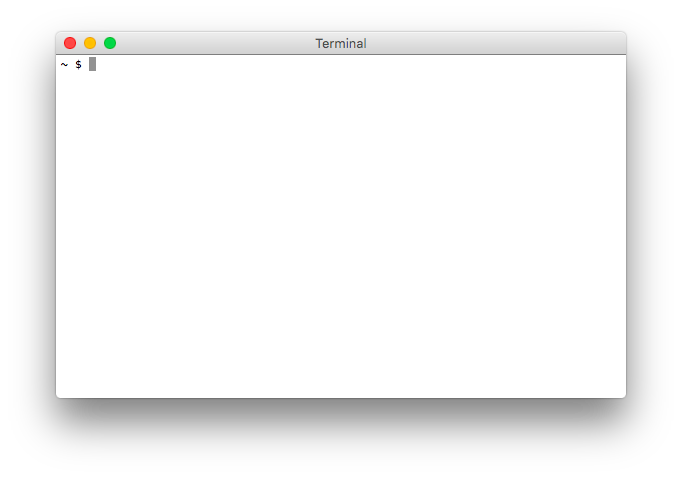
Right now, I'm in my home directory. The home directory is represented
by the ~ symbol. When you first open your terminal, you will start in
the home directory.
Don't worry if your terminal window doesn't look exactly the same; the important part is that the text on the left-hand side of the
$has a~(tilde). That text might also have the name of your computer.
Organize your files
In this section, we will be learning terminal commands to manage our files.
Directories
The first command we'll use is ls. Try typing it in the terminal:
lsThe ls command lists all the files and folders in the current
directory. A directory is another name for a folder (such as the
Documents folder). Since we're in the home directory right now, you
should see the contents of your home directory.
Making new directories
Our next command is called mkdir, which makes new
directories. Let's make a directory called cs61a to store all of
the assignments for this class:
mkdir cs61aA folder called cs61a will appear in our home directory.
Changing directories
To move into another directory, we use the cd command. Try typing the
following command into your terminal:
cd cs61aThe cd command will change directories -- in other words, it
moves you into the specified folder. In the example above, we chose to
move into the cs61a directory.
If we want to go back to our home directory, there are a few ways to do so:
- Type
cd ..(two dots). The..means "the parent directory". In this case, the parent directory ofcs61ahappens to be our home directory, so we can usecd ..to go up one directory. - Type
cd ~(the tilde). Remember that~means home directory, so this command tells your terminal to change to the home directory, no matter where you currently are. - Type
cd(that is, thecdcommand with no arguments). Typing justcdis a shortcut for typingcd ~.
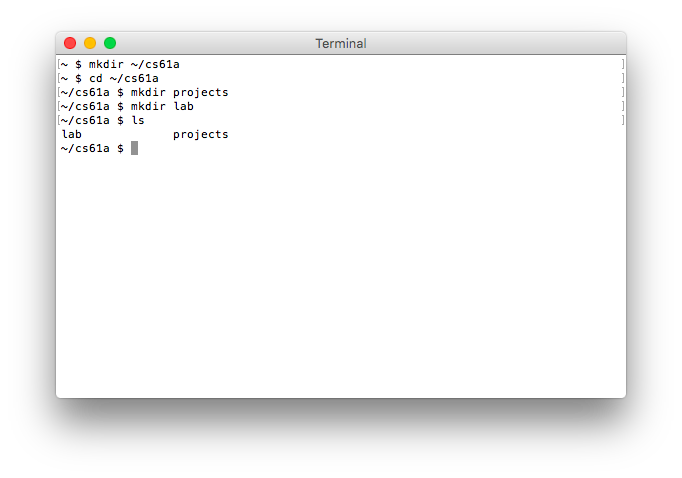
At this point, let's create some more directories. Make sure you are in
the ~/cs61a directory, using the necessary cd commands. Then create
projects and labfolders inside of our cs61a folder:
cd ~/cs61a
mkdir projects
mkdir lab
Now if we list the contents of the directory (using ls), we'll see two
folders, projects and lab.
Downloading the assignment
Next, download the zip archive, lab00.zip, which contains all the
files that we'll need for this lab. Once you've done that, let's find our
downloaded file. On most computers, lab00.zip is probably located in a
directory called Downloads in your home directory. Let's use the ls command
to check:
ls ~/DownloadsIf you don't see lab00.zip, ask a TA or lab assistant for help.
Extracting starter files
We'll then need to extract the files in the zip archive before we can start working. Different operating systems and different browsers have different ways of unzipping. If you don't know how, you can search online.
Using terminal or Gitbash, you can unzip from the command line (hooray!), you can use the
unzipcommand:unzip lab00.zipMake sure you are in the
Downloadsdirectory in your terminal.
Once you unzip lab00.zip, you should have a new folder called lab00 which
contains the following files:
lab00.py: The template file you'll be adding your code took: A program used to test and submit assignmentslab00.ok: A configuration file forok
Moving files
Let's move our starter files into our new lab directory. From the terminal, use the following command:
mv ~/Downloads/lab00 ~/cs61a/labThe mv command will move the ~/Downloads/lab00 folder
into the ~/cs61a/lab folder.
Now, go to the lab00 folder that we just moved. Try using cd to navigate
your own way! If you get stuck, you can use the following command:
cd ~/cs61a/lab/lab00We're ready to start editing a file. Don't worry if this seems complicated -- it will get much easier over time. Just keep practicing! You can also take a look at our UNIX tutorial for a more detailed explanation of terminal commands.
If you ever forget what a terminal command does, add
--helpto the end of the command:ls --helpThis will bring up info on the command like usages and arguments
Understand the question
Open up lab00.py in your text editor. You should see something like this:
def twenty_seventeen():
    """Come up with the most creative expression that evaluates to 2017,
    using only numbers and the +, *, and - operators.

    >>> twenty_seventeen()
    2017
    """
    return ______
return 7 * 7 * 7 + 7 * 7 * 7 + 11 * 11 * 11The lines in the triple-quotes """ are called a docstring, which is a
description of what the function is supposed to do. When writing code in 61A,
you should always read the docstring!
The lines that begin with >>> called doctests. Doctests explain what the
function does by showing actual Python code: "if we input this Python code (the
lines that say >>>), what should the expected output be (the lines underneath
the >>>)?"
In twenty_seventeen,
- The docstring tells us to "come up with the most creative expression that
evaluates to 2017," but that we can only use numbers and arithmetic operators
+(add),*(multiply), and-(subtract). - The doctest for
twenty_seventeen()checks that no matter how we do our calculation,twenty_seventeenshould return the number 2017.
You should never change the doctests in your assignments! The only part of your assignments that you'll need to edit is the code.
Write code
Once you understand what the question is asking, you're ready to start writing
code! You should replace the underscores in return ______ with an expression that
evaluates to 2017. What's the most creative expression you can come up with?
Run tests
In 61A, we will use a program called ok to test our code. ok will be
included in every assignment in this class.
Back to the terminal! Make sure you are in the lab00 directory we created
earlier (remember, the cd command lets you change
directories).
In that directory, you can type ls to verify that there are the following
three files:
lab00.py: the starter file you just editedok: our testing programlab00.ok: a configuration file for OK
Now, let's test our code to make sure it works. You can run ok with this
command:
python3 okIf you are using Windows and the
python3command doesn't work, try using justpythonorpy. If neither of those work, take another look at the install Python 3 section to make sure you are setting up your PATH correctly. Ask for help if you get stuck!
Note: The first time you run OK, you will be prompted for your bCourses email. Please follow these directions. We use this information to associate your code with you when grading.
Every time you run OK, OK will try to back up your work. Don't worry if it says that the "Connection timed out." We won't use your backups for grading.
If you wrote your code correctly, we should see a successful test:
=====================================================================
Assignment: Lab 0
OK, version v1.8.1
=====================================================================

~~~~~~~~~~~~~~~~~~~~~~~~~~~~~~~~~~~~~~~~~~~~~~~~~~~~~~~~~~~~~~~~~~~~~
Running tests

---------------------------------------------------------------------
Test summary
    Passed: 1
    Failed: 0
[ooooooooook] 100.0% passed
If you didn't pass the tests, ok will instead show you something like this:
---------------------------------------------------------------------
Doctests for twenty_seventeen

>>> from lab00 import *
>>> twenty_seventeen()
2013

# Error: expected
#     2017
# but got
#     2013

---------------------------------------------------------------------
Test summary
    Passed: 0
    Failed: 1
[k..........] 0.0% passed
Fix your code in your text editor until the test passes.
Submit the assignment
Now that you have completed your first CS 61A assignment, it's time to turn it in.
Step 1: Submit with ok
From your terminal, make sure you are in the directory that contains ok. If
you aren't there yet, you can use this command:
cd ~/cs61a/lab/lab00Next, use ok with the --submit option:
python3 ok --submitThis will prompt you for an email address if you haven't run OK before. Please follow these directions. After that, OK will print out a message like the following:
Submitting... 100% complete
Backup successful for user: ...
URL: https://okpy.org/...
You can follow the URL to view your submission.
Step 2: Verifying your submission
You can follow the link that OK provides to see your final submission, or you can go to okpy.org. You will be able to view your submission after you log in.
Make sure you log in with the same email you provided when running
okfrom your terminal!
You should see a successful submission for Lab 0.
Congratulations, you just submitted your first CS 61A assignment!
More information on OK is available here. You can also use the
--helpflag:python3 ok --helpThis flag works just like it does for UNIX commands we used earlier.
Appendix: Using your class account
Logging into your class account
From your laptop
Most of the work in this class can be done without logging into your account. However, there may be times when you'll find working from an instructional account to be easier.
Let's log in now. Open up your terminal and type in the following command:
ssh cs61a-?@ashby.cs.berkeley.eduwhere ? is replaced with the rest of your username.
If you're interested, here's an explanation of what the command does:
sshis a secure shell (i.e. terminal) that connects to other computers over a network.cs61a-?is the username on the remote computer.ashby.cs.berkeley.eduis the domain name of the remote computer. For our purposes it can be any of the servers that belong to Berkeley's CS department.
You can also watch this video for help.
The first time you attempt to ssh to a new server, the following message will
appear:
The authenticity of host 'ashby.cs.berkeley.edu' can't be established.
RSA key fingerprint is ...
Are you sure you want to continue connecting (yes/no)?
Say yes. Your computer will remember the remote server, and won't ask you again.
Once you confirm, you will be prompted for your password. If you haven't changed your password yet, use the password you were assigned when you registered for your account.
When you type your password, nothing will show up! This is a security feature, not a bug. Continue typing and press enter to log in.
From an instructional machine
Most of our instructional computers use Ubuntu, a version of the Linux operating system. To log in, just find a lab computer and enter your username and password.
Once you log in, you'll want to open a terminal. On Ubuntu, you can open a
terminal with Ctrl-Alt-T.
Changing your password
The temporary password is not the easiest thing to remember. While still logged in, you can change your password by running this command and following the directions on the screen.
ssh updateRegistering your account
The first time you log in to your class account, your terminal may ask you some registration questions about the following:
- Last name
- First name
- Student ID
- Email (please use the same email as above!)
- Code name (we don't use this information, you can enter anything you want)
If your terminal doesn't prompt you for this information the first time you log in, you can type
registerto begin the process. You don't need to do this again if you've already registered before.
If you find errors (e.g. you misspelled your name), fix them immediately by running the command:
re-registerLogging out
Once you've registered your account and changed your password, you can
log out by pressing Ctrl-D, or with the command exit.