Updates
- Nov 30 @ 3:30 PM: Updates on the starter repo due to timing issues in run_pagerank.py. Run 'git pull proj5-starter proj5-2' if you started the project earlier. If you have already run benchmarking code, you can submit the output files you already had, though if you have time, we recommend running your code again.
Goals
We will be running the PageRank algorithms from part 1 on several large networks using Amazon EC2.
Introduction
In the second part of Project 5, we'll use the power of EC2 to run our PageRank algorithms. We'll be using 5, or 10 c1.medium machines at a time, each with the following specifications:
Model: c1.medium
Cores: 2
Mem: 1.7 GiB
Storage(SSD): 1 x 350 GB
Price: $0.0161 per Hour
Thus, when we're working with 10 instances (machines), we're working under the following "constraints":
Cores: 20 Total
Memory: 17 GB Total
Storage(SSD): 10 x 2 x 350 GB = 7TB
That's quite a lot of power!
Step 0: Update your Repo for Part 2
Before you do anything, make sure you commit and push your changes! Otherwise you risk losing your work!
Only one person needs to add the proj5-2 files to the repository. Communicate with your partner before doing this step. Make sure you have committed and pushed your changes to project 5-1 to Bitbucket first. Then, create a new branch called proj5-2:
git branch proj5-2
git checkout proj5-2                # or a shortcut is: git checkout -b proj5-2
Make sure you are on branch proj5-2. You can check this by typing:
git branch
Next, fetch the proj5-2 files from the proj5-2 branch in the proj2-starter repository and merge:
git fetch proj5-starter
git merge proj5-starter/proj5-2 -m "merged proj5-2 skeleton code"
Finally, push the proj5-2 branch to Bitbucket:
git push --set-upstream origin proj5-2 # or a shorcut is: git push -u origin proj5-2
You can now switch between the branches using the git checkout command.
Step 0.5: Create Your Account
After you update your repo, navigate to ec2_launch. You should see a Makefile. To obtain your account and certificate, run:
make account
You should be able to see a 32 digit key at the end when successful. If you see '403 InvalidClientTokenId The security token included in the request is invalid' at the end (You may see this before Done, but it's ok), repeat:
make clean ; make account
It can fail a lot, so be patient. Sometime, logout and login can work. If you finish this step successfully, you don't have to repeat this step.
Step 1: Launch Test Instances
First, let's describe how your code will run on EC2. Through AWS, we'll be renting a cluster -- which is just a set of computers connected together on a fast local network. Spark runs on top of these machines and designates one as a master and the rest as slaves The master runs the driver program which oversees all operations and allocates work to slaves (aka worker nodes). Slaves are used to perform all parallelized operations, such as map and reduce.

If you finish the previous steps successfully, you first want to test your code. Let's launch your own EC2 instance for testing by running:
make launch-test
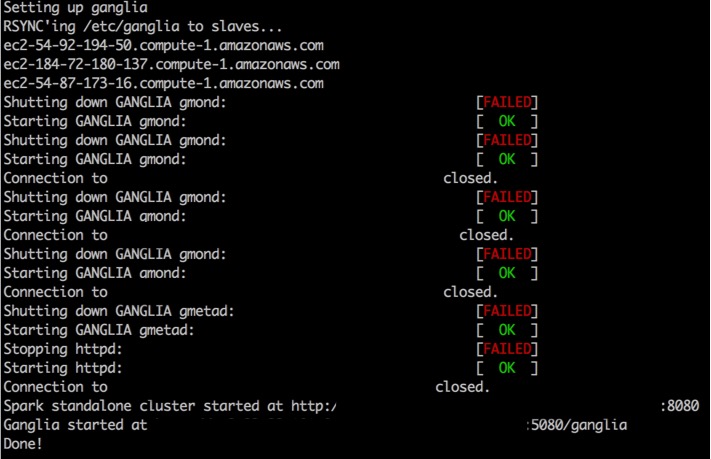
It will launch two affordable instances(c1.medium); one will be the master that runs our driver program, and the other will be a slave node. It will take a few minutes, so also be patient here even if you see some 'Connection refused' messages.
You can see the following capture when you succeed:
Even if you failed this command, you have already launched your instances, so you must not go to bed without destroying them. More details of how to do this can be found in later steps, but if you need to sleep, run make destroy.
This step will likely time out, or give you a "Error executing remote command" error. This is likely because the cluster is still launching, so be patient. If the make command times out, run:
make resume
to try to reconnect and the copy necessary files to the instances. These files are used to install the Spark on our machines. This process might take anywhere up to around fifteen minutes, so be patient
When this finishes and you see a screen like the one above, congratulations! You have sucessfully set up your own cluster, and are now able to harnass all that computational power. If you want to ever want to try messing around with a Spark cluster by yourself after this class, you can find some documentation here.
Step 2: Log in EC2 Instances and Run Tests
Before we login to our instance, it would be nice to know the url of our cluster; to get this, run:
make master
Remember this url; we will need it later.
You're ready to ssh into your EC2 instances after Step 1. To do this, from the ec2_launch folder still, run:
make login
Now, you're on EC2! This another linux machine. To deploy your code here, first clone your repo here:
# note that we use HTTPS instead of SHH to clone your repo.
# it will ask your account information
git clone https://mybitbucketusername@bitbucket.org/mybitbucketusername/proj5-xxx-yyy.git
cd proj5-xxx-yyy
git checkout proj5-2 # make sure your are on the part2 branch.
At this point, we can pretty much run the code we wrote on part 1 on this EC2 cluster, except for a few small differences. The most notable one is that instead of running files off the local file system, we need to put our inputs into a Hadoop Distributed File System, or HDFS. This allows all of our workers to access our files so they call parallelize the work. Luckily, our cluster already has such a file system installed.
To move the three sample files from /data into the HDFS, run:
bash setup_ec2_test.sh
If you want to add or remove files from the HDFS, or just mess around it, you can look at the documentation found here. For our purposes, the important thing to do is to view what you have in the HDFS; to view this, run the following command:
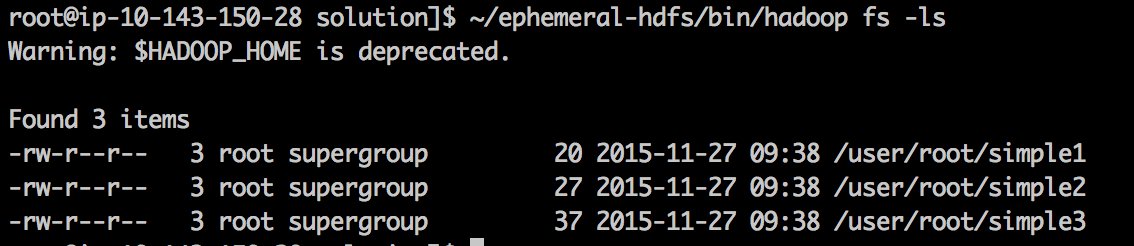
~/ephemeral-hdfs/bin/hadoop fs -ls
You should see the following as output. Note the filepath "/user/root/simple1"; this is the filepath within HDFS that we can give to Spark to access our files.
At this point, you should be ready to run your code on EC2! The pattern for doing this is pretty much the same as in part 1, except for a few details. Firstly, notice we changed run_pagerank.py. Most of these changes are minor to include timing information; however, notice we call a repartition function on our inputFile. What this does is divide the inputFile into multiple chunks, so that each slave node can take advantage and execute our code in parallel. To handle this, we added an extra parameter to our run_pagerank.py code. Secondly, to run our code, we call Spark submit with the following:
~/spark/bin/spark-submit run_pagerank.py [method] [input] [iterations] [number of partition]
Lastly, now when you input your file name, you need to write the HDFS file path, which you can get by using the fs -ls call from above. For example, to run 2 iterations of SimplePageRank on the simple1 input partitioned twice and to direct the output to a file called out, type:
~/spark/bin/spark-submit run_pagerank.py s /user/root/simple1 2 2 > out
When your code is running, it would be nice to view the progress of our Spark job. Luckily, Spark comes with a webUI that less us monitor the cluster! The url we got from running make master earlier should be in the format ec2-xxx.compute-1.amazonaws.com. Navigate to ec2-xxx.compute-1.amazonaws.com:8080 on your browser, and you should see something like this:
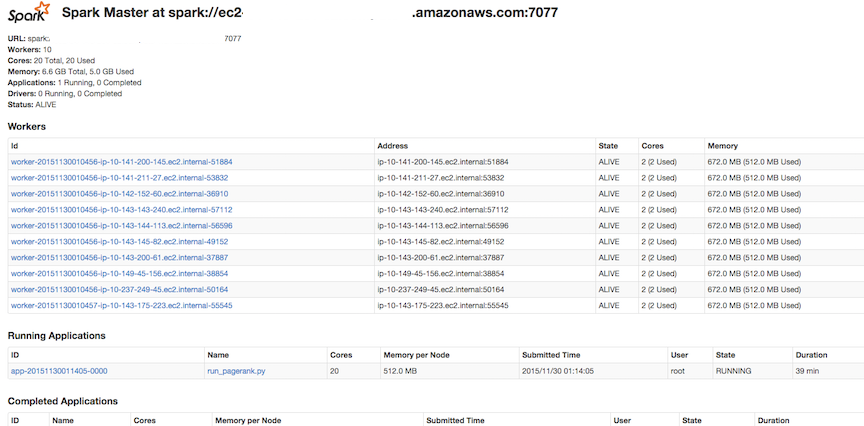
Using this, you'll be able to view job status and all kinds of cool stats in your browser, as long as the cluster is still running by reloading the page. You'll need some of this information to answer the required questions later.
Spend some time making sure that your code still outputs the same things even when you are running it on EC2.
Step 3: Destroy Test Instances
Finally, once we're all done grabbing all the information/data we need, and have run all the jobs that are needed, we go ahead and shutdown the cluster. This destroys all data that we placed on the machines in the cluster. In addition, the URLs you used earlier to see the web GUI will cease to function. Thus, be sure that you grab all the data you need to finish your project before terminating. In order to terminate, run the following from the hive machine:
make destroy
WARNING. Make sure you destroy your instances when you finish with them! We will be monitoring usage, and if you leave an instance running for an unreasonable amount of time (for example, overnight) you will lose points.
Step 4: Run Your Code on Five Instances
We highly recommend you test your code first, before running it on a larger cluster
So far, we have managed to run our code on an AWS cluster, but we're still haven't tried running our code with a larger dataset. This step is a largely repetition of Step 1 ~ 3. For this, launch your five instances of c1.medium with:
make launch-small
Even if you failed this command, you have already launched your instances, so you must not go to bed without destroying them. Also, if you fail this step, run:
make resume
to copy necessary files to the instances.
Next, you can ssh in these instances with:
make login
On your instances, you also have to run the followings to copy your files:
git clone https://mybitbucketusername@bitbucket.org/mybitbucketusername/proj5-xxx-yyy.git
cd proj5-xxx-yyy
git checkout proj5-2
After you clone your repo into the EC2 cluster, we need to download a dataset. SNAP, or the Stanford Network Analysis Project has a lot of open source graph networks that are avaliable to public use. We will be using two datasets from here to analyze. To download these datasets, run:
bash setup_ec2.sh
This script downloads two datasets; a 88 thousand edge graph from Facebook, and a 150 thousand edge graph of emails from Enron. Notice that the second dataset is roughly twice as large as the first one. For this excercise, we will partition our input into 500 parts. Note this is not optimal; we will tinker with this parameter in part 5.
For each of these datasets, run both SimplePageRank and BackedgesPageRank for 20 iterations. Save the output files, and record how long it took each run of pagerank to complete. You can do this by running the script:
bash run_ec2_benchmark_5.sh
While your script is running, navigate to the Spark webUI at ec2-xxx.compute-1.amazonaws.com:8080. Scroll down to running applications, click on run_pagerank.py. You should a page like the following:

Take a screenshot of this page while your job is running; you will need to submit this later.
You should find the benchmark file in /results. Make sure you record this; it contains the runtimes of our Spark jobs, as long as some node and weight values.
Step 4.5: Destroy Your Five Instances
Please note that this is the most important step of part 2. if you leave an instance running for an unreasonable amount of time (for example, overnight), you will lose points(these are not EPA points, points on part 2!)
Once we're all done grabbing all the information/data we need, and have run all the jobs that are needed, we go ahead and shutdown the cluster. This destroys all data that we placed on the machines in the cluster. In addition, the URLs you used earlier to see the web GUI will cease to function. Thus, be sure that you grab all the data you need to finish your project before terminating. In order to terminate, run the following from the hive machine:
make destroy
Step 5: Run Your Code on Ten Instances
This step is almost the same as Step 4, but start with make launch-big instead of make launch-small to launch ten instances of c1.medium.
To benchmark this part, run:bash run_ec2_benchmark_10.sh
Don't forget to save the output file you generate, as well as take a screenshot of the running stages page like in part 4!
We mentioned earlier that a partition size of 500 is definitely not optimal. We had you work with size size since it is a bit easier to see the different speedups between the size of the clusters at this high partition. However, part of working with Spark is tinkering with your parameters to try to get your code to run as fast as possible.
Open therun_ec2_benchmark_10.sh script and tinker the repartition_count field. Try running with values of 1, 2, 5, 10, 20, and 100. Which repartition_count value gives you the fastest run? Save the output file of your fastest run. Don't forget to clear our output file between runs!
Step 5.5: Destroy Your Ten Instances
Please note that this is the most important step of part 2. if you leave an instance running for an unreasonable amount of time (for example, overnight), you will lose points(these are not EPA points, points on part 2!)
Once we're all done grabbing all the information/data we need, and have run all the jobs that are needed, we go ahead and shutdown the cluster. This destroys all data that we placed on the machines in the cluster. In addition, the URLs you used earlier to see the web GUI will cease to function. Thus, be sure that you grab all the data you need to finish your project before terminating. In order to terminate, run the following from the hive machine:
make destroy
Assignment
Part 2: Due 12/06 @ 23:59:59
Complete the following
questions (and do the required runs on EC2) and place the answers in a plain-text file
called proj5-2.txt. The contents of this file are what will be graded for
this part of the project. Please read through all of the questions before starting to run
anything on EC2, so that you know exactly what information you need to collect before
terminating a cluster.
- Run your code for both SimplePageRank and BackedgesPageRank for 20 iterations on both Facebook dataset and the Enron dataset, parititioned into chunks of 500, on clusters of size 5 and 10. How long do each of these 8 scenarios take?
- When running SimplePageRank on the 10 instances with a repartition count of 500, what was the ratio of size of the input file to the runtime of your program for the Enron dataset? How about the Facebook dataset? Does this match your expectations?
- What was the speedup for 10 instances relative to 5 instances for 20 iterations of BackedgesPageRank on the Enron dataset with a repartition count of 500? What do you conclude about how well Spark parallelizes your work? How does the algorithm scale in regards to strong scaling? weak scaling?
- In part 5, you tinkered with the repartition count. At what repartition count was your code the fastest on average? Why do you think it would go slower if you decreased the partition count? Why do you think it would go slower if you increased the partition count?
- How many dollars in EC2 credits did you use to complete this project? Remember the price of single c1.medium machine is $0.0161 per Hour, and a cluster with 10 slaves has 11 machines (the master counts as one).
Submission
To submit, you will need six files:
- proj5-2.txt, which contains the answers to the questions under assignment.
- output_5, which cotains the output from running your code on part 4, with the 5 machines and a repartition count of 500.
- screenshot_5.png, which contains the screenshot of the webUI from part 4.
- output_10, which cotains the output from running your code on part 5, with the 10 machines and a repartition count of 500.
- screenshot_10.png, which contains the screenshot of the webUI from part 5.
- output_10_fastest, which cotains the output from running your code on part 5, with the 10 machines and whatever repartition count gave you the fastest speed.
submit proj5-2
on a hive machine.
You do not need to submit anything on Bitbucket, or any code.
Useful tool: Screen - terminal multiplexer
Programs such as screen and tmux are terminal multiplexors. They enable two main features: (1) to have multiple terminal windows within one, (2) to be able to reconnect to an ssh connection if your network connection drops. Here we'll focus on (2).
You will likely find screen to be a very valuable tool even beyond proj5-2! In the context of this project, screen is useful if you want to run a Spark job on EC2 without having to leave your terminal window open and always logged into hive and EC2. If your terminal or computer crashes for some reason, you can easily reconnect to EC2 and still have your job running.
screen works by creating sessions. So let's first begin by logging into a lab server, and creating a new session called foo
$ screen -S foo
You'll notice you are now in a new blank shell prompt. From here you can run any commands you'd like.
You can explicitly detach from your session with the keyboard shortcut: (Ctrl+A) D. Or you might find yourself accidentally detached if your network connection dies. When you are detached, any processes in the session still continue to run (which isn't true with a normal ssh connection).
In either case, to reconnect to the session, you can ssh onto the same server and reconnect with:
$ screen -rd foo
If you forget the name of your session or want to see all of your open sessions, use screen -ls.
screen -h.
Sanity check exercise: can you and your partner create a new session called calendar that runs the command cal? Simulate your network dropping, by X-ing out of the ssh connection. Can you reconnect to the calendar session? How do you delete a session you are done with? (check screen -h)