Lab 0
Deadline for full credit: End of lab session Friday, September 6th
Deadline for half credit: End of lab session Friday, September 13th
Hello! Welcome to CS61C! We’re so happy to have you along for the ride :)
Check-off and Gradescope Submissions
Many of the labs will have an autograder. All will have a REQUIRED in-person check-off portion. As such, we REQUIRE that you have a partner. This will help us by reducing the number of check-offs we have to perform and give us more time to answer your questions while also giving you someone to discuss class material with.
Before requesting a check-off, please make sure that you’ve submitted to the Gradescope autograder (if applicable). BOTH partners need to be present at check-off to receive credit and both partners will be asked to participate. Try your best to find someone in your lab section with similar work habits as yourself.
How Check-offs Work
- Sign up on the check-off queue to request a check-off. Note: this queue is only for check-offs. If you have questions there will be a help queue that you should sign up on instead.
- Show the submitted autograder portion for the lab to your TA/AI. You will submit your lab GitHub repo to the “Lab Autograder” assignment on Gradescope.
- Answer the check-off questions your TA/AI ask you.
- The TA/AI will give you a token (i.e. a short hexadecimal string) which you will submit to another Gradescope assignment to receive credit for the lab.
- Create a text file named
tokens.txtand enter your token. Upload this file to the corresponding checkoff assignment (for lab 0, that’s Lab 00 Checkoff).
Objectives:
Each lab will begin with a few objectives; use them to reflect on your learning and guide your thinking! Here are the objectives for today’s lab.
- The student will be able to describe and adhere to all course policies including the lab checkoff policy.
- The student will correctly sign up for GitHub classroom, Gradescope, Piazza, and other course-related forms.
- The student will gain familiarity with unix and git commands.
Sign-ups
If you are not yet in the Gradescope and/or the Piazza for this class, you can add Gradescope with the entry code MZYB25, and you can join Piazza by clicking here (note that all of the links in the lab open in new tabs).
Make sure to sign up for a CS61C instructional account here. If you can’t create an account for whatever reason, don’t worry! Make sure to fill out this Google form since having an instructional account is useful for many assignments in this course.
Once you receive your account, you can register by ssh’ing into one of the hive machines:
$ ssh cs61c-XXX@hive<1..30>.cs.berkeley.edu
You might be prompted with a questionnaire to register your account. If you don’t see
a questionnaire, it should be fine, but you can the re-register command to be sure.
For this course, we’ll be using GitHub classroom to distribute and collect your programming assignments. If you do not have a GitHub account, you should make one now. You can do so here.
Warning: Do not skip selecting your SID in the following step.
After creating or logging into your GitHub account, follow this link to accept our invitation to GitHub classroom. Select your SID from the list (Do not skip this step). If your SID is not on the list, let a TA know. Accept the lab assignment; you may need to check your email and confirm the invitation. Then, make sure to fill out the Lab Repository Registration Form. If you don’t have an instructional account right now, enter “zzz” in the form. You will be able to edit this later.
Course Policies
You can view the course policies on the class website. You are responsible for understanding and adhering to all policies throughout the course of the semester. In particular, please be sure you’re familiar with the grade breakdown, lab policies, and academic dishonesty policies.
Once you’ve finished reviewing the policies, take this quiz.
Unix Commands
If you took CS61A and CS61B, you likely have some experience with the terminal and terminal commands, but we’d like to list some less common commands here that may come in handy during the course. For a review of the basic unix commands, look over this guide. Be sure to read and understand section B along with the commands below, as you’ll use them all in the checkoff exercise for this lab.
As a reminder, when typing commands or file paths, you can use your Tab key to autocomplete the entry. You can also use CTRL + A to navigate to the beginning of your line to fix any mistakes (CTRL + E will go back to the end). Your up and down arrows will allow you to refill commands you’ve used previously without typing them over while CTRL+R will let you search through your recently used commands
touch, echo, and cat - Working with Files
$ touch filename
This will create a blank file with the file name you provided. If you’d like to create a file with contents already inside, you can use
$ echo "Your contents here, inside quotes" > filename
This will create a file with the name filename in your current directory. If the file already exists, it will be overridden. The file will contain “Your contents here, inside quotes” but without quotes. The ‘>’ symbol takes one argument which modifies where values printed to stdout are piped. Here, we are redirecting them to a file named filename.
You can also use the echo command by itself, in which case it will print the
string to the terminal (without creating a file in the process).
$ echo "Your contents here, inside quotes"
You can view the contents of a file with the cat command.
$ cat filename
This will print out the file contents of filename to your terminal. The file must be in your current directory, but you can provide a relative or absolute path to print out non-local files.
ssh - “Secure Shell”
For this class, we’ll expect you to test most of your projects, homeworks, and labs on the hive machines (also called ‘instructional machines’). In order to access them, you’ll need to make an instructional account for this class. You can do so here. If you are a concurrent enrollment student, or have not yet been enrolled in the course, please fill out this form to obtain an account (note, this will not happen immediately but staff will let you know when your account has been generated). Once you have an account, you can ssh into the instructional machines with the following command:
$ ssh cs61c-<your 3-letter login>@hive<1..30>.cs.berkeley.edu
Having trouble? Check your WiFi. You’ll only be able to ssh on AirBears2, not CalVisitor.
Since the hive machines are used by many different classes, some of the machines may be overloaded or offline. To check the status of the hive machines, please visit Hivemind. We suggest you pick one which is underutilized.
You’ll need to enter the password given to you after you created an account. If you’d like to change this password, you can run the following command:
$ ssh cs61c-<your 3-letter login>@update.cs.berkeley.edu
scp - “Secure Copy”
This command is used for copying files from a ssh environment onto your local computer, or vice versa.
If you’re working on your own computer, you’ll need a way to get starter files for some of the assignments. We’ll use git for the most part, but you may occasionally want to get individual files or entire folders from the hive machines (or move files from your computer the other direction!)
You can do this with the following command:
$ scp source destination
$ scp cs61c-XXX@hive2.cs.berkeley.edu:~/my_folder/my_file.txt ~/Desktop/CS61C/lab0/
Note that in the source path, we specify <account>:<path> to indicate our
source is remote. The destination path is assumed to be local, so we don’t need
to specify an account. There is a space between source and destination.
If I wanted to copy the other direction (from my local machine to my hive account) I would use:
$ scp ~/Desktop/CS61C/lab0/my_file.txt cs61c-XXX@hive2.cs.berkeley.edu:~/my_folder/
- Note: You shouldn’t run this while you’re logged into a ssh instance of your hive account! Run it locally in both cases.
ls -a - “List All”
$ ls -a
You’re probably familiar with the normal ls command which can be used to list
files. Adding the -a flag shows all files in a directory, including ones which
are hidden and start with a period. You should run this before you add files to
your git repo to avoid adding hidden system files. It is also helpful when
debugging git as we’ll see later on!
You can see the difference between running a regular ls command and an ls
-a command in the same directory below:
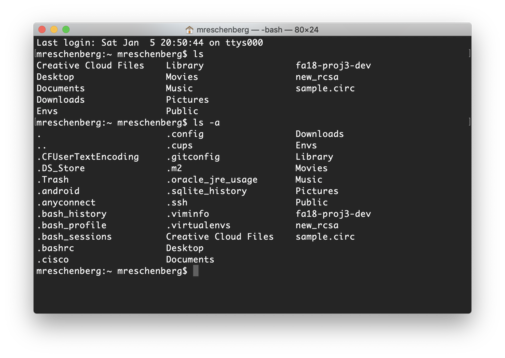
Try it yourself. See anything cool? We recommend running it in a git repo and poking around :)
man - Manual Pages
The manual pages are a great unix reference that is often underused; they hold the official documentation on everything from definitions of programming concepts to language standards and conventions. In this course we’d like you to get comfortable with them, especially for c- and unix-related questions.
$ man -k single_keyword | less
This command will search the manual pages for a command that pertains to the keyword you mention. Forget how to open files in vim? You can search for editor and get a list of all related editor commands on your machine.
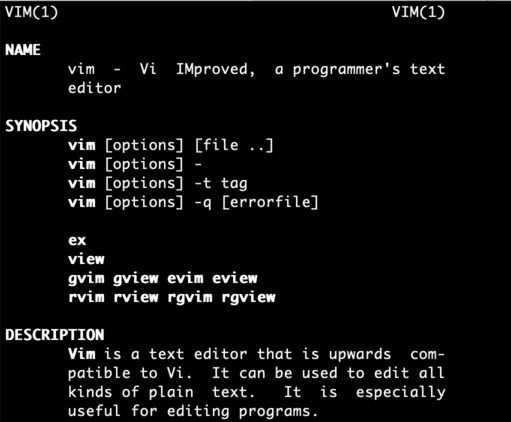
$ man command_name | less
If you know a command you’d like to look up, you can omit the -k flag and get
the entry by itself. Say we used the above search to find vim, and now we want
to read more about it. When we run the above command, we might get something
like the following. This page is scrollable (use your arrow keys, or the space
bar). Hit q to quit the manual page and get back to your terminal prompt. It
contains information about what the program is used for, what certain flags do
when you invoke the program with them, and where to go for more information.
Vim Basics
Vim is a text editor included on the hive machines. It comes with most unix-based computers and you probably have it on your machine too! You can type vim to test if the app is available. Below are a series of commands we expect you to be able to use:
Note: like we saw above, there are many editors available for use; you’re welcome to pick whatever you’re comfortable with, but we’ll expect you to know how to use vim in addition to whatever you choose to work in.
| Command | Explanation |
|---|---|
vim file.txt |
Opens a file in vim. The file must be in your current directory |
vim ../tests/test.c |
Opens a file from any directory through a relative or absolute path |
<escape>:q |
Closes (quits) vim without saving |
<escape>:wq |
Closes vim after saving |
<escape>:w |
Saves your file |
<escape>:q! |
Force quit vim (for when you’ve made changes but do not wish to save them) |
<escape>i |
Insert mode, allows you to type into the file |
<escape>/dogs |
Searches your file for the nearest occurrence of the word ‘dogs’. Press ‘n’ to go to the next occurrence or ‘N’ to go to the previous |
<escape>:set nu |
Shows line numbers within your file |
Note: these commands are preceded by <escape> because you’ll need to hit the
escape key to switch you out of your current mode. For example, if I’m
inserting (typing) into a file and then would like to save, I’d have to hit
<escape> to get out of insert mode, then type :w to save my file. If you
aren’t in a mode (ie. you’ve just opened your file) you don’t need to hit
escape first, but it won’t hurt :)
Git Exercise
This exercise will show you how to set up your repositories locally and on the remote, use vim, and work with a variety of git commands. By the end of it, you should feel comfortable ssh’ing, resolving merge conflicts, editing files, modifying your .git/config file, and pushing/pulling/committing. If you’d like to review your git commands before beginning, you can check out this guide.
First, ssh into your inst account. If you are unable to do so because you do
not have an instructional account, you may complete the exercise below on your
local computer. First, you’ll need to use the man pages, as described above, to
search for a command that will help you make directories. Once you’ve found it,
create a new folder called ‘labs’. cd into this new directory.
View all hidden files. What do you see?
Init a new git repository (note: do not clone, you should init an empty repository)
View all hidden files. What has changed? How do you know if a directory contains a git repository?
What we have created is a local repository that has no remotes attached. If you try to push and pull, git won’t understand where to put your information (also, the repo is empty and there is nothing to push).
Before we modify our repo, let’s tell git who we are. This information will be used to sign and log your commits. You may not need to do this if you’ve set up git before, but if you’re on the hive machines it’s likely a step you’ll need to take. Run the following inside your git repo; make sure to change the name and email to match your information.
$ git config --global user.name "John Doe"
$ git config --global user.email johndoe@example.com
Okay, now we’ll start by adding remotes; these are ‘trackers’ that let git know where to push/pull when the respective commands are used. Each remote has a name and one or more branches associated with it. To add a remote, run the following inside your git directory (you may want to copy/paste this). Do this now:
$ git remote add origin <link to the repo generated by GH classroom>
$ git remote add starter https://github.com/61c-teach/fa19-lab-starter.git
If we ever want to pull new lab starter code, we execute the following command.
$ git pull starter master
However, since the lab repo that GitHub classroom generated should already contain
the lab 0 materials, we need to pull from the origin remote:
$ git pull origin master
Execute the above command so that we can have the files locally. List your files when you’ve finished to verify that the files show up in your folder.
Open ‘first_set.txt’. This file contains descriptions of unix commands. Use the man pages to figure out which command they refer to; be sure to include any necessary flags. Once you’ve found them, write the commands on one line at a time in the provided ‘answers.txt’ file.
Note: For the autograder to work, all the answers must be in the answers.txt file in the order specified below.
Add and commit this file with the commit message “Initial commit.”. Push this to your github classroom repository.
Now, we’ll need to switch over to your local computer. Exit your ssh session by typing ‘exit’. You should be back at your own terminal prompt. If you’re working on the (physical) hive machines, do the following in a different directory.
scp your entire labs folder to your local machine or new directory. You may find
it helpful to use the pwd command to find your current directory/path. This
will give you an absolute path to the files you wish to copy, meaning that the
files should be locatable from anywhere. Relative paths on the other hand,
locate files with respect to your current location within a directory.
Once you’ve copied the entire folder, cd into this folder and open your
answers file.
- Note to linux users: you can run CTRL + SHIFT + C to copy from terminal (and the same args w/ V instead to paste).
Above where you wrote your answers, add commands (and relevant flags, if needed) that fit the following descriptions:
- Move files from one directory to the next
- Change a file’s permissions
- Show the directory you’re currently in
- Check if a host is online
Save this file but do not commit or push it.
Log back into your instructional account. In the same file, find this last command (and relevant flags, if needed) and list it at the top.
- Show file permissions for all files in a directory
Save, add, commit, and push this file.
Once you’ve done this, go back to your local environment or other directory, and add/push the file we were previously working. You should get a message from git. What does this mean? How do you resolve it?
Fix the issue and push the file.
Once you’ve done so, you should have all your answers in one file together on your local machine. The final ordering should be as follows:
- Show file permissions for all files in a directory
- Move files from one directory to the next
- Change a file’s permissions
- Show the directory you’re currently in
- Check if a host is online
- Which command walks a file hierarchy in search of a keyword?
- Which command displays information about processes running on your machine?
- Which command terminates a process?
- Which command can help you find the difference between two files?
Checkoff
- Make sure that your answers are in the answers.txt file. We expect the contents
to look like the following for the autograder to work:
1. <command> 2. <command> 3. <command> 4. <command> 5. <command> 6. <command> 7. <command> 8. <command> 9. <command> - Make sure to resolve the merge conflict on the machine that you wish to submit
from. Then, on the same machine and in the lab00 directory, run the
copy_git.shscript.$ ./copy_git.sh - Before submitting on Gradescope, make sure that your completed
answers.txtfile and thegit.tarfile (generated bycopy_git.sh) show up on your GitHub lab repository. - Once you’ve verified that the autograder passes, then add your name to the checkoff queue.
- Show your TA/AI the successful Gradescope submission and answer any additional questions they have.
- Take the token that they give you (1 unique one for each lab partner!) and copy
it to a
tokens.txttext file. - Submit only the
tokens.txtfile to the Lab00 Checkoff Gradescope assignment and verify that it succeeds. This might take a little while, but no more than a minute.
Other tools you may find helpful!
These are some tools you may find helpful, but are by no means required for this course :)
Text Editor vs. IDE
CS61C doesn’t endorse any particular text editor or IDE. Many people get by in this course using a text editor with no frills (think: vim/emacs/vi). We’ll expect you to know how to use vim as it is the default editor on the instructional machines.
For your own work, you may find it nice to have CLion from JetBrains if you’re used to working in IntelliJ for CS61B. Note though that we won’t be providing any course-official support, so setting it up and maintaining it are up to you.
The majority of students do their work in a local editor (Sublime, Atom, VSCode) and use git to copy their files from their local machine to the hive. Some students also set up Cyberduck to make copying files over easier. Again, we won’t provide any course-official support, but you’re welcome to do what works best for you.
Byobu/Tmux
If you’re working on the hive machines, you may run into ‘Connection lost: broken pipe’ errors which cause you to lose your session. If you’d like to be able to regain your session and support multiple terminal tabs across one ssh interface, you may want to install Byobu or Tmux. They’re virtual terminal clients which add additional functionality to your normal shell.
Quick SSH
Tired of typing your entire ssh to get online? Follow the instructions in this guide