61Ccc Code Generation
Deadline: Friday July 19th, 23:59:59
Getting started
Please accept the github classroom assignment by clicking this link. Once you’ve created your repository, you’ll need to clone it to your instructional account.
Please read the entire spec before beginning the project.
Note you must complete this entire project on the instructional machines. The code relies on linking to a library only available on the instructional accounts and will not work anywhere else. If you don’t want to ssh you will need to physically go to soda and work on the instructional machines.
What is Code Generation?
In this project we will be completing a compiler for a C like language. A compiler consists of many steps, parsing input files, enforcing operator precedence, validating typing, etc. However in this project we are only concerned with outputting code. All of these other steps have been completed for you. Without diving too heavily into the details, this code generation takes a tree data structure containing the structure of a program (called a dast) and traverses the tree to produce the assembly for that program.
This project is NOT about building a compiler, there is an entire course dedicated to that (CS 164). Instead we will be using a compiler to gain a better of understanding of the relationship between C code and the assembly created to implement it. We opted to use a compiler because most of the assembly produced is not written directly by people and we wanted to expose you to the idea of automating assembly generation.
For this project, you’ll be writing C code that produces RISC-V code. This can be tricky, but we know you can do it! We’d like to emphasise that this project isn’t meant to test your C-coding abilities; we won’t be running any memory checks and we aren’t concerned with Valgrind errors (though if something doesn’t work, they’re a good debugging first-step!). Then we run the RISC-V code you produced through venus and we will compare the outputs. You do not need to be concerned with any error cases, these will either be handled for you in the rest of the compiler or are runtime errors. Note that this is a relatively new project in only its second semester of use, so you may encounter bugs. However we promise none of these will impact your grade as all autograder tests have been verified.
Goals
Before we dive into the details we want to briefly outline our goals for this project. After completing this project please reflection on these ideas. We would like your feedback on if you think these goals have been met or if you had additional learning experiences beyond what we have outlined here.
In this project we hope that you will understand:
- How to produce various C operations in RISC-V
- How the instructions selected relate to type details
- That higher level produces can be automated
Generating Assembly
The primary focus of this project is on generating assembly, so we first need to highlight how to do that. Our assembly generation will print out RISC-V instructions to stdout. We will then take that output and run it through venus, possibly combined with some assembly we wrote by hand, and check the output to determine correctness.
To actually produce our assembly instruction there are a series of Emit functions in instructions.h. Most of these directly produce an assembly instruction that corresponds to the name. For example
EmitADDI (enum reg rd, enum reg rs1, int imm)
outputs an ADDI instruction that reads
addi rd rs1 imm
You will find a full list of all the instructions we used in generating our output in instructions.h. However you are not limited to these instructions. If you wish to use additional instructions you may add them, but you must make modifications to additional-instructions.h and additional-instructions.c. Two sample instructions are provided in additional-instructions.c that you can copy and paste from to produce you instructions.
Also in instructions.h you fill an enum containing the list of registers you can use in this project. Our code maps these to strings for output purposes, but you will likely want to refer to at least some of these values by name throughout the project.
Assembly Invariant
Another important detail about our compiler is how we use registers. We deploy a consistent “invariant” that all expressions place their output in register S1.
The only exception to this rule is the return statement which saves its value in A0 to abide by RISC-V convention.
Let’s explore what this means and then look at a code example.
Let’s consider an example like the negate operation -x. This roughly maps to two operations: a negate operator and an identifier. Note that operators lie outside of what they are applied to, so negate is the parent of the identifier. The starter code then employs the following steps:
Enter Negate Operation Code
Enter Identifier Code
S1 = x
Exit Identifier Code
S1 = -1 * S1
Exit Negate Operation Code
In actual C code this looks like:
void ProcessExprPrefixNegate(DAST* dast, char* startLabel, char* endLabel, int regBytes) {
	DAST* child = dast->children[0];
	// cgen and load arguments
	Dispatch(child, startLabel, endLabel, regBytes);
	// negate
	EmitADDI(T0, x0, -1);
	EmitMUL(S1, S1, T0);
}
For every recursion step we call Dispatch(), which is basically a big switch statement that finds the correct function to generate the code for our inner expression. Then that result is ALWAYS placed in S1, where our operator can then be applied. Finally that results must ALWAYS be in S1.
How To Start
Our intention for this project is to give you more practice working in assembly. However, we are aware that because this project is written in C and the starter code calls and implements a lot of functions that it may be difficult to know how to even start/understand the project. The purpose of this section is to try and ease that pain and really highlight what is necessary for you to understand to complete this project.
Please read through this section in detail before starting the project.
Where to find the code
All the code you need to edit is in student-cgen.c. The functions are ordered from top to bottom to match the spec. You may also find instructions.h helpful in detailing what instructions have already been made available for you.
DAST
When our compiler enters the code generation stage we move to a data structure known as a DAST. Our DAST holds quite a bit of information, but what is relevant for you is that it is essentially a tree holding the information about what operation (integer literal, add, sub, etc) a particular piece of code is and also some information about how the result should be interpreted.
Rather than show you the entire structure (which is long and unnecessary), let’s look at a reduced form of the struct containing the details that are relevant for this project.
typedef struct DAST {
  // What type of node is it (add, sub, call, etc)
  enum NodeType type;

  // What are the children of this node in the tree.
  struct dast** children;

  // How many children does this node have.
  size_t size;

  // Information about the return type of the current expression.
  // You will only ever need to compare this value to global variables.
  Decl *typeDecl;

  // Some other stuff in the starter code you won't directly access

} DAST;
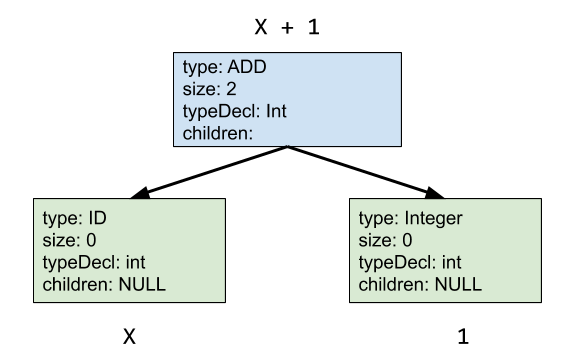
Now let’s try and visualize this with a more detailed example. Imagine we have the following line in C:
x + 1
where x is an int type. Then the DAST nodes would look like
Code Structure
In addition to understanding our fundamental data structure you may also find it helpful to understand the general layout of the code. The majority of code generation occurs through mutual recursion of two types of functions:
void Dispatch(DAST* dast, char* startLabel, char* endLabel, int regBytes)void Process<X>(DAST* dast, char* startLabel, char* endLabel, int regBytes)
There is no function called Process<X> and instead there is one Process<X> function for each relevant statement in codegen (for example ProcessExprBinaryBitAnd or ProcessExprBinaryEq). The general layout of how to produce the right expression is:
- We have a DAST node we wish to generate so we call
Dispatch(). Dispatch()is basically a big switch statement, so depending on the node typeDispatch()selects the correctProcess<X>()function.- This node may have children. If necessary recurse by replacing
dastwith its children and making calls toDispatch() - Produce any code in
Process<X>()that belongs after all recursion is done.
Note that because of this recursive nature all Process<X>() functions have identical parameters. This means some parameters you will never use in this project must still be passed in for the starter code to work.
You do not need to understand startLabel, endLabel, and regBytes. They are not important for you and all you need to do is copy them in exactly unless it says otherwise.
Task 1: Binary Expressions Invariant
Now that we have introduced our invariant we need to uphold it in more complex situations. In particular we are concerned with binary expressions. Take multiplication for example. To produce the result of the multiplication we need to compute the result of both operands. However we cannot put both in S1 at the same time. Instead what we need to do is to store one of the results in a location that is NOT S1 after its output is produced.
To do so we will need to store one the binary expression’s children on the stack. (Why can’t we just put this in a register?). Then we can recurse on our other child to load it into S1. Finally to do any of our binary expressions, we need to move that first output back into a register.
Complete SetupBinaryInvariant() to apply these steps. Be sure and return the value of the other register you select outside of S1. Note please hold the second child in S1 and the first child in the other register. Failure to do this could break the starter code.
At this point you should be able to run make part1 to see if you completed task 1 properly.
Hint: If you are having issues try checking the arguments to EmitLW and EmitSW. The order is: reg1, immediate, reg2. The arguments correspond to:
lw reg1 immediate(reg2)
Writing Assembly
The next section has you writing assembly to implement various assembly operations. It may be tempting to jump right into writing the code and try and start passing tests.
However, we strongly believe that this is not the right approach. Instead we believe that since you are planning to write assembly you should start by just writing assembly. To facilitate this action we have provided you with a series of assembly files in binary-assembly. These files will contain locations for you to fill in your code as well as some tests to consider for checking if your assembly is correct. For the first few operations we will provide you with every case you will need to consider to verify your assembly. For later operations we will provide you the framework and ask you to fill in test cases.
Let’s take a look the example for bitwise AND. Click the link and load the file into venus. There are two places for you to fill in. The first ??? should be replaced by the register you selected in Task 1. Then you need to fill in the code to actually perform a bitwise AND.
Note this is NOT a function call. You should not apply RISC-V calling convention and instead should work directly with S1 and the ??? register. This is because we want to generate almost the exact assembly that you can use in your code.
Once you fill in this file be sure and save it in the appropriate file in binary-assembly. This is very important because if you need help in office hours we are going to expect to see these files in office hours if you ask for help. There will be some checks you can’t verify in just assembly (such as types), but we still encourage you to write the code for each type in assembly.
IMPORTANT: IF YOU COME TO OFFICE HOURS YOU MUST SHOW US WORKING ASSEMBLY FOR EACH OPERATION BEFORE WE WILL DEBUG YOUR COMPILER CODE. IF YOU DON’T HAVE A WORKING ASSEMBLY TEST WE WILL NOT DEBUG YOUR C CODE AND ONLY THAT ASSEMBLY FILE.
The only exception to this rule is mapping C semantics to assembly.
Task 2: Binary Expressions
Now that we have establish our invariant we can actually produce the code for our various binary expressions. Each of these Process functions makes calls to part1 and some additional starter code that handles details like typing. Please DO NOT remove any of this starter code as it may alter the output of your program.
The primary purpose of this section is to get an understand how to perform each of these binary expression in RISC-V. As a result, we recommend that you try to work in assembly directly and then try to generate code after. You will have a much easier time if you first try and debug simple operations in Venus before trying to debug whole programs outputted by the compiler.
Morgan has written a debugging guide which you should look at to help you with this part of the project: Debugging Guide
Bitwise And, Bitwise Or, Bitwise Xor
Complete the functions ProcessExprBinaryBitAnd(), ProcessExprBinaryBitOr(), and ProcessExprBinaryBitXor(). These expressions should all be very short but serve as good practice selecting the registers from part1.
Logical And, Logical Or, Equals, Not Equals
Next complete the functions ProcessExprLogicAnd(), ProcessExprLogicOr(), ProcessExprBinaryEq(), ProcessExprBinaryNotEq(). These functions are slightly more complicated, so again we recommend trying to write out the assembly directly before you implement the C code.
One additional caveat of these functions are that they must place either 1 (True) or 0 (False) in S1, depending on the outcome of the expression. It is NOT acceptable to have these functions place any value other than 1 or 0 in S1.
Unlike C, we will not be expecting And/Or to short circuit (if you are not sure what this means please ignore it). You are welcome to do so if you are motivated, but you will not be tested on this detail at all and you will need to remove all the existing starter code for those functions if you do want to implement it.
Addition
Now that we have established how to generate code and how to complete certain operators it’s time to move into more C semantics. In this next section you will be implementing addition.
What makes addition interesting is that we are now concerned with implementing pointer arithmetic. If you recall our section on C, you saw that if we had:
int* x;
int* y = x + 1;
printf ("%p, %p\n", x, y);
That these printed pointer values weren’t actually 1 apart and instead differed by the sizeof(int). Note that when you increment a pointer in C it always moves by the integer specified times the size of the contents pointed to.
Complete ProcessExprBinaryAdd() to allow for both regular arithmetic and pointer arithmetic. We represent types by creating a base type and having a pointer count. For example let’s say the first child has type int**. Then int is the baseType and the pointer count is 2. However for this section the exact baseType doesn’t matter.
Instead what you will need are:
c1PtrTotal; // Tells pointer count 2, in int **
child1->typeDecl->dataSize; // Tell how big the base type is. sizeof(int) in our int** example
Also note that because we are in a 32-bit architecture every pointer has size 4, which is why there is no direct way to get sizeof(int*).
We will not be providing tests for any pointer arithmetic on the provided autograder. This will be in the final autograder and you will need to write tests for this condition to verify it works.
Subtraction
Subtraction is very similar two addition except there is one additional operation to support. In C you can subtract two pointer to determine the number of elements between them. For example if we had:
int* x;
int* y;
printf ("%d\n", x - y);
Then this gives the different in the addresses divided by the sizeof(int). Complete ProcessExprBinarySub() to account for normal subtraction, subtracting from a pointer, and subtracting two pointers.
We will not be providing tests for any pointer arithmetic on the provided autograder. This will be in the final autograder and you will need to write tests for this condition to verify it works.
Greater Than, Greater Than or Equal, Less Than, Less Than or Equal
Finally complete ProcessExprBinaryGT(), ProcessExprBinaryGTEq(), ProcessExprBinaryLT(), and ProcessExprBinaryLTEq(). For these operators you will need to account for the specific type to determine if the comparison should be signed or unsigned. For a list of how to determine the type and how types should interact look at the comments on each of these functions.
These functions must also place only either 1 (True) or 0 (False) in S1.
At this point you should be able to run make part2 to see if you completed task 2 properly.
Function Setups
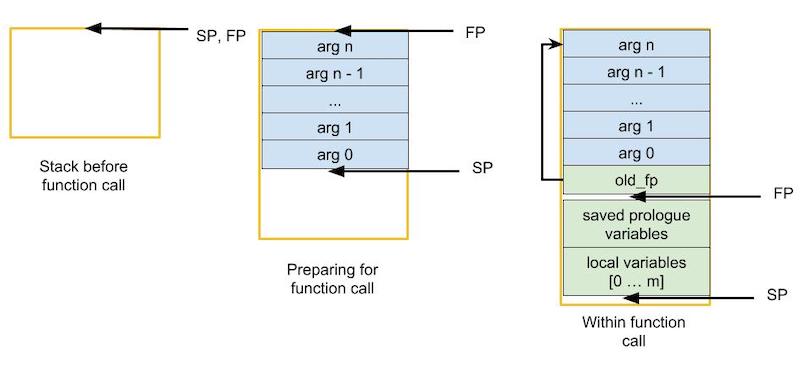
In addition to the S1 invariant, we will introduce a few other deviations from the general Callee/Caller convention you’re used to. First, we do not use argument registers (a0, a1, …) to pass arguments to functions. Instead we push all arguments onto the stack (We will still use a0 to save our return value!). Second, we will make use of the frame pointer in addition to the stack pointer.
The frame pointer is changed at the beginning of a function’s invocation. It marks the end of the function arguments (stored above) and beginning of the function’s local variables (stored below). We cannot simply rely upon the stack pointer because the stack will change sizes as the function executes; we use the frame pointer so that our function arguments are always at a constant offset from a fixed point. The image below demonstrates how arguments are loaded onto the stack and where the stack pointer and frame pointer point before, during, and after a function call.
Apart from the three changes to convention listed above, we will follow RISC-V convention as you’ve learned in class. This means saved registers should be put onto the stack when used and restored after. Likewise temporaries are not assumed to persist across function calls. Since we have not defined behaviour for argument registers, you are free to impose your own convention.
NOTE: We will not be visually inspecting your code to ensure it abides by convention, though it is in your best interest to do so as it makes managing registers much easier. You can expect the final autograder to stress test your code generator by providing many arguments and lots of stack manipulation.
Task 3: Call Expressions
To implement call expressions you need to finish the code in ProcessExprCall(). The existing code already determines the locations where arguments should be stored, decrements the stack and restores the stack. You will need to add to the code to:
- Recurse on children to generate each argument value
- Store each argument on the stack. The location is given by the offsets array and the size by the sizes array. Note the size determines which store instruction you use: either word or byte.
- Switch control to the function identified by
funcLabel. - Move the return value from
a0toS1to uphold our invariant.
At this point you should be able to run make part3 to see if you completed task 3 properly.
Task 4: Prologue and Epilogue
We now want to finish function declarations by saving the necessary registers. Complete SaveRegisters() and RestoreRegisters() to enforce calling convention. You do not need to save S0/FP because this is done for you but you should not make any other assumptions about which registers may or may not be used by the rest of the compiler.
At this point you should be able to run make part4 to see if you completed task 4 properly.
Outputting Labels
For these last two steps we need to produce labels. To do this you should make calls to EmitLabel() which the string for a particular label name.
Task 5: If Statements
Add support for if statements by finishing ProcessIfElse().
First, handle the case that there is only an if condition (ie. no else body). Generate the appropriate label(s), check the condition, and generate the body.
Next, add support for the else case. Be sure to execute either the if body or the else body but not both. You can do this with a branch-jump pair and additional label(s).
At this point you should be able to run make part5 to see if you completed task 5 properly.
Task 6: While Loops
Finally add support for while loops by finishing ProcessWhile(). Now for the first time it is important to pay attention to startLabel and endLabel. startLabel is the label at the start of the current loop (where continue should jump to) and endLabel is the label after the loop (where break should jump to).
You need to make sure to replace startLabel and endLabel in your recursive calls with the labels generated for your while loop.
At this point you should be able to run make part6 to see if you completed task 6 properly.
Integration Tests
To make sure that your code is complete we have provided you with two integration tests. You can run them with make integration. If all your code is working you should pass these tests.
Failing these tests could suggest a variety of problems. Some we suggest looking for are:
- Are you saving all the registers?
- Are you decrementing and restoring the stack properly?
Congrats! You’ve finished the project! :)
Please run make run-all-tests to verify that your code passes all the provided tests. Also make sure you have only edited student-cgen.c, additional-instructions.h, and additional-instructions.c.
Appendix
Testing
Like previous projects, we expect you to write your own tests to check your program’s functionality. To do so you will need to add files to tests/student-tests/inputs. We have provided one example for you, sample.61c, which you should copy as a template for your inputs. For the following example we will assume your file is called sample.61c.
$ make run-student-tests
This will produce two output files:
tests/student-tests/outputs/sample-output.Stests/student-tests/outputs/sample.out
The first is the assembly that will be run through venus and the second is the output the venus jar produced. We will not be providing you an expected output so you will need to check these yourself.
For any tests you run all C code should be in a file called <name>.61c and if you write any assembly (for example to test calling convention) it will be in <name>.S, where the names must be the same.
You can basically just write C code for your tests but there are some notable exceptions:
- If statements, while loops, and for loops must have { and }
- We do not support indexing into arrays.
- Logical expressions produce a boolean type which do not automatically cast to an integer. If you want the result you will need to manually cast.
- You cannot import the standard library
- All functions must have a return type, we do not have a
voidkeyword.
Additionally you probably don’t want to test complicated C. You don’t need to do anything with any operators that you are not asked to implement or any structs.
Our language does not have a printf() function by default meaning your functions won’t output to Venus’s standard-out. To help you verify your code, we’ve included a few specialised print functions in cgen-lib/print.h. You can insert these into your 61C code and, when assembled, Venus will print your values.
NOTE: We do not recommend using these functions while debugging assembly in Venus because they insert additional function calls and make it difficult to separate the code you’ve written from the code being generated. They should be used for quick verification and removed to narrow down larger issues.
Debugging
We highly recommend debugging your code by running through the assembly in Venus. Morgan constructed a debugging guide here for this project. Once you have completed part1 we strongly suggest you read through it.
Autograding
We will be providing an autograder for this project. It will provide 70% of your grade on the project. We highly suggest you write your own test cases.
All tests for the autograder are available locally. If you have inconsistency this suggests an error in your submisssion or the files you edited.
Submission
Submission we be done on gradescope, the same place as the autograder. We will only accept changes to additional-instructions.h, additional-instructions.c, and student-cgen.c. We will not have any regrades so please make sure you follow all instructions and ask questions if you think anything is unclear.