Project 1: Philphix
Deadline: Friday, July 2, 11:59:59 PM PT
Goals
Welcome to the first project of 61C! The goal of this project is to get you familiar with C, specifically working with pointers and memory allocation/deallocation, and instill in you some good testing practices.
The project you will be working on is called philphix and at a high level it is a simple text replacement tool (i.e. imagine you had a paragraph of text and wanted to replace all instances of the word ‘hi’ in that paragraph of text with ‘hello’). Essentially, the program you make will use a replacement set (a text file with pairs of words on each line: the first word designates the word you want to find and the second word designates the word you want to replace that word with) and an input reference file (a text file which you will go through to find the words you need to replace). Don’t worry if you don’t fully understand any of the details as we’ll iron out the specifics in more detail in the later sections of the spec but hopefully you get the bigger picture of the program we are trying to create.
Tip: Start early! You likely will have to learn and experiment a lot with C to complete this project, so make sure you budget enough time.
Getting Started
Visit Galloc. Log in and start the Project 1 assignment. A GitHub repo will be created for your team; this will be your repo for any Project 1 work you do.
Once you have done that, clone and enter into your repo:
$ git clone https://github.com/61c-student/su21-proj1-<Your Team Name>.git proj1-philphix
$ cd proj1-philphix
Now, add the starter repo as a remote:
git remote add starter https://github.com/61c-teach/su21-proj1-starter.git
If we release updates to the starter code, you can pull them with:
git pull starter main
Overview
The starter code contains the following files:
src/hashtable.c- Code for a generic hashtable. You will need to implement 2 functions inhashtable.c:insertData(HashTable *table, void *key, void *data), and*findData(HashTable *table, void *key).src/hashtable.h- Header file for hashtable.c. For more information on header files and how they are used, check out this link. You will need to fill in the definition of yourstruct HashTablein here.src/philphix.c- Contains various functions for our find and replace tool. You will need to implement 4 functions inphilphix.c:stringHash(void *s),stringEquals(void *s1, void *s2),readDictionary(char *filename), andprocessInput().src/philphix.h- Header file defining functions inphilphix.c. You may not modifyphilphix.h. If you wish to declare additional helper functions forphilphix.c, you will have to add them tophilphix.cand add a function prototype at the beginning of the file.Makefile- Makefile for compilingphilphix. For more information on Makefiles and how they are used, check out the Wikipedia page.tests/testing.sh- A bash script to use for additional testing.tests.all_tests.txt- Lists paths of dictionary, input, and output files for each test.tests/sanity/sanity.dict- Sample dictionary (aka set of replacement rules).tests/sanity/sanity.in- Sample input file.tests/sanity/sanity.ref- Sample output file.tests/binary_edge/binary_edge.dict- Edge test dictionary.README.md- A markdown file for you to document your project and learning experience.
Spend some time looking over these files and figuring out what is in each file and what they are used for.
TL;DR: hashtable.c and hashtable.h define a simple generic chained hash table. hashtable.h acts as an interface through which other files interact with our hash table implementation. Likewise, philphix.h declares the functions that are defined in philphix.c. philphix.c contains the main function, which serves as the program's entry point.
For those who want a review of hashing, 61B Spring 2019's hashing lecture slides are a good reference.
Background
As briefly mentioned above, philphix is a very simple replacement tool that accepts a single command line argument, the name of a replacement set to use. This replacement set consists of pairs of "words" (separated by an arbitrary number of tabs and spaces), each pair on its own line. The first word only consists of alphanumeric characters, but the second word can include any non-whitespace printable character. The first word is the target word the input word is being matched against; the second word is what is to replace the input word if at all due to priority.
For each word (sequence of letters and numbers unbroken by any other character) in the input, philphix processes it to see if it should be replaced. Here is the order of match priority:
- The exact word is in the replacement set
- The word with all but the first character converted to lower case is in the replacement set
- The word converted completely to lower case is in the replacement set
If there is no match the word is printed to standard output unchanged; if there is a match, the highest priority replacement for the word is printed.
It accepts a single command line argument: the name of a file containing a replacement set to use. For example, to use philphix, all you would need to type into the terminal is:
$ ./philphix tests/sanity/sanity.dict
Of course, you can replace tests/sanity/sanity.dict with whichever file you wish to use for your replacement set.
You should not have any memory leaks which are a function of standard input (stdin)
You can assume that the dictionary (if it exists) is well formed. Again, this means that each line contains only two words separated by some number of spaces or tabs. The first word contains alphanumeric characters only and the second word contains any non-whitespace, printable characters. Lines are delimited by the new line character (though a valid dictionary may or may not end in a new line).
Additionally, philphix must be reasonably efficient. It takes the staff solution less than a second to run for each test. Specifically, if you are failing the Basic Performance test, the main culprit is usually that the hash function being used isn't very effective (i.e. almost everything is being hashed to the same location). Feel free to look for a good string hash function on the Internet, but do not copy and paste code and make sure you cite your source as a comment at the beginning of the function.
Your Task
While completing this project will require getting familiar with many parts of the C language (C file input/output library, do memory allocation, manipulate strings, and coerce strings to void pointers and vice versa just to name a few), your final solution should not be all that long.
To finish this project, you will have to complete:
-
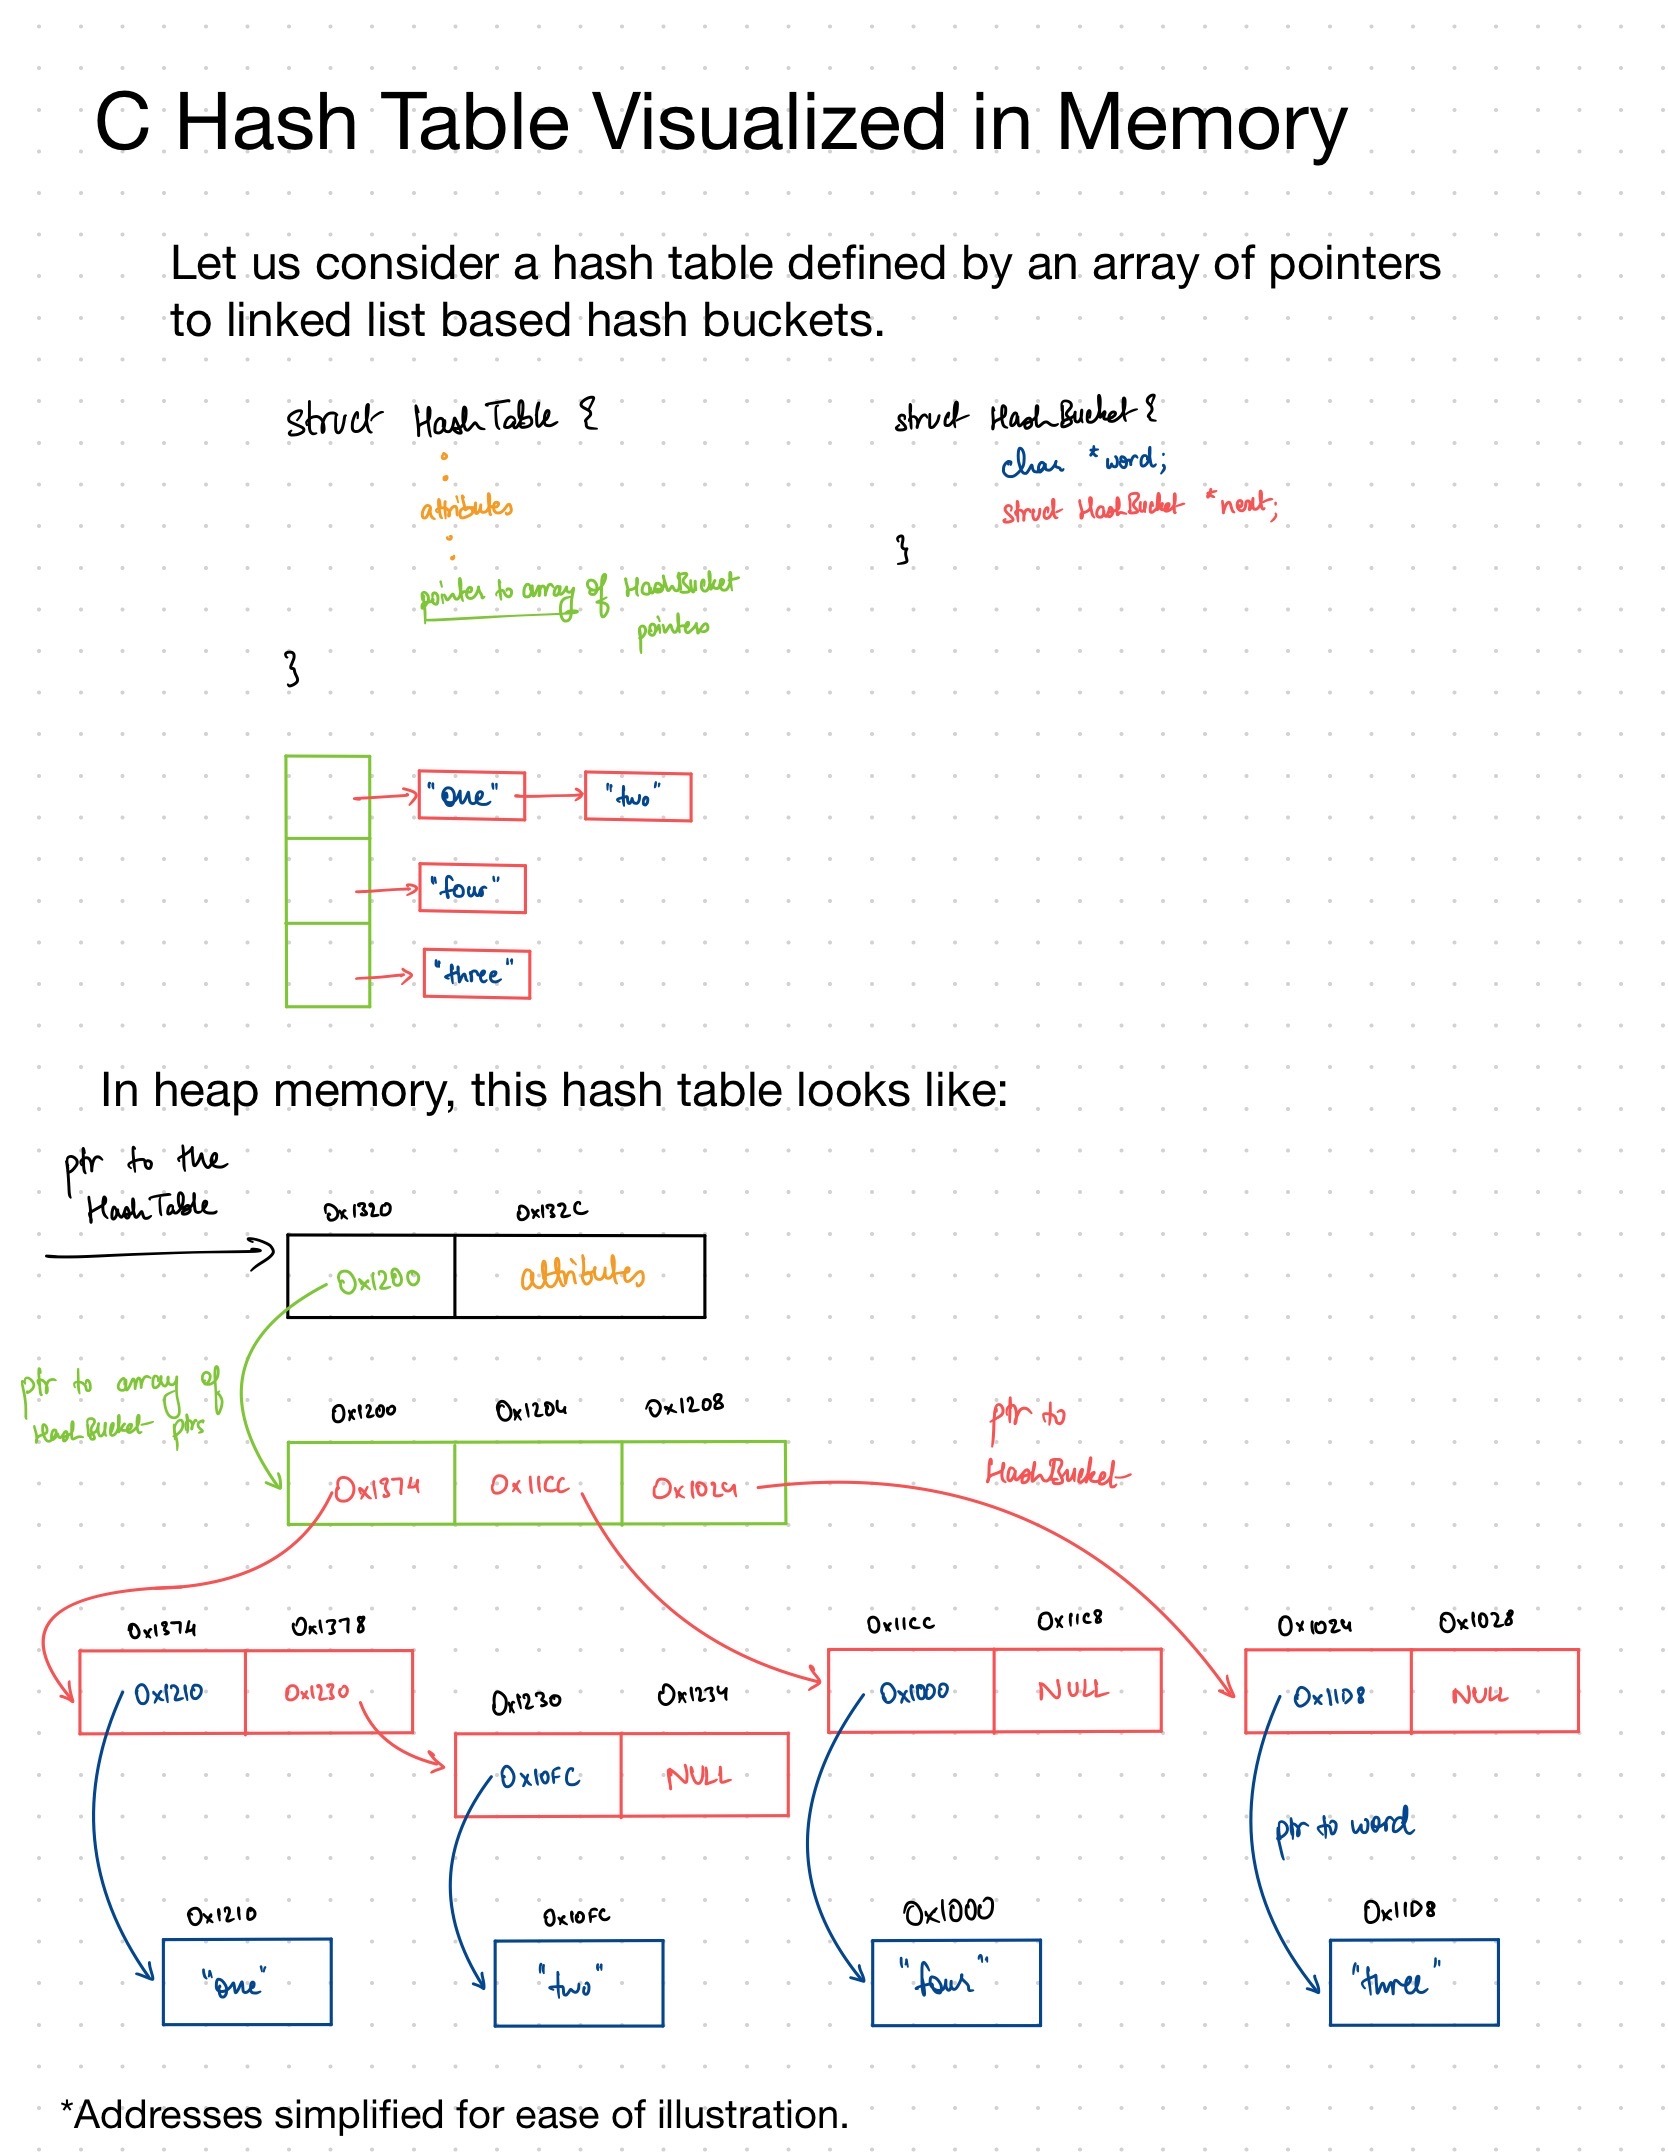
struct HashTableinhashtable.hHINT: Take a look at the parameters passed into the
createHashTablefunction to figure out what fields the HashTable struct should contain.Here's a visualization of the Hash Table in C's heap memory.
-
void insertData(HashTable *table, void *key, void *data)inhashtable.cDescription:
insertDatainserts the specified key/data pair into the HashTableHINT:
- Find the right hash bucket location with table->hashFunction
- Allocate a new hash bucket struct (Think about how you would figure out how much space to allocate)
- Append to the linked list or create it if it does not yet exist.
-
void *findData(HashTable *table, void *key)inhashtable.cDescription: findData returns the corresponding data for a given key and NULL if the key is not found
HINT:
- Find the right hash bucket location with table->hashFunction
- Traverse the linked list and check for equality with the table->equalFunction
- If a match is found, return it. If no matches are found, return NULL.
-
unsigned int stringHash(void *s)inphilphix.cDescription:
stringHashshould hash a string to a bucket index. You can assume that only null-terminated strings will be passed in (i.e.void *scan be safely cast to achar *)HINT: Feel free to search for effective hashing algorithms online. You are allowed to use anything you find, but just make sure you are not directly copy-and-pasting any code and that you understand the general idea of why that particular hash function you found works well. If you use reference(s), add comments linking to them (in line with our Academic Dishonesty policies).
-
int stringEquals(void *s1, void *s2)inphilphix.cDescription: stringEquals should return a non-zero value if the two strings are equal (you can safely cast them to a
char *) and 0 otherwise. -
void readDictionary(char *dictName)inphilphix.cDescription: This function should read in every word and replacement from the dictionary and store it in the hash table. You should first open the file specified. (If the file does NOT exist, you should print some message to standard error and call exit(61) to cleanly exit the program.) Next, read the words one at a time and insert them into the dictionary. You will need to allocate space (using malloc()) for each word. Once the file is read in completely, return. As described in the spec, you can initially assume that no word is longer than 60 characters. However, for the final 20% of your grade, you cannot assume that words have a bounded length. You CANNOT assume that the specified file exists.
-
void processInput()inphilphix.cDescription: This should process standard input (
stdin) and perform replacements as described by the replacement set then print either the original text or the replacement to standard output (stdout) as specified in the spec (e.g., if a replacement set oftaest test\nwas used and the string "this is a taest of this-proGram" was given tostdin, the output tostdoutshould be "this is a test of this-proGram"). All words should be checked against the replacement set as they are input, then with all but the first letter converted to lowercase, and finally with all letters converted to lowercase. Only if all 3 cases are not in the replacement set should it report the original word.3 cases:
- The exact word is in the replacement set
- The word with all but the first character converted to lowercase is in the replacement set
- The word converted completely to lower case is in the replacement set
Since we care about preserving whitespace and pass through all non-alphanumeric characters untouched, scanf() is probably insufficient (since it only considers whitespace as breaking strings), meaning you will probably have to get characters from stdin one at a time.
Do note that even under the initial assumption that no word is longer than 60 characters, you may still encounter strings of non-alphanumeric characters (e.g., symbols and punctuation) which are longer than 60 characters. Again, for the final 20% of your grade, you cannot assume words have a bounded length.
We suggest working on the subparts in the order listed above. Also, note that you may NOT import additional header files (*.h) This means
all your changes must be contained to ONLY hashtable.c, hashtable.h, and philphix.c.
Testing
If you prefer to follow along in video form, check out our testing and debugging videos playlist!
Now that you’ve finished all the coding tasks, it’s time to compile your program and test its correctness. We strongly suggest you do this on the hive machines (via ssh).
To compile your program, run
make
in the starter directory. You should recompile your program every time you change any of the files in the src directory.
To test your program, change into the tests and run the testing script as follows:
cd tests
./testing.sh
You might see a permission denied error the first time you try to run this file (as it hasn't been given execute permission). To fix this, you need to run the following once:
chmod +x testing.sh
Inside tests, we have a directory for each test containing the required dictionary (.dict), input (.in) and reference (.ref) files. We've provided you with a sanity test and an edge case test.
The tests directory is set up as follows:
sanity/: Containssanity.dict,sanity.in, andsanity.ref.binary_edge/: Containsbinary_edge.dict. This is a special test that takes as input and reference your philphix binary from the starter directory.all_tests.txt: Each line of this text file holds paths to the required.dict,.in, and.reffiles (separated by spaces) for one test.testing.sh: Runs each test inall_tests.txt, shows its output and reports whether it passed or failed.
You should target passing the sanity test and then the edge case test. Passing these provided tests doesn’t guarantee that your code is 100% correct but it is definitely a great start. You should then write and pass custom tests before submitting to the autograder.
To create a custom test, you need to create a directory <testName> in the tests directory.
Then, you need to add a set of the following 3 files to the <testName> directory:
<testName>.dict<testName>.in<testName>.ref
Next, add the the following new line to the all_tests.txt file:
<testName>/<testName>.dict <testName>/<testName>.in <testName>/<testName>.ref
Finally, run the testing script again:
./testing.sh
As you will read below in the Grading section, 80% of the tests for your submission will be visible to you; however, there are two main caveats: you only have a certain number of tokens in a certain time frame and you don’t know the specific information we are passing in with the input files for the tests other than the general test name. This is why creating your own custom local tests is crucial.
Here's a list of the autograder tests to help you get started with writing your own custom tests.
- Sanity
- Alphanumeric
- Large Dict (Basic Performance)
- Capitalization
- Empty File
- Arbitrary tabs and spaces in the dict
- Numbers only
- No newline at the end
- No newline at the end longer dict
- Binary File
- Memory Leak test
- Long word (> 60 characters) in input (hidden)
- Long word (> 60 characters) in dict (hidden)
The local tests you create will hopefully help you further debug the areas you may need to focus on based on your autograder results and also account for the 20% of the tests that are hidden.
Tip: Consider running your program under valgrind to detect any memory errors. For example, use
valgrind -q ./philphix tests/sanity/sanity.dict
to have valgrind print out any invalid memory accesses it detects during the run. In C, it's easy to write a program that appears to work correctly for simple tests, but which fails or crashes with larger inputs. Valgrind catches many of these hidden bugs that might otherwise appear only in the autograder. For more on Valgrind, reference Lab 2.
Debugging
Even the best programmers don't pass all tests on the their first shot. So what next? Time to dive into the code, understand where things are breaking down and quash those bugs!
A simple way to debug involves printing expressions to stdout/stderr and comparing them with what you expect for a given test case.
In case your code matches your expectations but fails a test, reviewing the spec and your tests for correctness are good ideas.
A more involved and powerful way to debug is using (C)GDB, which you've been introduced to in Lab 1.
To debug your code using (C)GDB (from the starter directory),
cgdb philphix
After you've set the desired breakpoint(s), the syntax to run philphix under (C)GDB with arguments, and input/output redirection is given by: run arglist <inf >outf.
For instance,
run tests/sanity/sanity.dict <tests/sanity/sanity.in >tests/sanity/sanity.out
takes input from tests/sanity/sanity.in and sends output to tests/sanity/sanity.out,
whereas,
run tests/sanity/sanity.dict <tests/sanity/sanity.in
takes input from tests/sanity/sanity.in and sends output to stdout which is visible inside (C)GDB.
As a reminder, our testing and debugging videos playlist contains a video covering the frequently used (C)GDB commands.
Partner Programming
Per class policy, you are allowed to partner up for projects for this semester. There is no strict requirement of how you should work with your partner, but we do expect that both members of the group write code and have a strong grasp of the project after its completion. The driver-observer approach is one of the simplest ways to collaborate on projects with one student actively typing the code (“driving”) while the other student observes, asks questions, suggests solutions, looks for potential bugs and thinks about slightly longer-term strategies. Roles should be swapped frequently, so that one student isn’t typing a majority of the code.
Pair Programming Benefits:
- Higher quality software
- Reduced completion time
- More readable code
- Transfer of knowledge
Pair Programming DOs:
- Swap roles frequently
Pair Programming DON’Ts:
- Do not get distracted while observing (NO reading the news/scrolling through Social Media/watching YouTube)
- Do not judge peers - instead learn from each other
Pairing Setup
Pairing in Person
This is the traditional approach to pair programming. Partners sit together at the same computer, ideally one with a large or double monitor. The driver controls the keyboard and mouse, while the navigator looks at the code and assignment description.
Remote Pairing
Fortunately, it is also very possible to do pair programming online, thanks to the wide range of collaborative cloud applications.
You'll need two things:
- A way to hear each other.
- A way to share code and the command line.
For hearing/seeing each other, you can set up a call using Zoom, Google Meet, Discord, Jitsi, or another platform of choice. For sharing code, you can follow the instructions for your editor of choice. Some common ones are listed below:
- VSCode: VS Live Share (highly recommended)
- Atom: Teletype
- Sublime: RemoteCollab
- CLion: Code With Me
- Vim: tmate
You'll both want to be using the same editor, so you'll either want to find a partner using the same editor or be willing to try a new editor. That can be a part of the learning experience, too! If for some reason you're unable to do actual pairing in an editor, you can always fall back to screenshare on a video call.
* Adapted from CS61A's Pair Programming guide and CS169 (Spring 2019) slides
Submitting
Please submit to the Project 1 assignment on Gradescope.
Remember that grading will be done almost entirely by automated scripts. We will be only using your hashtable.c, hashtable.h, and philphix.c files when grading! Your output must exactly match the specified format, making correctness the primary goal of this project.
Grading
The grading for this project will consist of visible and hidden tests. 80% of the tests will be visible to you when you submit your project to gradescope, while the other 20% will be hidden until grades are released. The tests that are visible have distinct names/descriptions to strongly hint at what they are testing, so if you are failing any of them, creating a custom test hitting that same test case is strongly encouraged. Additionally, the hidden tests will be testing to see if you are accounting for the fact that words can be longer than 60 characters. We highly recommend that you create your own tests to test for that behavior. Additionally, even though we are making 80% of the tests visible, we still expect that you understand how to write your own test cases for debugging and general testing purposes. Please refer to the video on testing in the Testing section above if you are unsure where to start and definitely feel welcome to post follow ups on Ed if you are facing any issues.
Required Feedback Survey
In order to complete the project, you must fill out this short feedback survey after you've finished the rest of the project. It is required! More importantly, it helps us gauge your learning experience and make the project better for future semesters.
Academic Honesty
As mentioned above, for this project, you are allowed to have partners. Remember to fill out this form to designate who your partner is.
NOTE: Please avoid working too closely with other classmates other than your partner; sharing general ideas and tips is okay but debugging by looking at another students’ code (other than your partner) is strongly warned against. This is not because we want to discourage helping each other but as it has been shown to lead to both pre-meditated and accidental academic dishonesty cases in many semesters regardless of if you intentionally memorised their code or not. Please do not put yourself and your classmates’ in that situation as it causes everyone involved a lot of additional stress at the end of the semester when it could’ve been easily avoided by simply not viewing each other’s code, even when just helping. That being said, if you’re not sure if something is okay to do or not, just ask on Ed, either in a post or on the respective project thread as it’ll help everyone to clearly delineate what’s allowed and encouraged versus what is not.
FAQ
The autograder failed to execute correctly?!?!
This is typically due to you having a lot of print statements which will cause the autograder to hang or run out of memory when it is executing. If you run into this, please remove/comment out your print statements and resubmit. If you continue to have this issue after you have confirmed that you have done that AND you have confirmed that you pass the sanity test locally, please make a post on Ed with a link to your submission. If you do not include a link, we will not be able to easily find your submission!